


Can PC Overheating Cause Data loss: Causes, Warning Signs & Fixes
July 22, 2026| 27 min read


Our content follows trusted Editorial Standards - accurate & unbiased.
Summary: Are you still using Windows 7 and want to upgrade it to the new Windows 11? This article will answer all the doubts on the subject and help you upgrade your operating system to Windows 11.
Free Download 100% SecureEveryone is excited about the new Microsoft Windows 11, and the tech community is perpetually buzzing with its features, updates, and drawbacks. However, users have been wondering since Windows 11 launch whether their existing operating system is eligible for the upgrade. If yes, will they get Windows 11 free upgrade?
If you are a Windows 7 user, you might be aware that Microsoft announced the end of support for Windows 7 in January 2023. So, you’ve got more reasons to upgrade your operating system than any other user. Moreover, if you have doubts like 'Can I upgrade from Windows 7 to Windows 11?' or 'Will Windows 11 be a free upgrade?' etc., you’ll get the answers through this article.
The first and foremost reason is the end of support for Windows 7. But what does that mean? It means that you won’t be getting any further updates for Windows 7 from Microsoft. So you'll be stuck with the same version and same features.
With the end of support for Microsoft Windows 7, you won't receive any security updates and fixes. Thus your PC will be open to a vast risk of malware and virus attacks, bug issues, and many other problems with no tech support to address.
If you were thrilled with the Windows 10 features, the Windows 11 features would surely take you on a joyful tech ride.
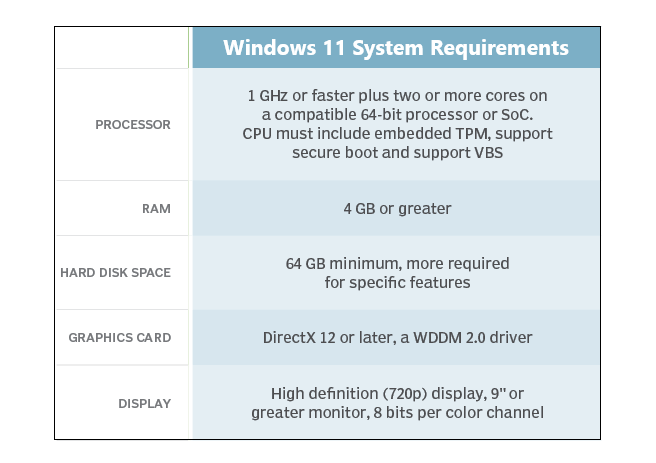
If your Windows 7 PC meets the hardware requirements for Windows 11, you can download it and upgrade your PC. However, it won’t be as simple as it is to upgrade from Windows 10 to Windows 11. You’ll need to either clean install or migrate Windows 11. However, your Windows 7 PC will only get the Windows 11 free upgrade if it fulfills the following system requirements.
While you can easily upgrade Windows 10 to Windows 11 using the Microsoft Windows Updates utility, it is not the same for Windows 7. There are two methods to upgrade Windows 7 to Windows 11 clean installation and migration. Let’s discuss each of the methods one by one.
Clean installing Windows 11 is similar to fresh installing a new operating system. If you use this method to upgrade to Windows 11, all the existing files, settings, and apps will be removed from your PC, and you’ll have a fresh start with Microsoft Windows 11.
We have categorized each sub-process under a specific part to simplify this lengthy procedure. Therefore, you need to go sequentially and follow the procedure step-by-step.
As clean installing Windows 11 will erase everything on your PC, you must backup your data to save it. If the data on your PC is already backed up, you can move ahead. Creating a backup on Windows 7 is easy, and you don’t need much expertise to perform it. However, you will need an external drive of sufficient storage capacity to save all the data on your PC.
To clean install Windows 11, you can use the media creation tool and create a Windows 11 bootable media. You need a USB drive of at least 8 GB storage capacity to create an installation media. You can also use a CD/DVD of the same capacity. Download the media creation tool from the Microsoft Store along with the Windows 11 ISO file and follow the instructions.
Once you’ve created the backup and installation media, you are all set to proceed to upgrade to Windows 11 through a clean install. Follow the steps below.
Step 1: Shut down your PC and connect the Windows 11 bootable media.
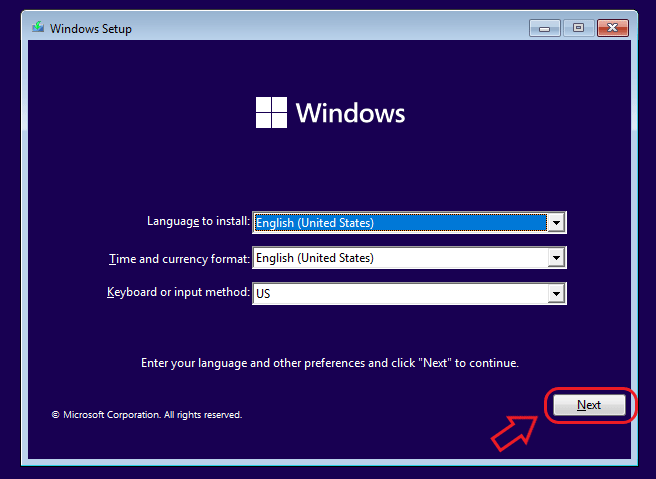
Step 2: Boot your PC into BIOS or UEFI firmware settings and select the installation media as the booting media. You’ll see the Windows Setup. Click Next to continue.
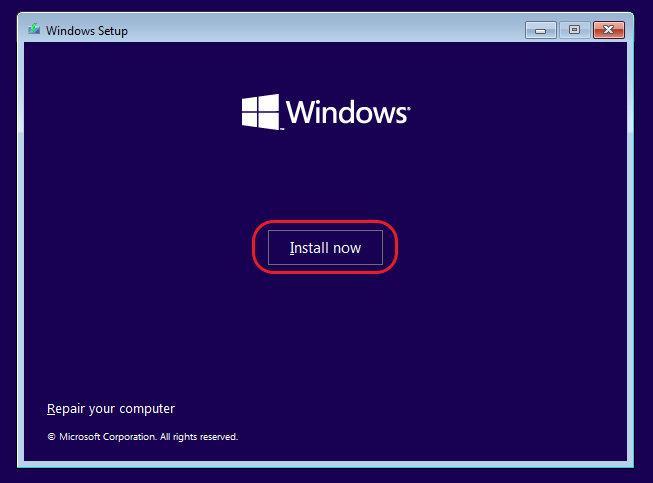
Step 3: Click Install Now.
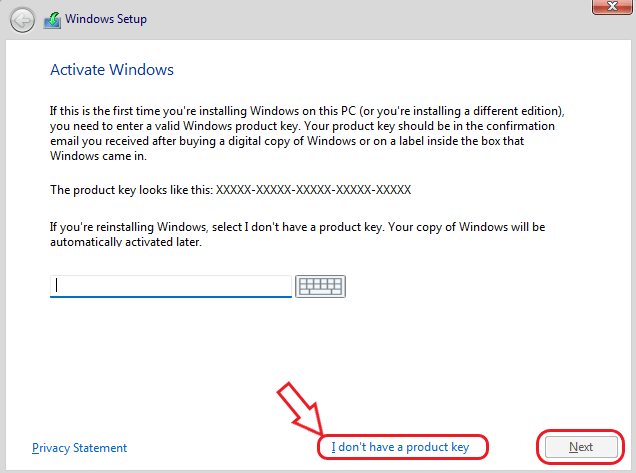
Step 4: Click I don’t have a product key option at the bottom-right and click Next.
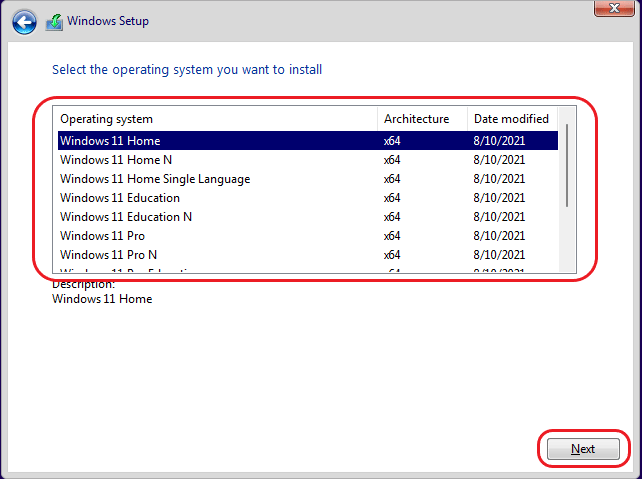
Step 5: Select the edition you want to install from the list and click Next.
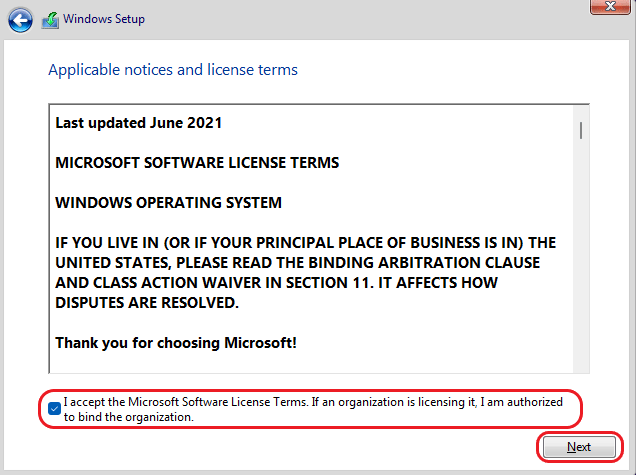
Step 6: Check the box against I accept the Microsoft software license terms at the bottom and click Next.
Step 7: You’ll be asked which type of Windows installation you want. Click Custom: Install Windows only (Advanced).

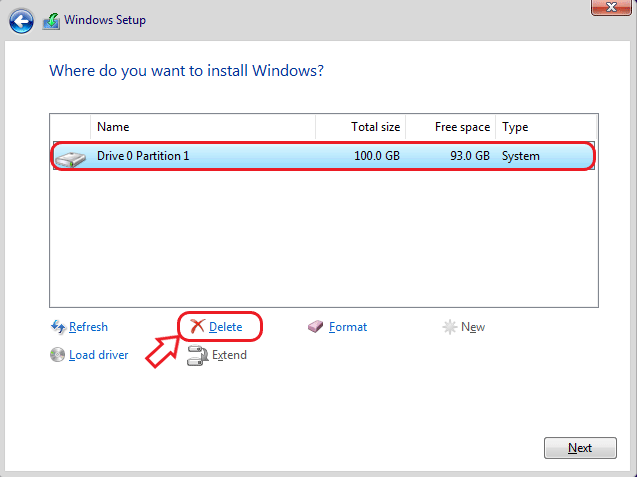
Step 8: Select the drive where you want to keep the installation files and other related data of Windows 11 and click Delete.
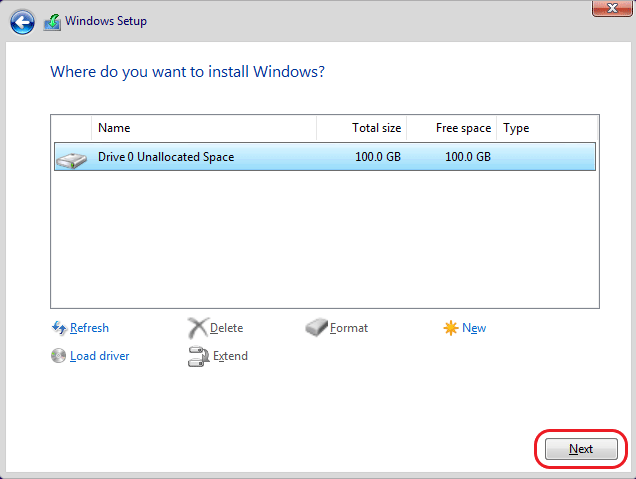
Step 9: Click OK to confirm the deletion. The selected drive will appear as an unallocated drive. Select it again and click Next.
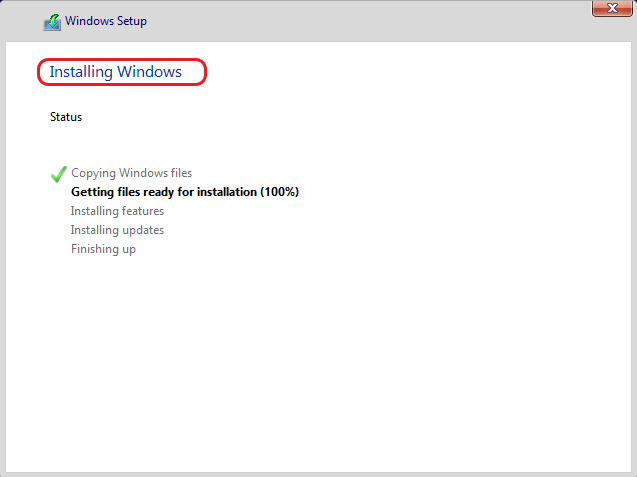
Step 10: The Windows 11 installation process will commence. Be patient and let it complete.
Once the process completes, your PC will restart. You can now set up the Microsoft Windows out-of-box experience. You’ll be asked to select your country, preferred keyboard, add your Microsoft account, generate a PIN, etc. Follow the on-screen instructions.
When the setup is complete, your PC will restart again, and the following screen appears. Input the generated PIN to continue with the all-new Windows 11 from Microsoft.
You must complete some final setup steps before using the Windows 11 OS. Here is what you need to do.
As the procedure to upgrade to Windows 11 through clean install requires deletion of all the data, there are high chances of data loss. However, professional data recovery software can easily recover any data lost on your PC.
Stellar Data Recovery Professional for Windows is one of your trusted partners for powerful data recovery options. To keep a constant check on your system's health, the software has a built-in PC health check app. The software is 100% secure and retrieves any data from a Windows PC in three simple steps depicted below.
The recovered data will be saved at a destination of your choice. You can also preview the recoverable scanned data before recovering it.
If you have a PC with Windows 11 already installed, you can migrate the OS to your current PC or even to a new PC. To do so, you need to clone the system drive and migrate it to your Windows 7 PC. If you have already downloaded Stellar Data Recovery Professional for Windows, you are already halfway there. The software has a built-in powerful cloning feature, which you can use to clone the drive on Windows 11 PC.
Connect an external HDD or SSD to the Windows 11 PC. First, make sure the external drive has sufficient free space. Now, follow the steps below to create a clone of the system drive of a Windows 11 PC.
Step 1: Launch Stellar Data Recovery Professional for Windows and click the Waffle icon (⁝⁝⁝) on the top-right to select Monitor Drive.
Step 2: Select the Clone Disk option in the new software window.
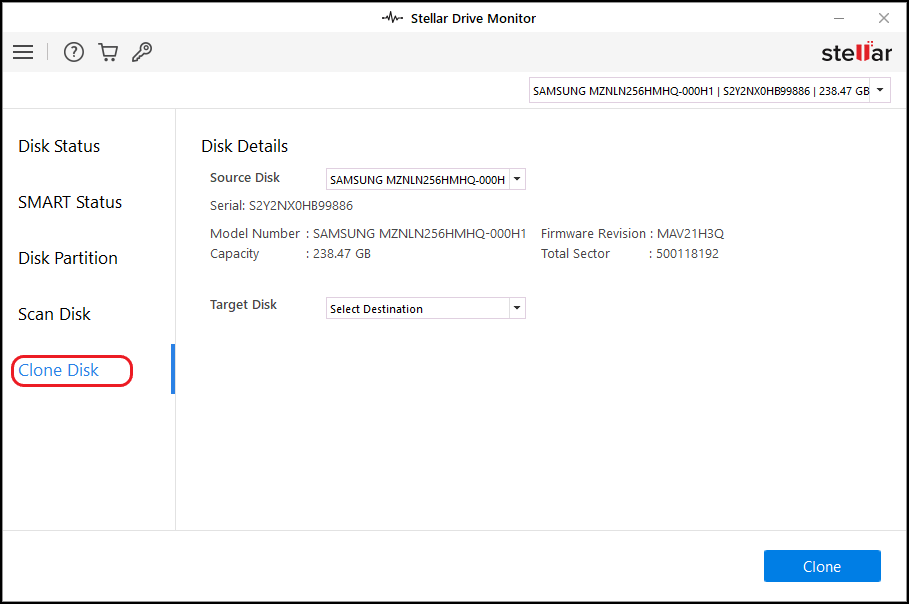
Step 3: From the Source Disk drop-down menu, select your Windows 11 PC's internal drive; from the Target Disk drop-down menu, select the external drive connected to the PC.

Step 4: Click Clone and wait for the process to complete.
The software will copy each data on the Source Disk (Windows 11 system disk) to the Target Disk (external disk).
Now that you have a clone of Windows 11 PC's system drive, shut down your system, connects the external drive to Windows 7 PC, and follow the steps below.
Step 1: Power on your PC and press F2/F12/Del key to enter BIOS.
Step 2: Go to the Boot Menu and select the external drive as the boot priority option.
Step 3: Press F10 to save the changes and let the booting process complete.
Step 4: Launch Stellar Data Recovery Professional on Windows 7 PC.
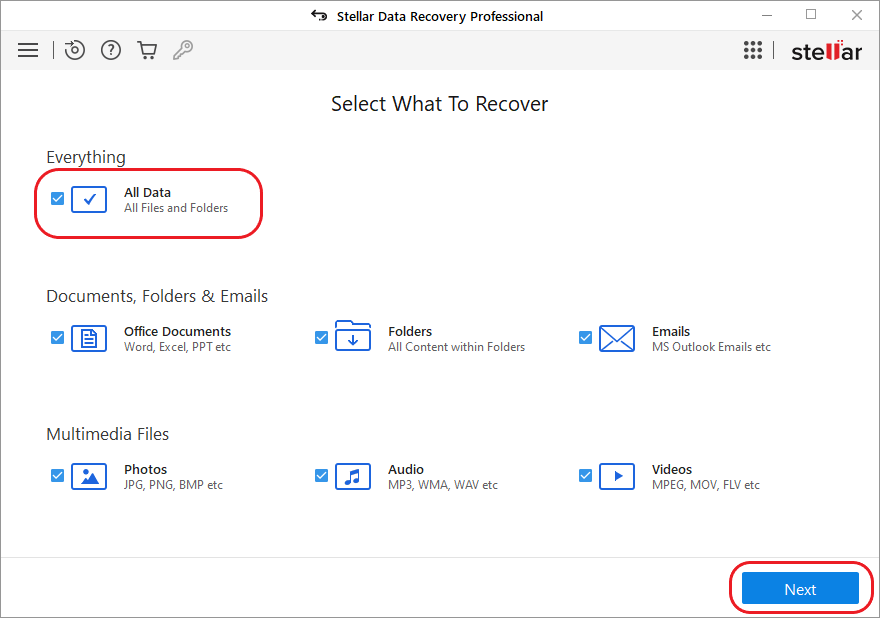
Step 5: Click the All Data option in the Select what to recover window. Click Next.
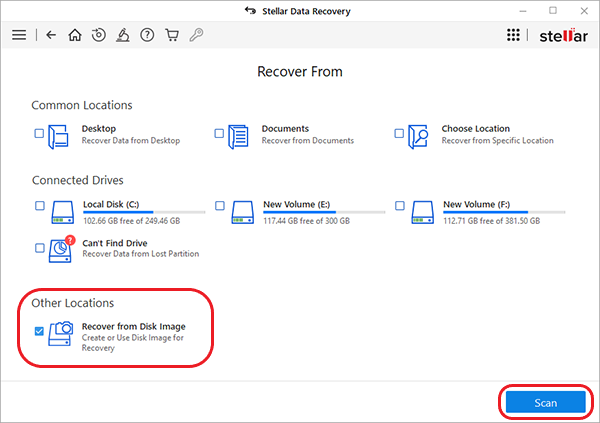
Step 6: Select the Recover from Disk Images option under the Other Locations section on the Recover From screen and click Scan.
Step 7: Select Recover from the existing image radio button in the dialog box and click Next.

Step 8: The cloned image will be listed in the software window, select it, and click Scan to start the recovery.
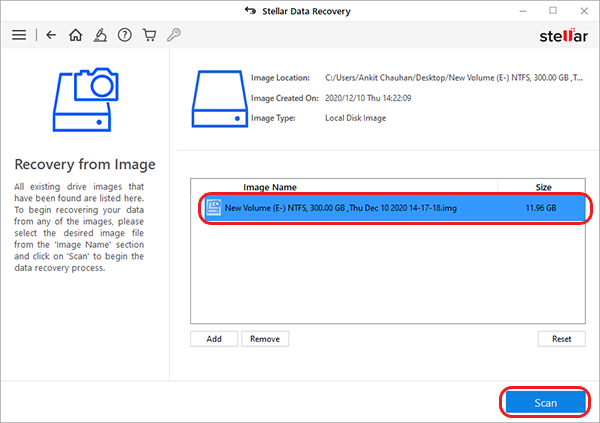
Step 9: Once the recovery process is complete, click OK. All the recovered data will be displayed in the software window.
Step 10: Click the root node in the left pane to select all data and click Recover.
Step 11: Select the system drive of your PC as the destination to save the recovered data and click Start Saving.
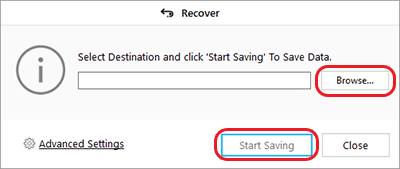
Step 12: The recovered files will be saved at the designated location, and your PC's OS will upgrade from Windows 7 to Windows 11.
Remember that all the settings of the Windows 11 PC will also be transferred to your Windows 7 PC.
Microsoft Windows 11 has not only introduced some of the most innovative features but the features retained from its predecessors have also been refined. Depending on your choice, you may upgrade your Windows 7 PC to Windows 10 or 11. However, if you plan to upgrade, why not go for the latest version of Windows OS.
Senior Content Writer
This article was written by Ashutosh Kumar, a Content Writer at Stellar Data Recovery.
Curious about our content creation process? Take a look at our Editor Guidelines.
July 22, 2026| 27 min read

July 22, 2026| 27 min read
July 28, 2026| 27 min read


 27 min read