It is now well-known that simply deleting files on a Windows computer doesn’t remove them from the storage drive. Even if you delete the files by bypassing or emptying the Recycle Bin, traces of those files remain on the drive until they’re overwritten. Such files are recoverable using a data recovery software.
If you want to securely and permanently erase sensitive files to ensure they can’t be accessed or recovered, this article will explain how to completely wipe files on a Windows system.
Methods to Erase Files on Windows
Windows provides options to wipe an entire drive or only the free space. It completely wipes the data by overwriting it with zeroes to ensure it cannot be recovered. If you want to erase only selective files or folders, there is no option available on Windows. To erase specific files, folders, and other data, you need to use a reliable file eraser software.
Method 1: Erase Hard Drive Using Windows Built-In Option
According to Microsoft’s Documentation, the format feature overwrites the existing data on a drive with zeroes when a full format is performed (this applies to Windows Vista and later versions). However, this doesn’t work for Quick format. To erase an entire internal drive, external drive, or USB drive, follow these steps:
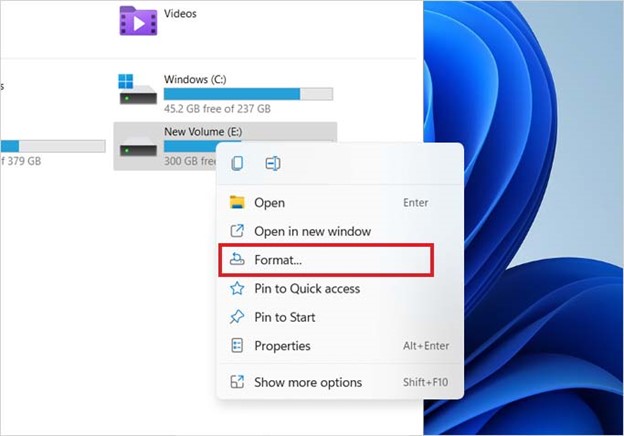
Step 1: Open the File Explorer from Start Menu.
Step 2: Locate the hard drive you need to wipe.
Step 3: Right-click on the drive and select Format.
Step 4: Under the Format Options, uncheck the Quick Format checkbox.
Step 5: Click Start to wipe the selected drive completely.
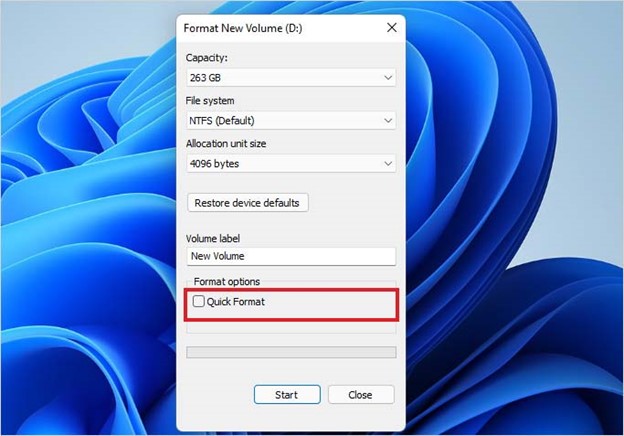
You can also select other options from the available settings, such as the file system format.
Method 2: Permanently Erase Deleted Files on Windows
Since deleted files can be recovered, it’s better to overwrite the free space left after deletion to permanently erase them. You can use the Windows Terminal to wipe the free space. Follow the steps below:
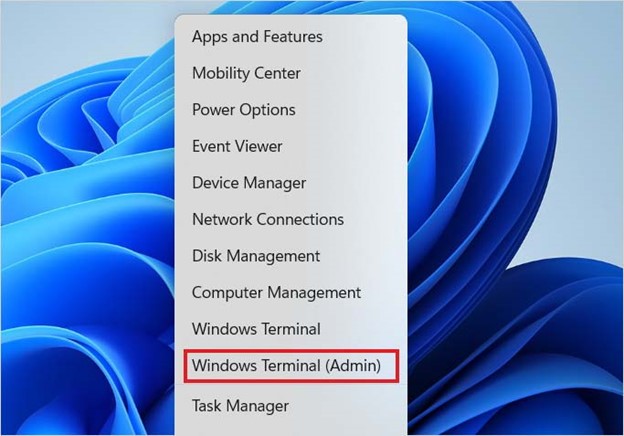
Step 1: Click the Start Menu and type Windows Terminal.
Step 2: Launch the Windows Terminal. Alternatively, press Windows + X and select the Windows Terminal (admin) option.
Step 3: Enter the following command: cipher /w:X:\ (replace ‘X’ with the letter of drive you want to wipe for free space, including traces of deleted files).
Step 4: Press Enter. The command will show progress in the Windows Terminal window.
Depending on the volume of free space and system configuration, the command will take some time to complete, securely wiping all free space on the selected drive.
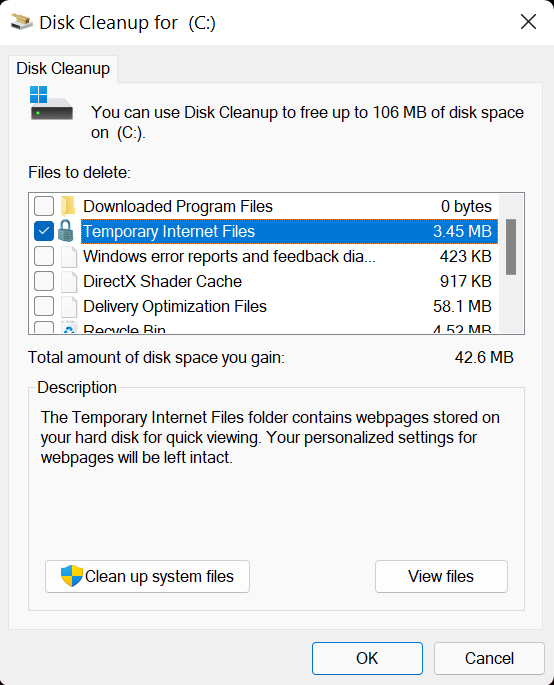
Method 3: Erase Temporary and Junk Files Using Disk Cleanup
Step 1: In the Search bar, type Disk Cleanup.
Step 2: In the Disk Cleanup window, check the Temporary Internet Files box and click OK.
Step 3: A dialog box will appear asking you to confirm the delete action. Once confirmed, the Disk Cleanup utility will delete the temporary files. If you want to clear additional personalized settings for webpages, click Clean up system files.
Method 4: Erase Private Data Using SDelete
SDelete is a secure-delete command line utility for Windows, capable of erasing files, folders, and empty spaces on the storage drive that may contain previously deleted private data, making recovery impossible. SDelete uses the trusted Department of Defense clearing and sanitizing standard DOD 5220.222-M that makes sure that the data deleted with SDelete is gone forever.
Follow these steps to securely delete your confidential and private data from a storage media:
Step 1: Download the SDelete.zip from the Microsoft’s official website.
Step 2: Extract it to Desktop or any other folder.
Step 3: Go to the folder where you extracted the SDelete utility.
Step 4: Hold the Shift key and then right-click inside the folder.
Step 5: Choose Open Command window here. A command prompt window appears.
Step 6: Type sdelete and hit Enter to see a list of options.
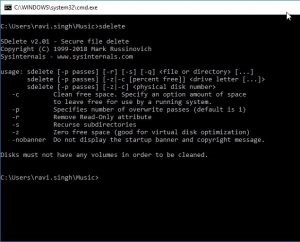
Step 7: Find the file or folder location you want to delete and type, for example: sdelete -p 2 “C:\Users\ravi.singh\Documents\Secret Info.docx”
Step 8: Use the parameters -s or -r for deleting directories and subdirectories recursively, and -p to specify the number of overwrite passes.
Example: sdelete -s -r -p 4 “C:\Users\ravi.singh\Documents\MySecretFolder”
This command erases MySecretFolder directory along with its subdirectories recursively with 4 passes.
Method 5: Erase Browsing History on Windows
To ensure privacy, it’s important to erase your browsing history, cookies, and cache files every time you close your web browser or shut down the system.
Here’s how to clear browser history on Microsoft Edge:
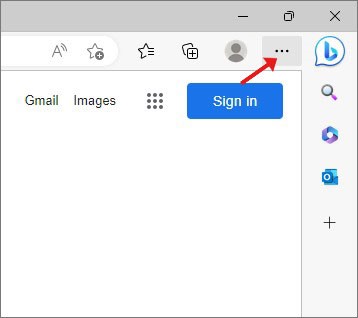
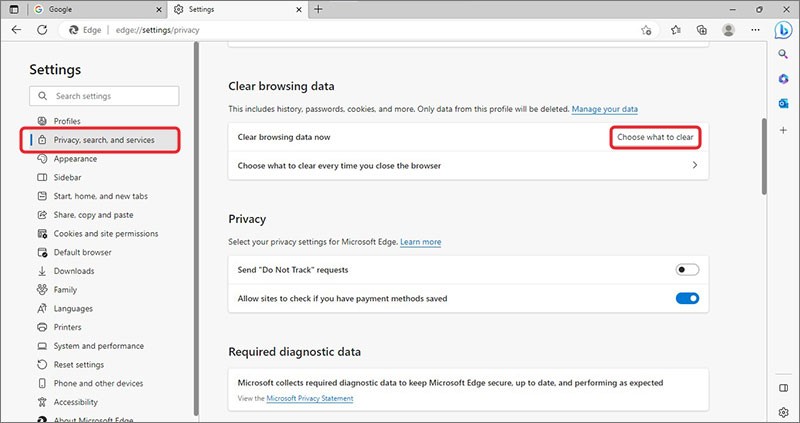
Step 1: Open Microsoft Edge web.
Step 2: Click the Hub button or the Three-dots in the top-right corner.
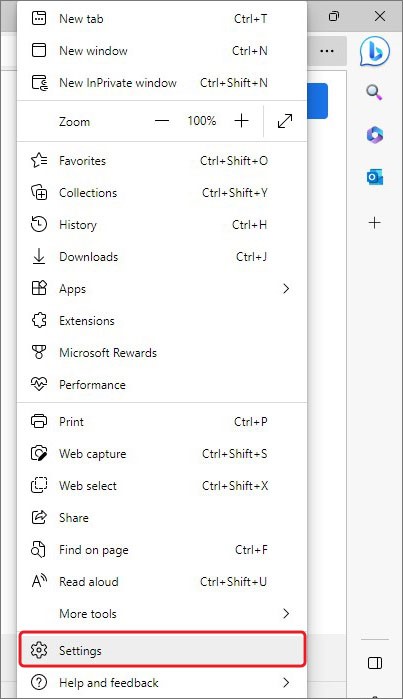
Step 3: From the list, click on Settings.
Step 4: Click on Privacy, search, and services in the left pane.
Step 5: Under the Clear browsing data, click Choose What to clear.
Step 6: Expand the drop-down menu.
Step 7: Select Time range drop-down menu and choose All time.
Step 8: Select all the items listed in the window and click on Clear now.
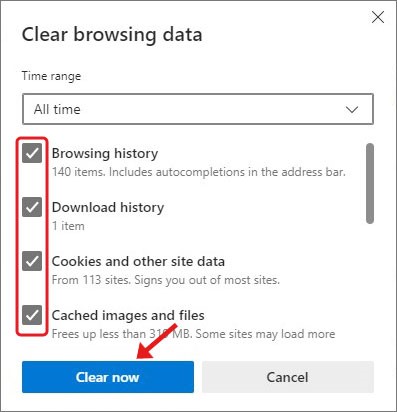
Step 9: Restart the browser.
Here’s how to clear browser history on Google Chrome:
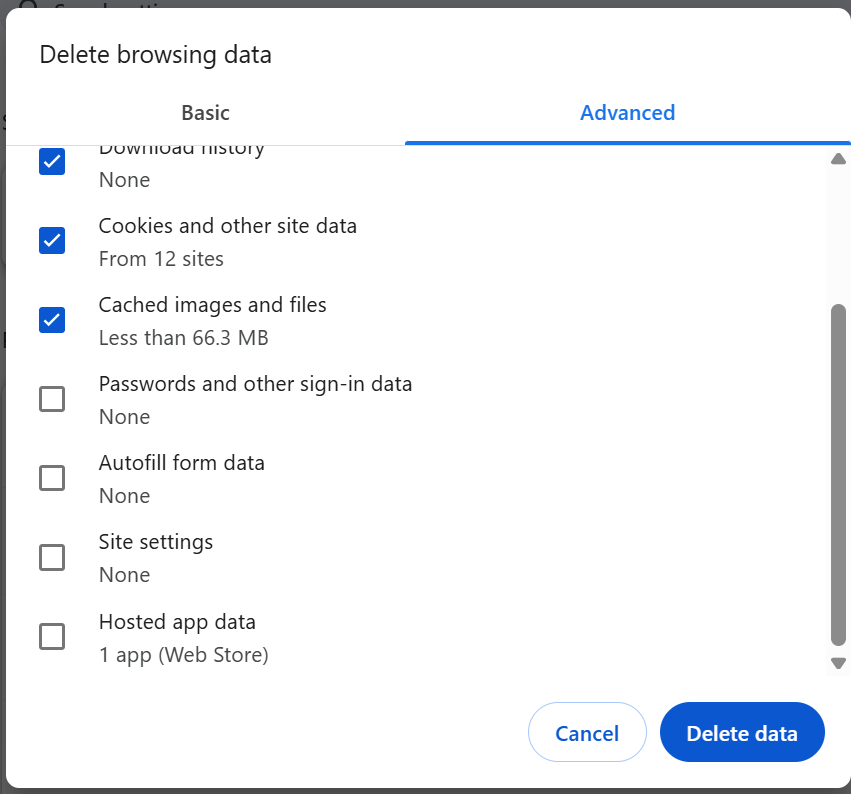
Step 1: Press Ctrl + Shift + Delete to open the history-clearing options.
Step 2: A menu will appear containing a list of what you can and cannot delete. Click on Advanced, then select the Time Range and the items (browsing history, cookies, cache, etc.) you want to delete.
Step 3: Click Delete Data to clear the selected items for the specified time duration.
Method 6: A Turnkey solution for all eraser needs
The specialized file eraser software uses multiple passes with different algorithms to completely shred your data, beyond recovery. With this file free eraser software, one can delete any kind of file, including temporary files, media files, browsing history, cached files, log files, and other junk data.
Stellar File Eraser is one such free tool that uses advanced shredding algorithms to permanently delete files, ensuring your sensitive data is securely wiped from your laptop or desktop PC. The tool also helps free up valuable disk space and can securely erase entire drives, partitions, or folders. It lets you schedule automatic erasure tasks and select specific files to delete them permanently—all in one simple, efficient process.
Here’s the process to erase any type of file on Windows by using the Stellar File Eraser:
Step 1: Launch Stellar File Eraser.
Step 2: From Select Option (on the left pane of the software window), choose the Erase Files & Folders option.
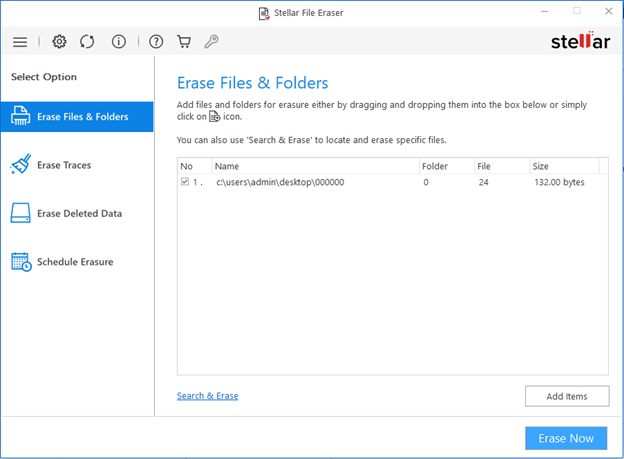
Step 3: The software provides the following three options to erase the files and folders:
- Manual Drag & Drop - Select the file to be erased, drag and drop it into the right-hand section of the software window.
- Search & Erase - If you know the file's name, insert it in the Search & Erase dialog box. Browse for the file location and click Search.
- Add Items - Click the Add Items button at the bottom-right and choose the files by navigating through the locations displayed.
Step 4: Once the selected file is displayed in the software window, click Erase Now.
Step 5: In the Confirm Erasure dialog box, click Proceed.
Step 6: Once the erasure is complete, you will see the Erasure Complete window. Click OK.
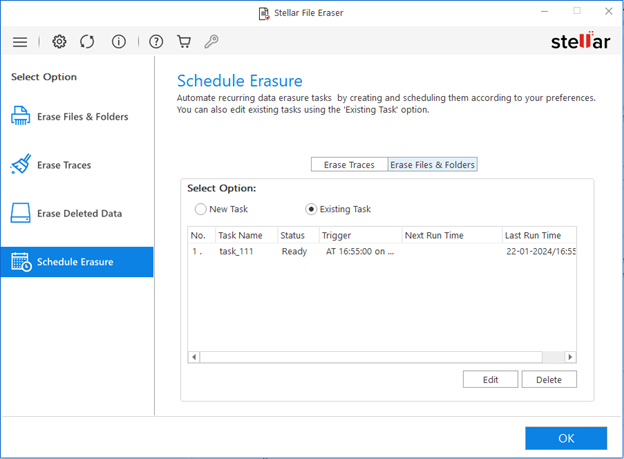
You can also schedule the above process using the Scheduler option to complete it at a specified time and date. Similarly, traces and deleted files data can be permanently erased using Stellar File Eraser.
Conclusion
While Windows offers the option to erase a complete drive permanently, or using command line, there is no option to select specific files and permanently erase them. Hence, we recommend you to use a file eraser software to permanently erase selective files, folders, browsing history, etc. on your Windows PC.


Rishabh is a senior content specialist at Stellar Information Technology, where he writes about comprehensive data care solutions.

 4 min read