Nobody wants to let other people access their private data. People try different methods to keep their data safe. But when the data is not needed or when you want to sell or dispose of a PC or any other storage device, you would want to erase your confidential data. Generally, the first approach you may take is deleting sensitive data using the Shift + Del key, emptying the Recycle bin, or formatting the drive. But these methods don't really erase data; the data remains in the computer’s storage drive and can be retrieved using publicly available data recovery software.
How to Erase Private Data Permanently in Windows beyond Recovery?
So, 'how to erase data permanently?' To permanently delete files in Windows 10 beyond the scope of recovery, you need to ERASE data. Data erasure or data wiping means overwriting the existing data with 0s, 1s, and random patterns such that the data is gone forever without the remotest chances of data recovery.
This article covers 4 best methods to erase private data permanently on a Windows 10 PC or laptop. You can perform data erasure with these methods using the step-by-step instructions provided. Let's get started!
Method 1:
Method 2:
Method 3:
Method 4:
Method 1: Erase Data using SDelete
SDelete is a Command Prompt (CMD) based utility, which lets you delete files and directories, and erase the free space on the drive by overwriting the files with a secure delete pattern.
Follow these steps to erase data permanently using SDelete:
- Download SDelete and extract the files to a folder at Desktop or other preferred location in your system.
- Press Windows + R (Windows 7), Press Windows + S (Windows 8, 8.1, and 10), type cmd, and hit Enter.
- Open Command Prompt as Administrator.
- Navigate to the SDelete file location. For example, if it's located in D:\tools, type cd D:\tools and hit 'Enter.'
- Next, type SDelete and then press Enter. For example, type Sdelete d:\tools\mytext.txt and hit 'Enter' to remove the mytext.txt stored in D drive's 'tools' folder file. (See Image 1)
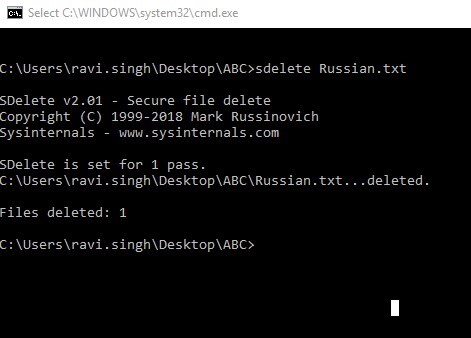
Image 1: Run SDelete to delete files permanently
- Once the process is completed, a message will appear confirming how many files have been deleted successfully.
- SDelete wipes data permanently from the hard drive and makes file recovery impossible.
Benefits:
- Free, command-line utility
- Overwrite free de-allocated space securely to wipe traces of files deleted earlier.
- Delete files securely to prevent data recovery
Drawbacks
- Command Line Interface makes it hard to delete several files and folders located at a different location.
- Being aware of the directories and file locations of all temporary files, junk files, browser data, office document backups, etc., is entirely impractical.
- Time-taking and troublesome since there is no GUI.
- You’ll need hands-on experience to use this software. Else, you may end up deleting critical system files, leading to permanent data loss.
Method 2: Erase Data using WinHex
WinHex is a powerful multi-functional tool that can perform several tasks, such as interpreting data types, analyzing and comparing files, cloning, disk imaging, and more. It is helpful in computer forensics, low-level data processing, IT security, and data recovery.
- Download, install, and launch the WinHex program.
- Click 'Open Disk' on Menu Bar, select the required disk and click 'OK.' (See Image 2)

Image 2: Open Disk in WinHex
- Double-click the file that you want to delete in Windows 10 securely. The file content will show in the form of Hex codes. (See Image 3)
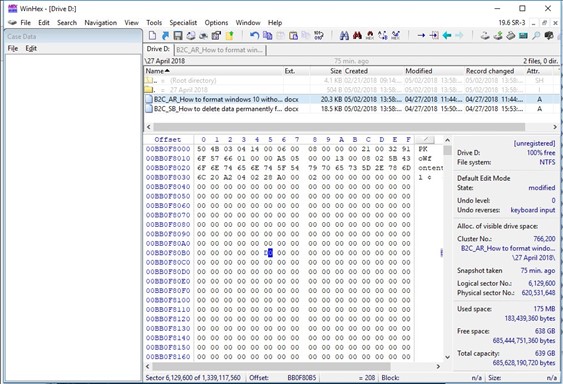
Image 3: Double-click the file to erase
- Replace all the original values with different random data (values).
- Afterward, save and close the file.
- Open File Explorer and check the same file to view its content.
The original data will be overwritten entirely with some random symbols and text. Or the file will corrupt, thereby preventing any sort of data recovery.
Benefits:
- Edit partition tables, boot sectors, along with other data structures with the help of templates
- Join, Split, Search, and Replace files
- Read and directly edit hard drives with FAT and NTFS
- Clone drives and enables drive imaging
- Encrypt files (128-bit strength)
- Wipe drives
Drawbacks:
- Not Safe: It's a complex tool that requires some technical know-how to use it safely. Without proper knowledge, you may end up deleting or overwriting your important files or folders on your system that can lead to system crashes, unusual behavior, and even permanent data loss.
- Requires Time: It takes a lot of time and requires opening each file to overwrite them. It is troublesome and inefficient.
- Complicated Interface: The user interface is fundamental and outdated.
Method 3: Using Cipher with Windows PowerShell
Using Cipher with Windows PowerShell can also help you overwrite the deleted data. It is a Windows built-in feature that can completely erase deleted data beyond recovery. Learn more.
- To erase data by overwriting with Cipher.exe, follow the given instructions:
- Quit all the programs, go to the Windows Search bar and type PowerShell, and open Windows PowerShell. (See Image 4)
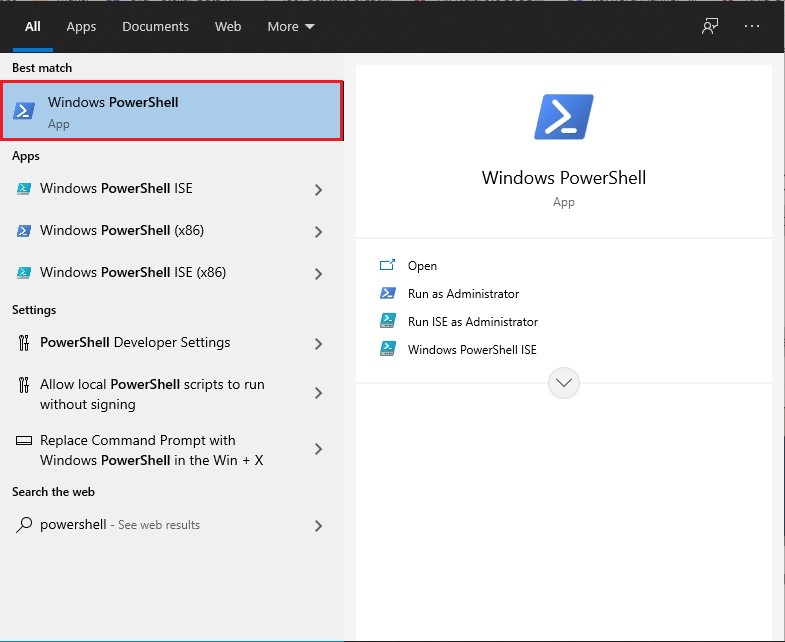
Image 4: Open Windows PowerShell
- In the Windows PowerShell window, type cipher /w: folder and hit Enter. The folder here is any folder that you want to erase. For example: if you want to overwrite the C: folder, type cipher /w: C:\folder and hit Enter. (See Image 5)
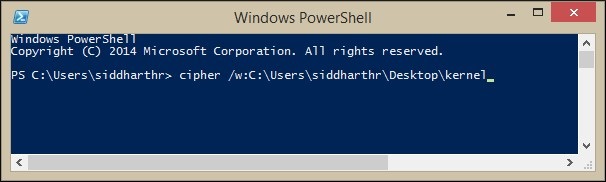
Image 5: Run cipher /w: folder command in Windows PowerShell
- All the de-allocated space on the folder will be overwritten.
Note: Deallocated space is referred to the free space available on the folder or drives to add new data after data deletion.
- Data available on the allocated space (the area where the files already exist) will not be overwritten.
- Don't close the window during the process. Wait until the process is completed. It may take some time to delete files in the Windows system permanently.
Benefits:
- It can encrypt and decrypt data on drives containing the NTFS file system.
- It allows you to view the encryption status of data from Windows PowerShell, a command-line tool.
- It prevents unauthorized recovery of private data by overwriting it.
Drawbacks:
- Cipher takes a lot of time to overwrite the data, making a recovery impossible. For example, if you need to erase data from a large hard drive, it could take all night to do so. Even simply deleting a single file folder may take around an hour or so.
- The command-line interface makes it difficult to delete multiple data at once.
- Needs hands-on experience of using this tool to make sure you don't delete your crucial data.
Method 4: Erase Private Data Permanently Using File Erasure Program
Using a Data Erasure tool, such as Stellar File Eraser – a neat GUI-based user-friendly data erasure tool – helps you erase private data permanently. This DIY (Do-it-yourself) software gives you great peace of mind as it safeguards your privacy by permanently erasing files, folders, internet history, etc., from the Windows system beyond the scope of recovery.
Unlike the utilities mentioned above, BitRaser File Eraser Software is entirely safe and secure. It does not affect any system or program files present in the C: drive. It uses powerful erasure techniques based on US Department of Defense standards to guarantee permanent data erasure. Stellar File Eraser helps you to erase your private data without any technical help or expertise.
Follow these steps to delete files in Windows 10 using Stellar File Eraser securely:
- Install, and run Stellar File Eraser on your system.
- To erase private data permanently, select Erase Deleted Data > Erase Now. (It will wipe all files deleted with the Shift + Del key or by emptying Recycle Bin.) (See Image 6)
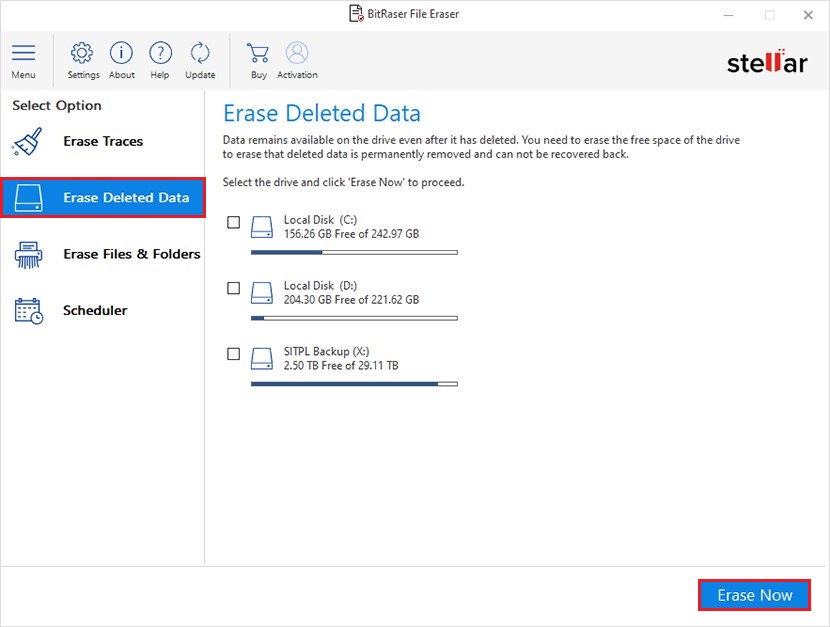
Image 6: Choose to delete the erased data
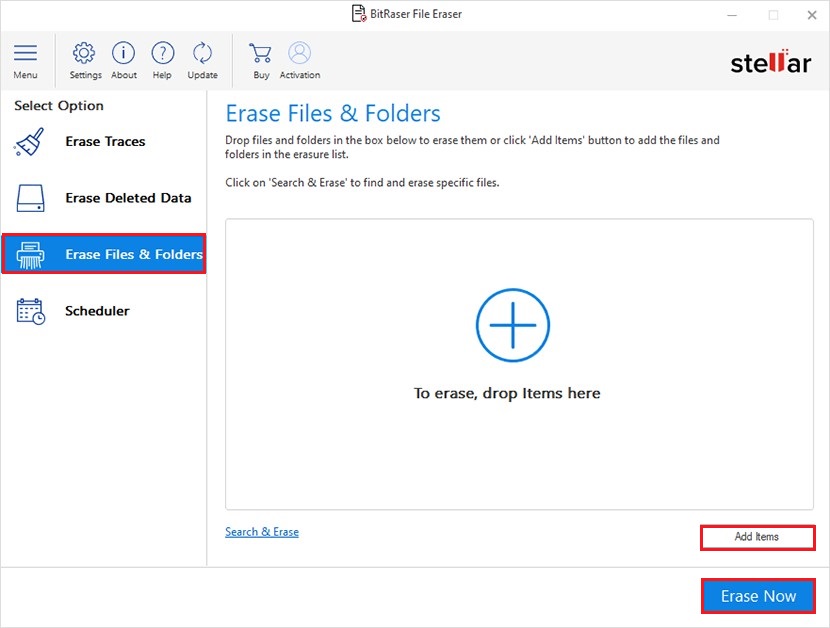
- Choose 'Erase Files & Folders' to securely delete specific files or folders
- Click on the + icon to add files and folders that you want to delete and click 'Erase Now.' (See Image 7)
- Your private data will be erased permanently.
Additional Information: The software possesses a 'Scheduler' feature that allows you to set a schedule for data erasure automatically.
Benefits:
- It erases the deleted files from drives and partitions to ensure their permanent wiping
- If "Scheduler" is turned ON, it can routinely delete the system traces, thus improving your PC's speed, performance, and storage space utilization.
- It lets you search and erase multiple files by using the 'Find File by Name' option.
- It lets you link all unwanted files and folders to a list to delete them beyond recovery in one go.
Drawbacks:
None
Quick Comparison of Data Erasure Tools
Below we share a quick comparison of the data erasure methods/tools provided in this article. You can review and compare them based on features, benefits, and limitations and choose the best one suited for your needs.
| Data Erasure Tools | User-Interface | Ease-of-use | Data Erasure Algorithms | Efficiency to Erase Data Permanently | Free/License Based |
| Sdelete | Command-line interface, NO GUI | Needs know-how of running complex commands | Department of Defense algorithm | • Successfully overwrites data • Time-consuming |
• This is a free command-line tool. |
| WinHex | No GUI | • Potent, multi-functional tool Requires technical expertise | MD5 message-digest algorithm | • Successfully overwrites data, • Time-consuming • Finds and deletes multiple files in a single folder |
• Free, hexadecimal editor |
| Cipher with Windows PowerShell | • Command-line interface • NO GUI |
• Command-line interface • Requires technical expertise |
Cipher (cryptographic algorithms) | Requires running commands to erase private data permanently | • Free command-line tool. |
| Stellar File Eraser | Neat and intuitive GUI | • DIY software • Easy-to-use • No technical expertise required |
Uses international erasure standards, such as Zeroes, Department of Defense (DoD) etc. | • Erases private data permanently in just a few steps • Can erase multiple files simultaneously. • 'Scheduler' feature for scheduling data erasure tasks |
• License Based |
Which Method to Choose to Erase Private Data Permanently?
This article covers the four effective ways to erase private data permanently in Windows 10. All of these methods can help you to erase data beyond recovery. However, there are some limitations/drawbacks with every method/tool. If you need to erase a few of your confidential files, you may use SDelete, WinHex, or Cipher with Windows PowerShell. However, the tools are complex and they may delete your system files without any prior warning. It's advised to use these tools carefully to permanently erase your private data.
On the other hand, Stellar File Eraser is a user-friendly and completely safe data erasure tool. It doesn't list important file directories in the software screen like Windows files, program files, etc., and prevents you from accidentally deleting important system files. With 3 specialized erasure standards defined by the likes of US Department of Defense, you can be sure that your private data is completely erased beyond recovery.


A seasoned technology writer and tech enthusiast with keen interest for everything in technology.

 4 min read