


-517.jpg&url=https://www.stellarinfo.com/article/how-to-use-system-restore-windows-10.php)


Sometimes, when you install an update, some app/software, device driver, or modify the system settings improperly in Registry, you may find the system malfunctioning or showing you different errors. System Restore helps you roll back the system to a good-old functional state. It is a Windows built-in recovery feature that captures the screenshot of the system’s current working state as a ‘restore point’ that you can use for restoring the system to a previous point in time to fix the problem.
The Windows 10 system restore comes disabled by default. To learn how to use system restore, you first need to enable it, let the Windows create a restore point automatically, or you do it manually for using it later for system recovery.
Setup your System Restore
Start setting up your system restore in three steps:
How to enable System Restore on Windows 10?
Follow the given steps to enable the System Restore on Windows 10 manually.
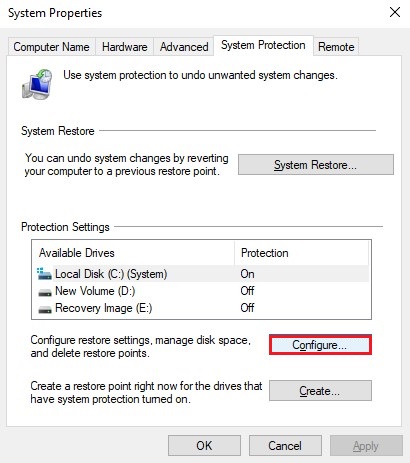
- Type Create a restore point in Windows Search Box.
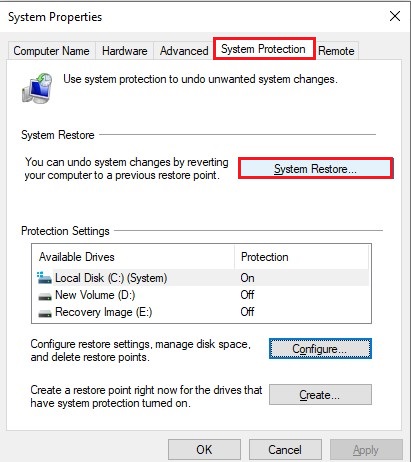
- On the System Properties window, navigate to Protection Settings and select the main system drive (:C/ drive).
- Now, click Configure to proceed.
- Now, select Turn on system protection > OK.
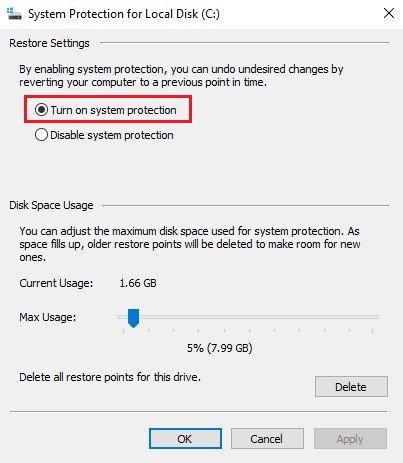
Quick Tip: Under the ‘Disk Space Usage’ section, you can use the slider to specify the storage amount for reserving the recovery feature. There is also ‘Delete all restore points for this drive,’ which can help you free up space or when you wish to start over with the feature.
After the process completion, Windows 10 will automatically create a restore point whenever applying a new update or when specific changes are made.
Remember, System Restore is available to undo system settings changes. Don’t treat it as a backup solution replacement.
How to create a restore point in Windows 10
If the System Restore is enabled, it will automatically create a restore point when it detects system setting changes. However, you may want to create a restore point automatically if you modify the system configurations.
Follow the given steps:
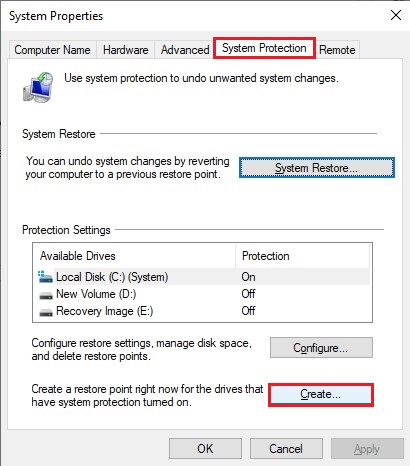
- Type Create a restore point in the Windows Search box and then navigate to System Protection.
- Under ‘Protection Settings,’ click Create.
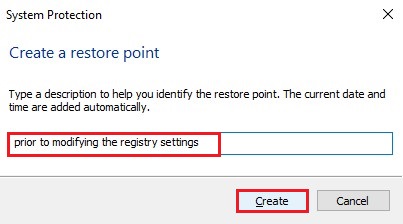
- Give a descriptive name to identify restore point and click Create.
- The restore point will be created successfully.
How to use System Restore on Windows 10 for recovery
If your system is having issues due to any recent changes made, you can perform a system restore to undo them in one go.
If you can boot into your system normally, follow the given steps:
- Type Create a restore point to open the system properties.
- Now, under System Protection, go to System Restore.
Note: If the ‘System Restore’ option is greyed out, it means that the system has no restore point.
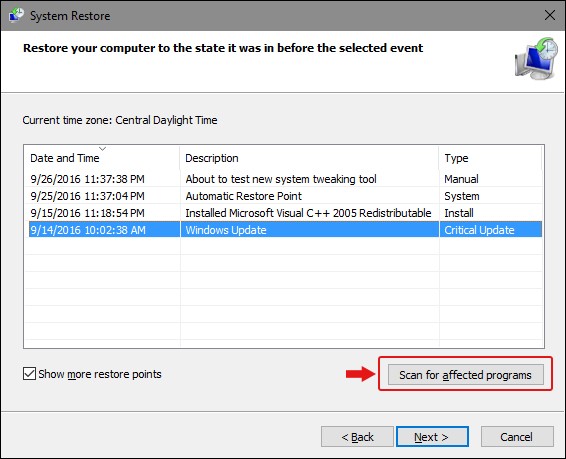
- Click Next and then select the restore point.
- Click Scan for affected programs. It will show you the programs, apps, or software getting affected due to this process.
- Now, click Close > Next > Finish.
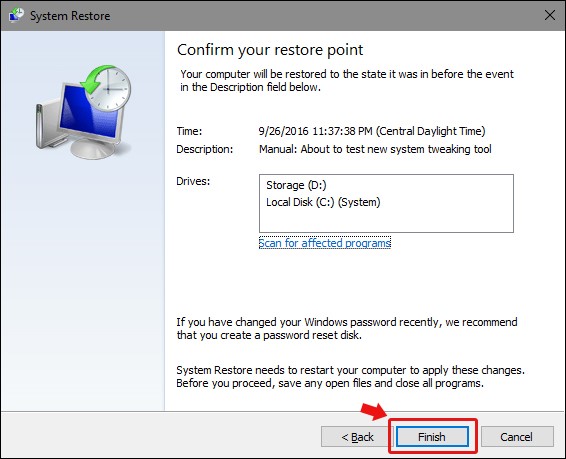
- Once the process is completed, the system will be restored to its previous good condition.
Use System Restore in Automatic Repair Setting
If you can’t boot into your system normally, perform a System Restore from Automatic Repair settings. Follow the given steps:
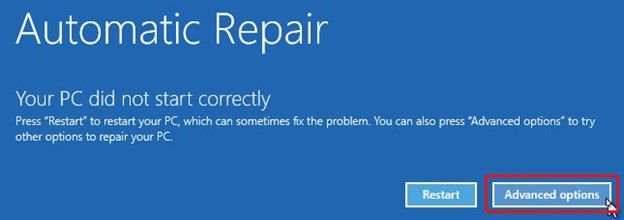
- Please turn on your device, and as soon as the system starts showing the Windows logo, turn it off.
- Repeat this step thrice, and it will reach the Advanced Repair environment.
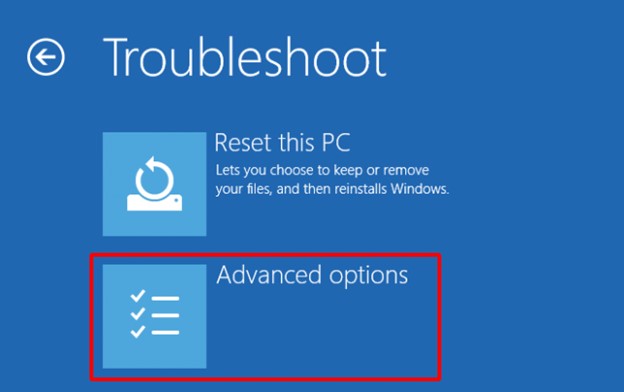
- In the Automatic Repair environment, click Advanced options > Troubleshoot.
- On the Troubleshoot screen, click Advanced options.
- On the next prompt, click System Restore.
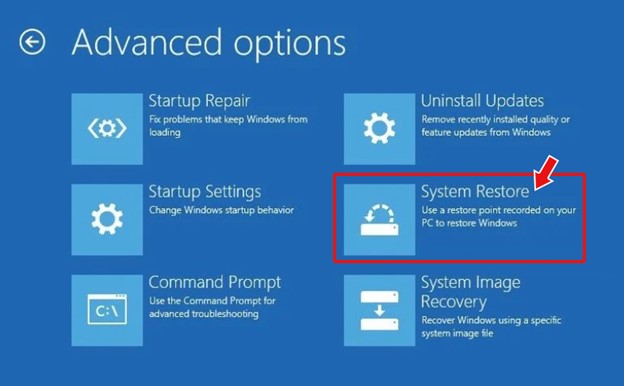
- Confirm the account password and click Continue.
- Click Next and select the restore point to revert the system to the previous functional state.
- Now, click Scan for affected programs > Close > Next > Finish.
- Once Windows 10 system restore is completed, the issues you’re facing with your Windows 10 system will be resolved.
Please note that this method can help you fix your system errors, but it will reset the PC to its default configurations. It removes all the system setting changes, affecting system files, Windows update, registry settings, device drivers, applications, and programs.
Hence, if you face any issue with your system and worry about losing your data, use reliable data recovery software, such as Stellar Data Recovery Professional. This DIY data recovery software can recover data from corrupted, formatted, BSOD-affected, or even crashed Windows 10 PC. You can download the software and use it to retrieve your important files and folders. Once restored, you can proceed with fixing the system errors.
EndNote:
To use System Restore on Windows 10, you’ll have to enable it first and then create a restore point (manually or let the Windows generate one). Once both steps are done, you’ll be able to use System Restore to fix the errors you’re facing with your PC/laptop. Moreover, System Restore may affect your system files, programs, apps, Windows update, registry settings, etc., by bringing it to an older state to fix the system errors. Hence, always have a backup of your data before performing this method. If you forgot to take backup or have no backup, use a powerful professional data recovery software, such as Stellar Data Recovery Professional. This DIY software enables you to recover data from formatted, corrupted, or even unbootable Windows PCs or laptops.
Also Read: How to Recover Files Lost After System Restore in Windows 10


A seasoned technology writer and tech enthusiast with keen interest for everything in technology.

 3 min read


