


Bootable USB media is a freshly formatted USB flash drive configured to boot an Operating System. When a PC or computer is powered on, it can be set to boot from the USB instead of the system's main drive. It comes in handy for many purposes, including:
Windows OS installation: One of the most common uses of a bootable USB media is to install the Windows Operating system.
System Recovery: Another use of bootable USB is to troubleshoot and fix issues with the Windows OS. This includes recovery environments with system repair utilities that help restore the system to a functional state.
Partitioning and Disk Management: Bootable USB drives facilitate disk management or partitioning, including hard drive partitioning, formatting, and cloning disk functions.
Data Recovery: Bootable USB drives help recover data from failed, crashed, or unbootable Windows systems and supported hard drives.
What do you need to Create USB Bootable Media?
To create a recovery media on Windows 10, you need to ensure that:
- A stable internet connection. Any interruption during bootable media creation would lead to a failed attempt.
- Your system, USB, or external drive on which you're downloading the ISO file should have enough storage space.
- A blank USB of at least 32 GB or a DVD of at least 8 GB (and a DVD burner). We'd recommend choosing USB to create bootable media.
- A 64-bit CPU, as Windows 11 only runs on 64-bit CPUs. Windows 10 can run on both 32-bit and 64-bit CPUs. To check your CPU configuration, go to Settings > System > About.
- Your system meets all the Windows 11 device specifications for upgrade requirements and supported features.
|
Note: If you install Windows 11 bootable media on a PC that doesn't fulfill the Windows 11 minimum system requirements, it may result in compatibility issues and may not support or receive updates. |
Methods to Create Windows Bootable USB Media
Scenario 1: To Install Windows 11 or Fix Windows Boot-up Errors
#1 Use the Windows Media Creation Tool
Using the Windows Media Creation tool is the most common way to create a bootable media. Microsoft has a dedicated service page from where you can download the Windows Media Creation tool. Follow the given steps to create recovery media on Windows 10:
- Connect a new or formatted USB drive to your system.
- Go to Microsoft's website page to create an installation for Windows.
- Select Windows 11 for whichever you want to create the bootable media there.
- Locate the Create Windows 11 Installation Media option on further prompt and click the Download Now button.
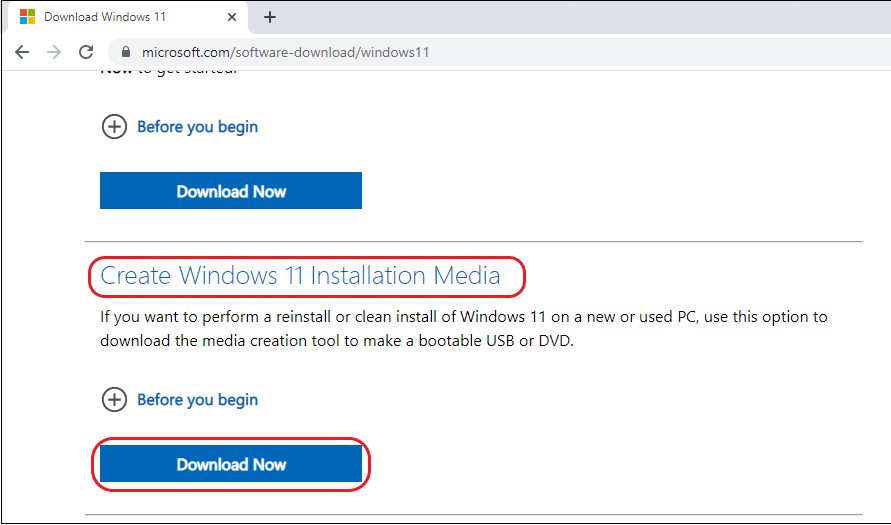
- Save the application setup at your preferred location on the computer.
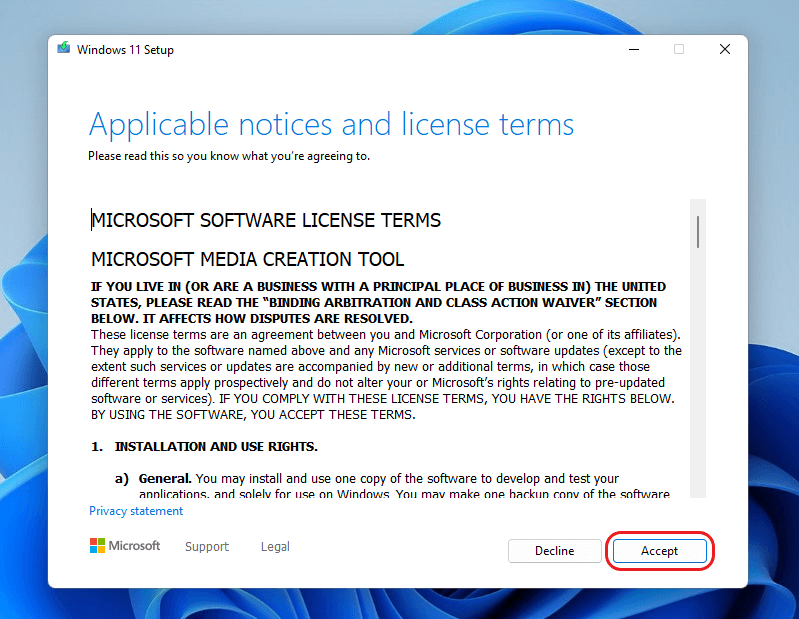
- Run the Windows 11 setup and click Accept.
- Choose Language and Edition, and click Next to proceed.

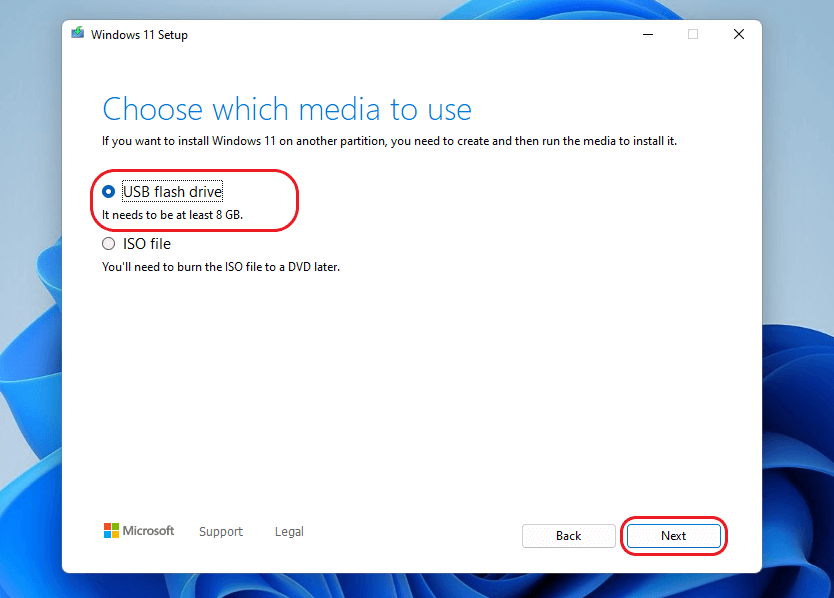
- On the following prompt, select USB flash drive and click Next.
- Follow further prompts to complete the process.
- Once done, your bootable USB media will be ready.
#2 Use Command Prompt
Command Prompt is a native Windows 11 command-line tool. You can easily create a Windows 11 bootable USB by entering several commands in the command prompt. You can use the diskpart command to create the USB installer. Here's how to do it.
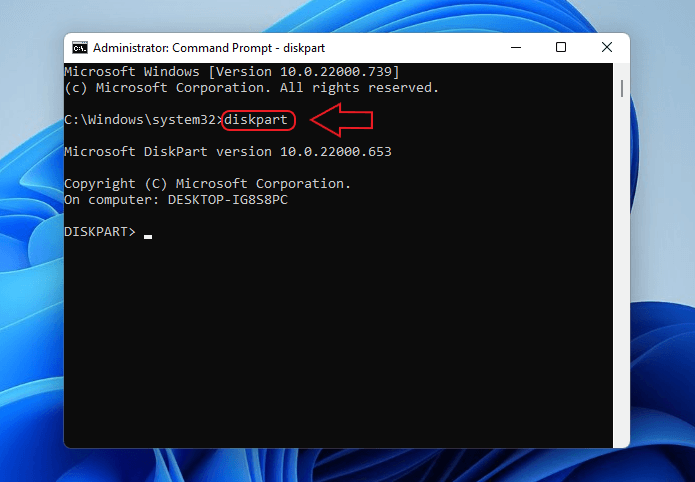
- Type cmd in the search bar and open Command Prompt by clicking Run as administrator.
- Type the command diskpart and hit Enter.
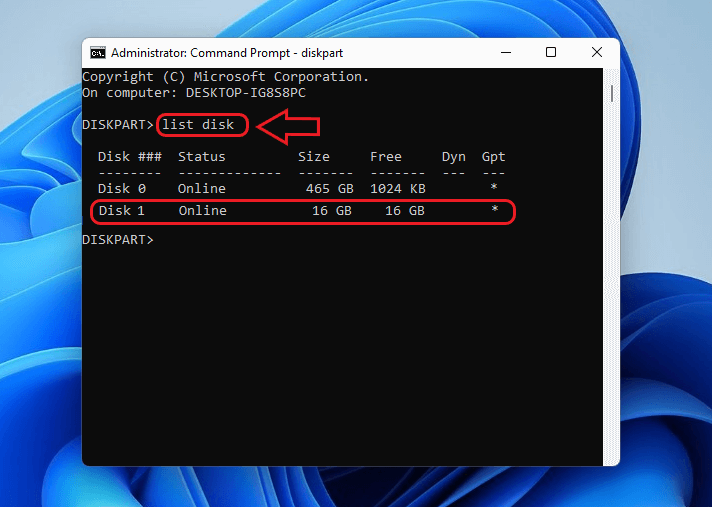
- To list the USB drive, type the command list disk and press Enter.
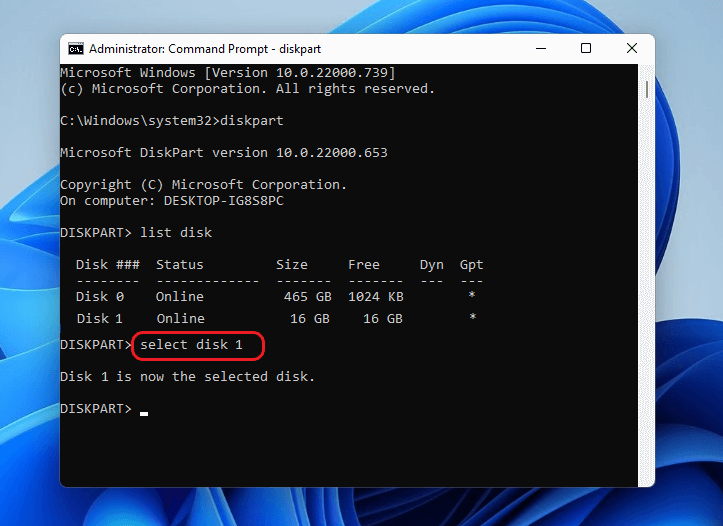
- Select the USB drive by typing the command select disk 1 (replace digit 1 with the USB's number in the list)—press Enter.
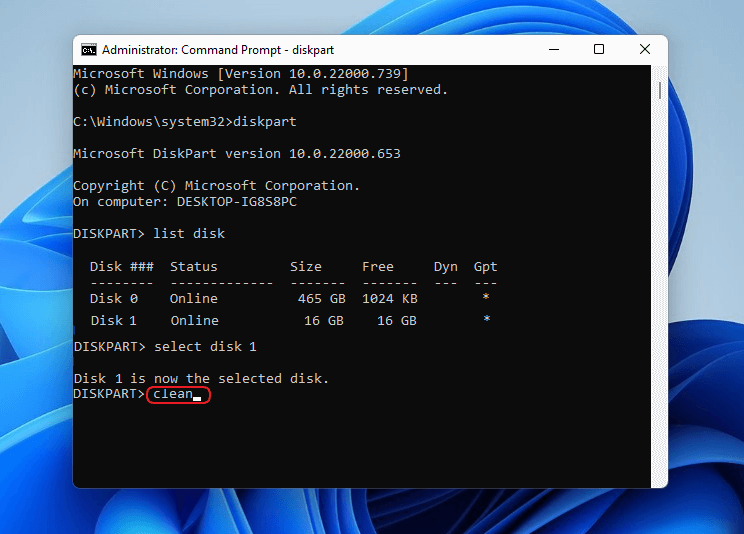
- You need to format the USB drive. Insert the command clean and press Enter.
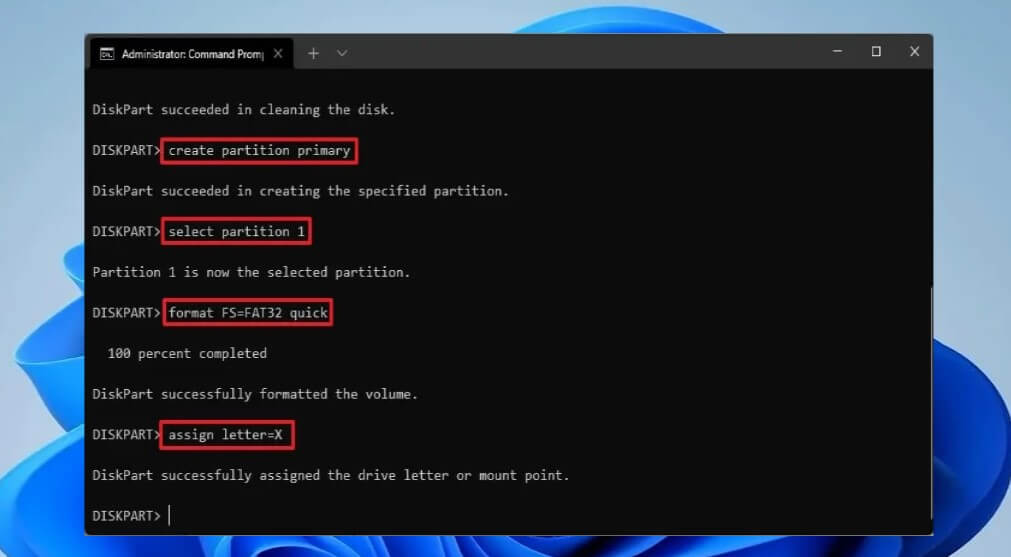
- Insert the following commands one by one and press Enter after each command.
create partition primary
list par
active
select partition 1
format FS=NTFS label=”bootableUSB” quick override
assign letter=X
exit
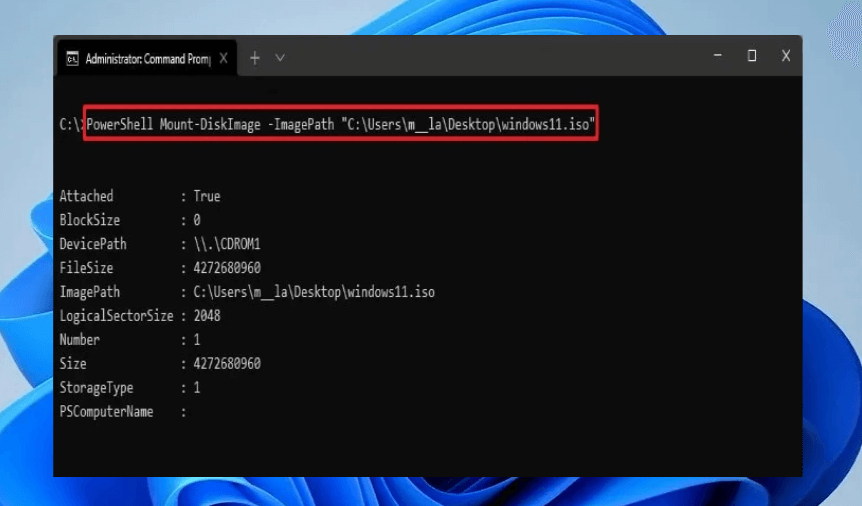
- Type the following command to mount the ISO file and press Enter.
PowerShell Mount-DiskImage -ImagePath "C:\path\to\Windows11.iso"
Type the following commands and press Enter after each.
Diskpart
List volume
Exit
- Again, insert the following commands one by one and press Enter after each.
E:
cd boot
bootsect /nt60 X:
xcopy E:\*.* X:\ /E /F /H
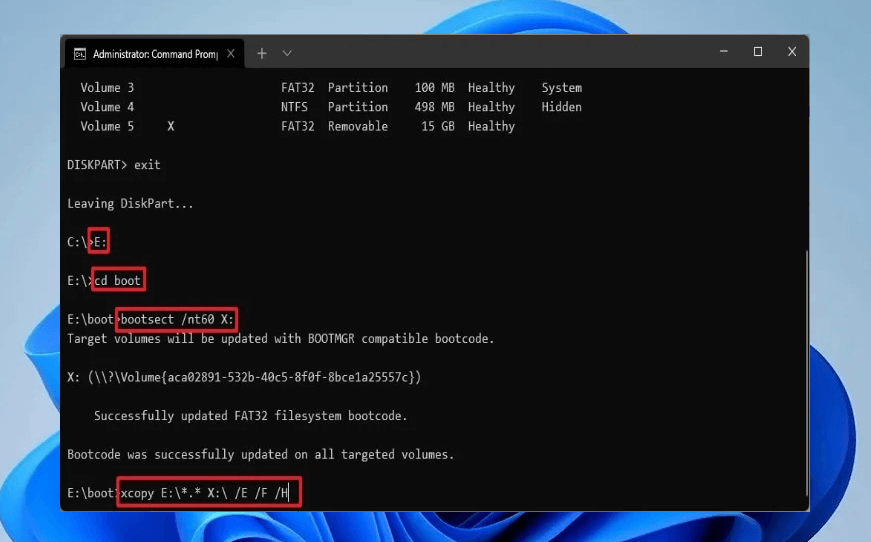
Once the process is complete, your Windows 11 bootable USB is ready to use.
#3 Create Windows 11 bootable USB with Rufus
Rufus is an open-source utility for formatting and creating bootable USB devices for Windows. It is fast and needs no installation. You can download the executable file and start using it directly. It is a handy tool for creating a USB installer using the Windows ISO file. Follow the steps below to build a Windows 11 bootable USB using Rufus.
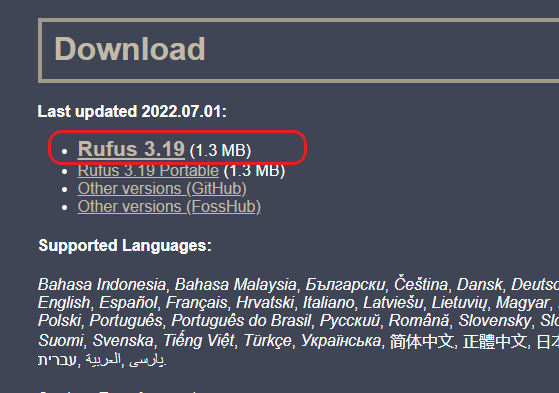
- Open the Rufus official site and download the utility under the Download section.
- Go to Downloads on your PC and double-click the executable file to launch Rufus.
- Click the Application Settings button at the bottom (third from left).
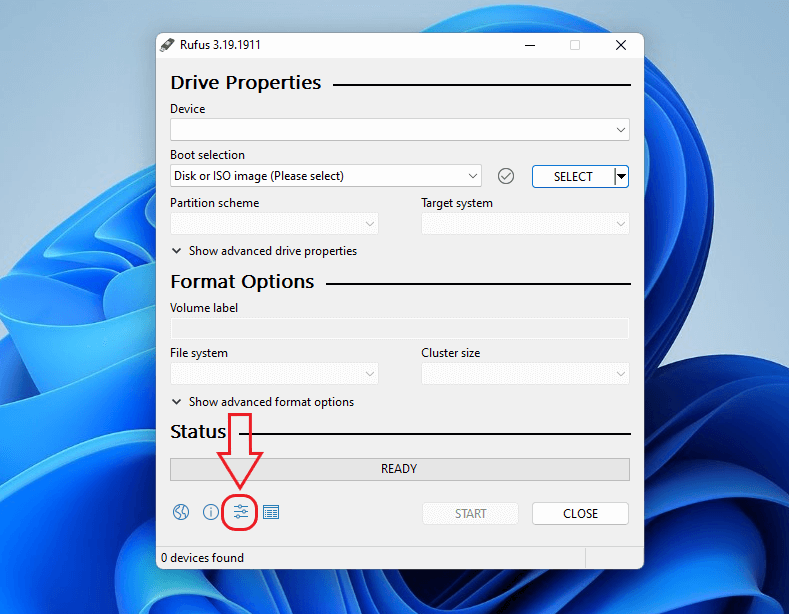
- Set the Check for updates section at Daily (Default) and click Close.
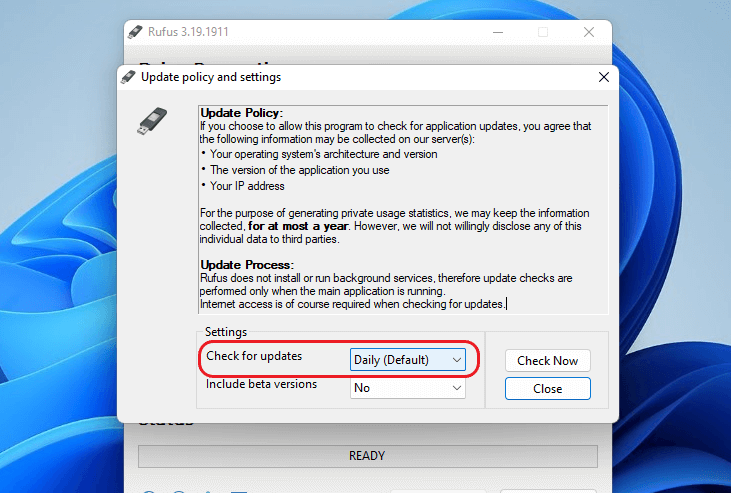
- Close the main windows and relaunch Rufus.
- Select your USB from the drop-down list under the Device section, select the downloaded ISO file from the drop-down menu under the Boot selection section, and click Select.
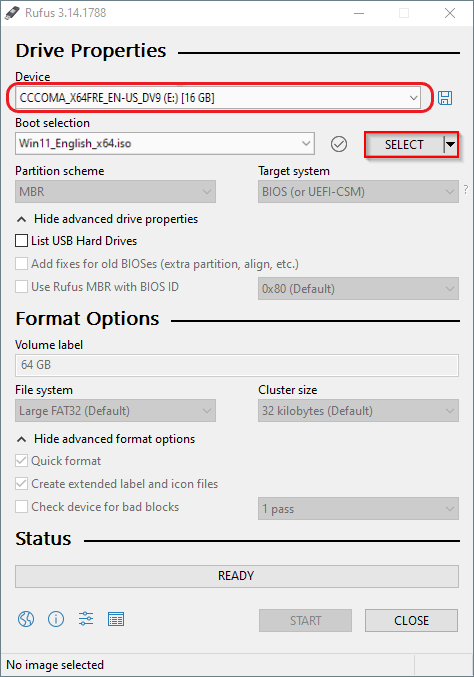
- In the new window, navigate to the location of the Windows 11 ISO file. Select it and click Open.
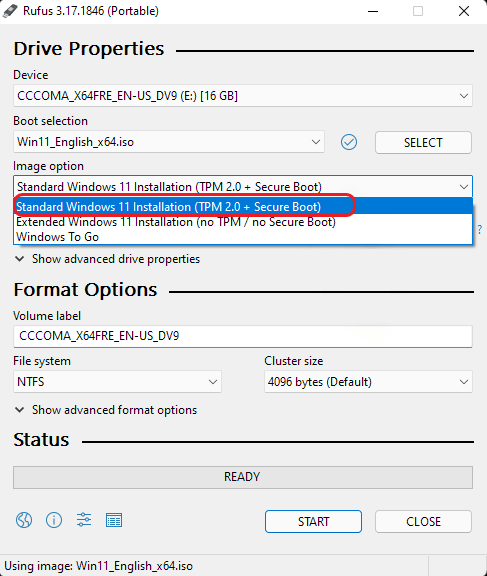
- Select the Standard Windows 11 Installation (TPM 2.0 + Secure Boot) option from the drop-down menu under the Image Options tab.
- Set the partition scheme (GPT) and target system (UEFI) as the default, and enter the name of your USB drive under the volume label tab.
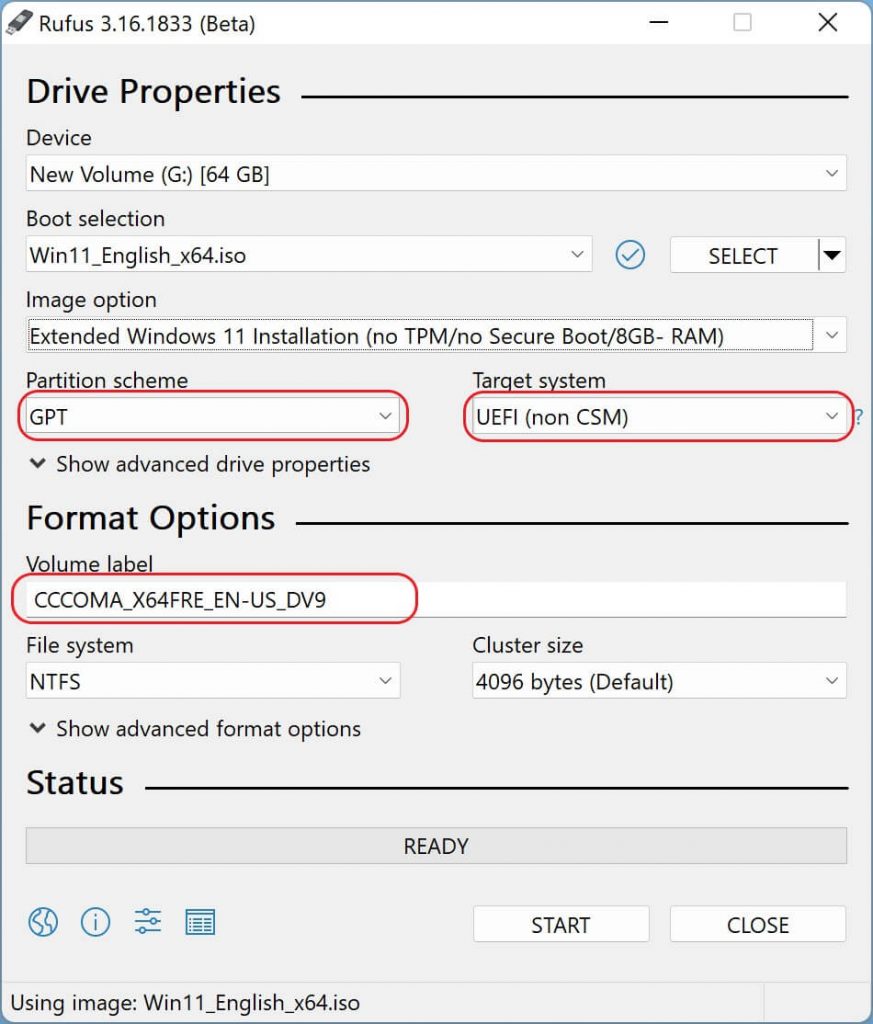
- Set all other options as default. Check the boxes against Quick format and create extended label and icon file options.
- Click the Start button at the bottom-right to initiate the process to create Windows 11 bootable USB.
Scenario 2: To recover data from a non-booting or crashed Windows system
Method 4: Create Bootable Recovery USB with Stellar Data Recovery Professional
If your system encounters a blue screen or becomes unbootable, you may use the bootable USB installation media prepared with the above methods. It may help you boot into your system and run the fixes to restore it to a functional state.
However, if the bootable media doesn't help you resolve issues with your system and you're worried about your data, use Stellar Data Recovery Professional. This easy-to-use yet powerful data recovery software allows you to create and use a bootable media drive with its 'Create Recovery Drive' feature. You can use the feature to build the bootable USB media and boot it into a crashed, non-bootable, or BSoD-affected system to retrieve data efficiently.
Follow the given steps to create a bootable USB media drive for data recovery from unbootable or crashed systems:
- Connect a new or formatted USB drive to a functional PC.
- Download, install, and run Stellar Data Recovery Professional on the system.
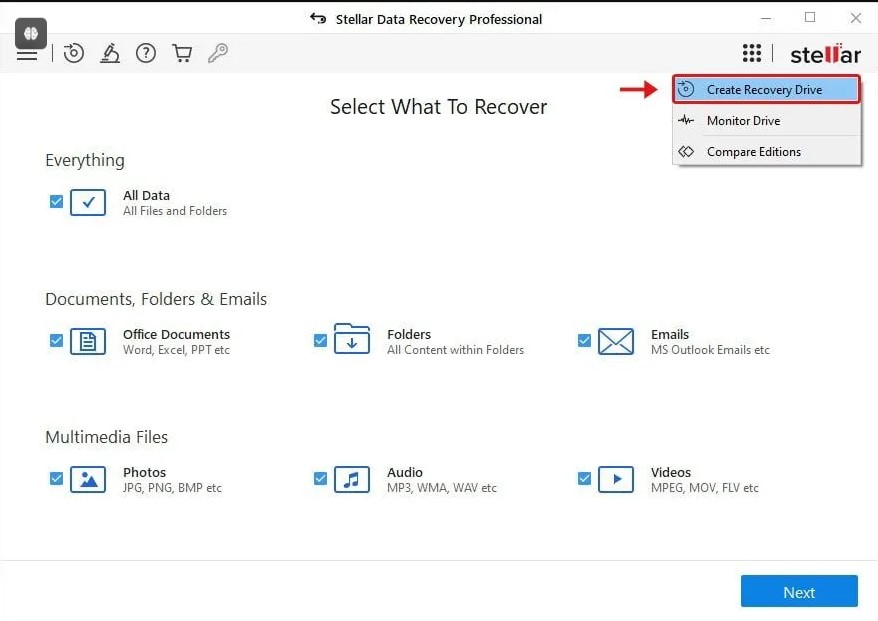
- Click the Waffle icon on the top-right of the 'Select What to Recover' screen.
- Then select 'Create Recovery Drive.
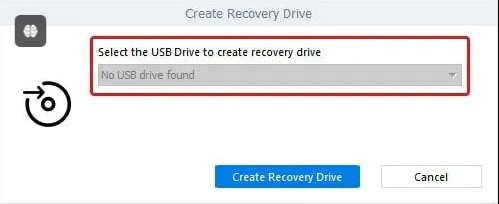
- The 'Create Recovery Drive' dialog box will open. Select the USB drive connected to your system and proceed.
- Once the process is completed, your bootable media drive will be ready.
|
Important Note: The bootable USB recovery media created with Stellar Data Recovery Professional doesn't help fix the unbootable PC. However, it can efficiently recover data from a non-bootable or crashed Windows 10 PC. |
Read More: What should you do if you can't create and activate bootable USB media through Stellar software?
Conclusion:
Creating Windows Bootable USB media is always beneficial, whether you want to install or clean install Windows. It also comes to the rescue when you encounter startup or boot-up errors with your system. It lets you boot into your PC and helps you fix the issues with the system through Windows RE (Recovery Environment).
Further, bootable USB media created with Stellar Data Recovery Professional helps you recover data from non-bootable, crashed, or BSoD-affected Windows PCs.


Tech Enthusiast and Senior Writer at Stellar®
-1843.jpg)
 9 min read


