You have to migrate back to an on-premises Exchange Server from Exchange Online on Microsoft 365 due to various reasons. In this article, we will go through the reasons why you would require such a move. We will also mention the suggested methods which you can use for migrating from Exchange Online to on-premises Exchange Server. We will also be going through the pros and cons of each method.
Why would you Move from Exchange Online to On-premises Exchange?
Let’s take a look at the most obvious and common reasons to migrate from a cloud platform, such as Microsoft 365, back to an on-premises server.
Financial Aspects
One needs to take into consideration the rising cost of cloud hosting and cloud platforms, especially when it comes to adding compliance and security add-ons, such as enterprise solutions and premium features. The company would take the decision of moving from the cloud and host its own servers after a full analysis of the cost and impact on the business, including security and backup. There are some businesses that find the investment in hardware and maintaining their own infrastructure would provide better return on investment.
Data Sovereignty and Regulatory Compliance
There are strict frameworks in place when it comes to specific businesses where they would be restricted from hosting their data outside their premises. One should also take into consideration the regulatory compliances, like GDPR, which require that the data is hosted within the company’s premises.
Further Customization and Integration
Microsoft 365 offers a lot of integrations and customization options but there is a limit, especially size restrictions and integrations with legacy applications and custom transport rule, including API and others.
What are the Methods to Migrate from Exchange Online to On-premises Exchange?
There are three approaches you can take to migrate back to an on-premises Exchange Server. There are two native methods – hybrid migration and export/import, and the other method is to use a specialized Exchange migration tool. Let’s explore these methods.
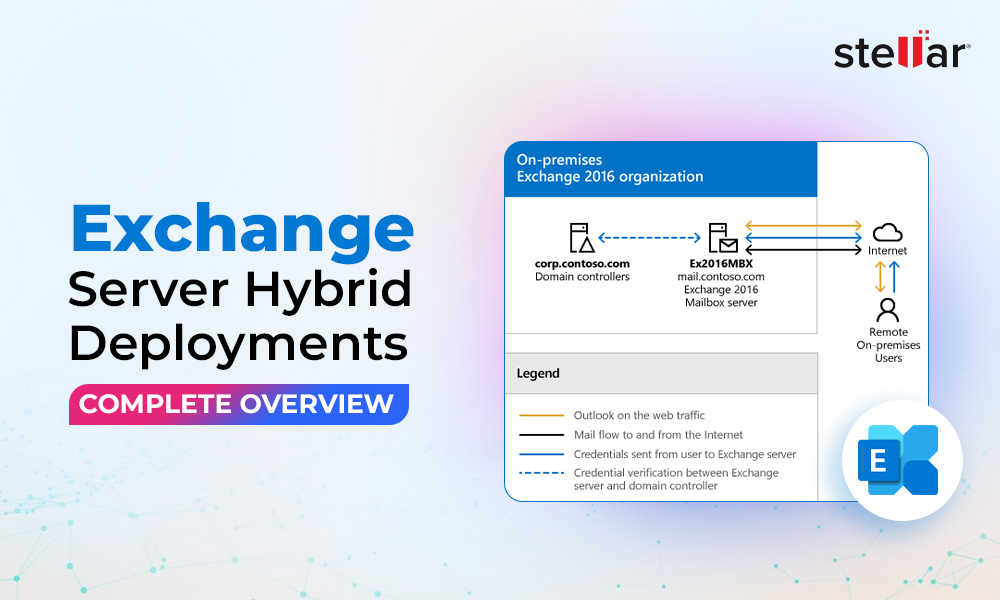
Method 1 - Hybrid Migration
In this method, you need to first install the Exchange Server Subscription Edition (SE) and connect it via federation to Office 365 with the Entra AD Connect and the hybrid configuration wizard. This includes the following steps:
- Installation of the Exchange Server environment and configuration of firewall rules and certificates.
- Installation of Entra ID Connect so that the local Active Directory is synchronized with its counterpart in Azure.
- Configuration of the trust between the two systems by installing the Hybrid Configuration Wizard.
This will setup a connection between the two systems and both Exchange systems will act as one. Before going for full data migration, it is suggested to migrate one mailbox or public folder to test the migration process.
To move a mailbox, you can use the New-MigrationEndpoint and the New-MoveRequest PowerShell commands from the Exchange Management Shell (EMS).
The above commands will create an endpoint to connect to Exchange Online and create a move request of the mailbox from outlook.office365.com to the specific database. This will start the synchronization process of the mailbox. Depending on the size of mailbox, performance of the server, and bandwidth, the process will take some time. The script can be customized to automate the process.
Although this method poses minimal disruption to the user and the business, the setup can get pretty complex and there are multiple point of failures. There are chances of human error when it comes to scripting. You should also note that this method will only be available for mailboxes. In addition, no cross-domain or cross forest migration is available while using this method.
Method 2 – Export and Import Method
This method involves exporting the data from the Exchange Online and manually importing it into the local Exchange Server. This is ideal for migrating small number of mailboxes or limited amount of data. During this process, make sure that the MX and SPF records are pointing to the on-premises Exchange Server and new emails are being delivered to the server.
Next, you need to extract the mailboxes using the Microsoft Purview. You can create a content search for all the items of mailbox. You can then export the items to PST files.
After this, open the Exchange Management Shell (EMS). In this, run the New-MailboxImportRequest PowerShell command, as given below, to import the PST file into the respective mailbox.
It is to be noted that a share, with the Exchange Trusted Subsystem security group having full control, is to be created to read the PST files and the Mailbox Import/Export role must be assigned to the user who will be importing the mailboxes.
After the command is executed, you can use the Get-MailboxImportRequestStatistics to view the status of the import.
Like the above method, you need to consider the chances of human error, when it comes to PowerShell scripting. Moreover, the PST export will be split into multiple files, if the mailbox is large and all the data will be encapsulated into a root folder, called Top of Information Store. In addition, you need to consider the fact that PST files can get easily corrupted. Using Microsoft Purview to export public folders is not currently available. For exporting small public folders, you can use Microsoft Outlook.
An Alternative Method – Use a Specialized Exchange Migration Tool
Both the native methods mentioned above come with a baggage of cons when it comes to data integrity, seamlessness, and ease to perform the process. As an alternative, you can opt for specialized Exchange migration tools. Stellar Migrator for Exchange is the right tool that can help reduces complexity and offers a variety of options for data migration. It can migrate data from a local Exchange Server to another, Exchange Server to Office 365, Office 365 to Office 365, and Office 365 to Exchange Server. It offers mailboxes and public folders migration with cross domain and cross forest migrations.
With this tool, the migration process is simple. The first step is to create a migration job and the path you need to take with the option to map the source to destination. Next is the selection of the date filters, including folder types and specific date ranges.
After this step, you can set the concurrent migration number (10 is the maximum). After this, the process will start with detailed real-time and post migration reports. Stellar Migrator for Exchange renders the process painless and as simple as possible.
Conclusion
There are number of reasons and restrictions you must consider when migrating back to an on-premises server from Exchange Online. The important thing when it comes to regulatory compliance or governance is the data integrity. Data migration can be a daunting task using the native methods and could possibly increase the complexity of the task. To ensure data integrity and simplicity, you can take the help of Stellar Migrator for Exchange – a specialized Exchange migration tool.


 6 min read