


User profiles are often used to store personal data and settings related to a particular user. Roaming profiles is a Windows feature that allows storing the user's profile on network storage or file server rather than the local drive. This helps manage user profiles in a network or virtualized environment.
This allows users to seamlessly access their personalized Desktop settings, documents, files, etc. across any Windows device within the network. However, there are some limitations of Roaming Profiles that can lead to performance issues in Outlook and other Microsoft Office apps. FSLogix helps overcomes these issues.
FSLogix is a set of solutions for managing and optimizing user profiles in virtual desktop environments, such as RDS and AVD. It helps simplify profile management in a virtualized environment by leveraging virtual hard disk (VHD) technology.
The technology was taken over by Microsoft and integrated across various Microsoft products, such as Outlook. It provides a seamless user experience by eliminating common issues associated with roaming profiles in virtualized environments, such as:
- Slow login/logout time
- Profile corruption and damage
- Application compatibility issues
- Oversized or large user profiles/mailboxes
- Poor Office 365 performance
In this article, you will learn the steps to successfully migrate roaming profiles to FSLogix.
Steps to Migrate Roaming Profiles to FSLogix Profiles
To migrate from roaming profiles to FSLogix profiles, follow these steps:
Step 1: Prepare the FSLogix Environment
Deploy the FSLogix environment with the necessary network infrastructure. You also need to create a virtual machine that acts as a file share (fileservers) for user profiles. This step is more important if you want to migrate Roaming Profiles to FSLogix.
NOTES: To learn more, read the Microsoft document - Set up FSLogix profile container with Azure Files and Active Directory Domain Services or Microsoft Entra Domain Services.
Step 2: Install FSLogix Application and Create FSLogix Profile Containers
You need to download, install, and configure the FSLogix application on every client machine. This is important for creating and managing the FSLogix profiles. You also need to create the FSLogix profile containers for each user. For this, you can use the FSLogix agent. These profile containers will store the specific user's profile data and settings.
The steps are as follows:
- Create a remote desktop connection to the virtual machine using the credentials that you set up while creating the virtual machine. Use the remote desktop client and enter the virtual machine IP over port 3389.
- Then, download the FSLogix agent and extract it.
Open the extracted folder and go to
- Win32/Release if you are using a 32-bit OS or machine.
- x64/Release if running 64-bit Windows operating system.
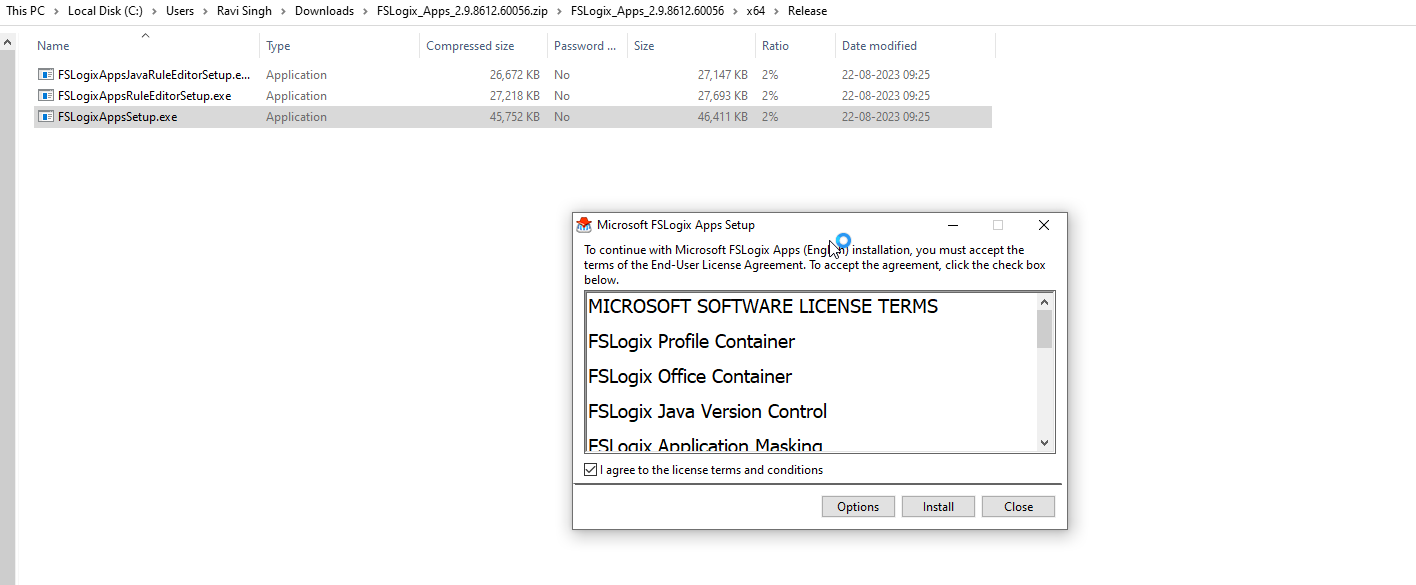
- Find and double-click on FSLogixAppsSetup to install the FSLogix agent. To learn more, you can refer to this documentation on FSLogix installation.
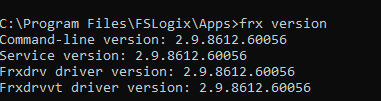
- Then, open the File Explorer on the client machine and navigate to C: > Program Files > FSLogix > Apps. Check and confirm the FSLogix agent is installed successfully.

- You may also use the command prompt and run the following commands to verify the installation.
frx version
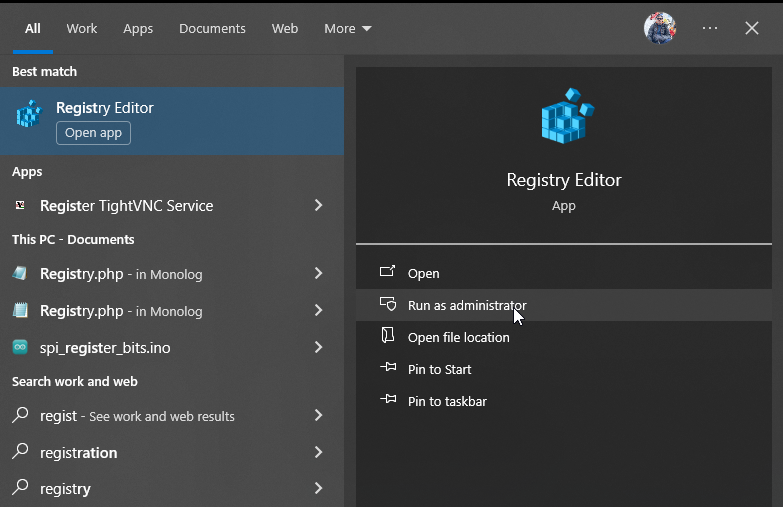
- Press Windows key + S and then search for Registry Editor. Select and click Run as administrator.
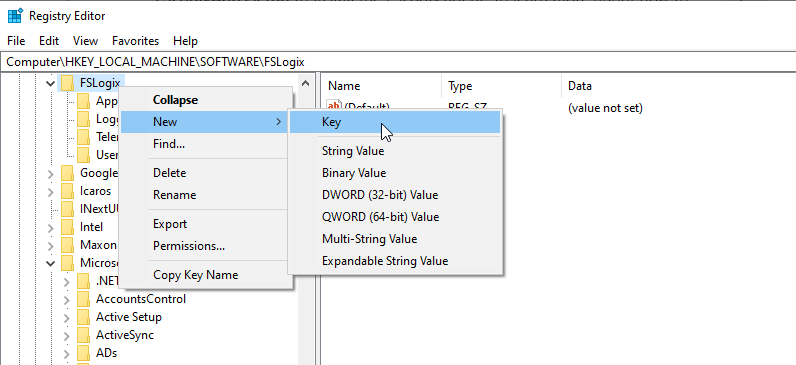
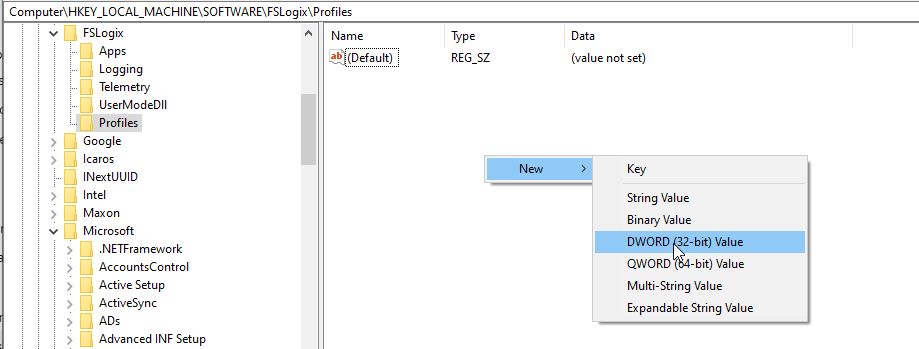
- Right-click on FSLogix and choose New > Key to create a key with the name Profiles.
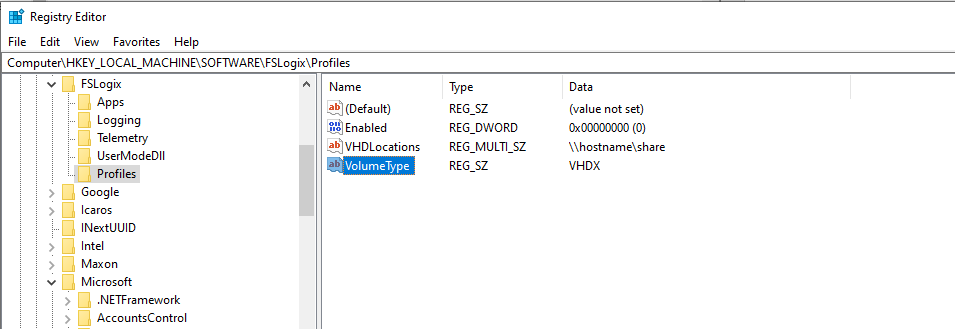
- Now, you need to click on the Profiles key folder in the left pane and then create the following values:
| Name | Type | Data/Value |
|---|---|---|
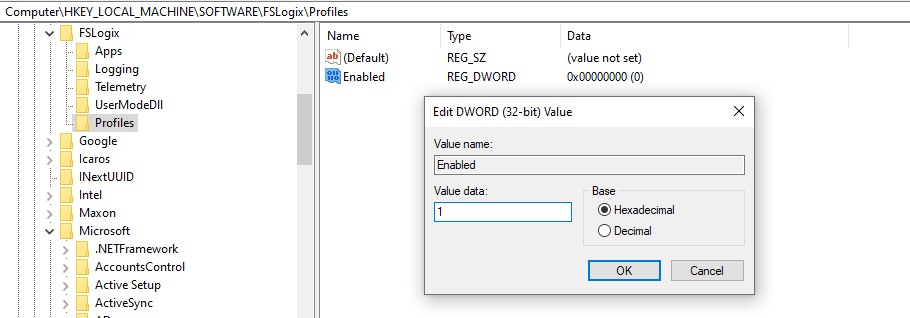
| Enabled | DWORD | 1 |
| VHDLocations | Multi-String Value | \\hostname\share |
- After creating the DWORD value, double-click on it, and edit the value and the name.
- Similarly, create the following value (if using the volume type VHDX and OneDrive Files on Dmand):
| Name | Type | Data/Value |
| VolumeType | String Value | VHDX |
Step 3: Verify the Profile Containers
Post deployment of profile containers, it's important to verify your profile container configuration and keep them consistent and aligned, based on organization's requirements. The steps are as follows:
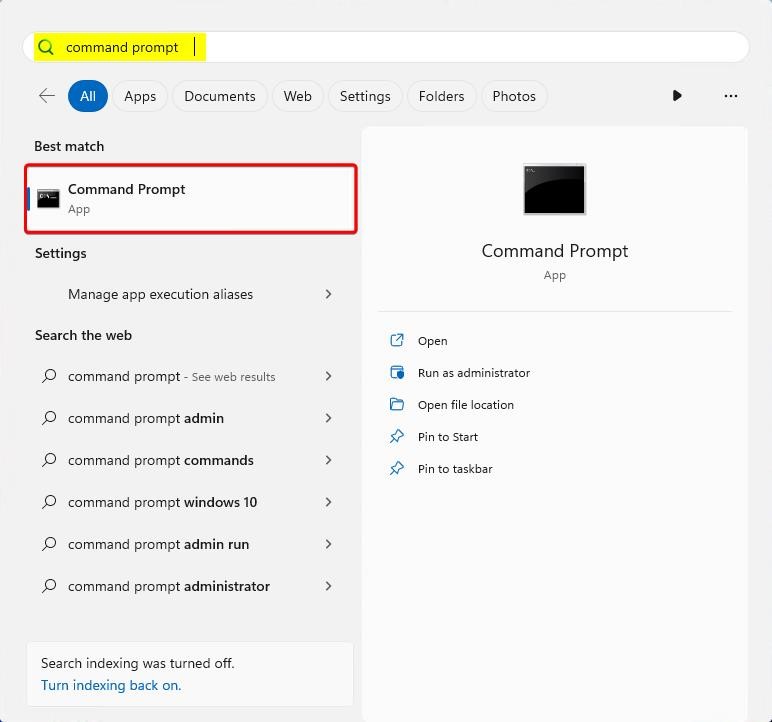
- Sign in as a standard user and click the Start button (Windows icon).
- Search and launch Command Prompt as administrator.
- Use the cd (change directory) command to change the folder path in the command prompt to C:\Program Files\FSLogix\Apps.
- Once you are at the location where FSLogix apps are installed, run the following command:
frx list-redirects
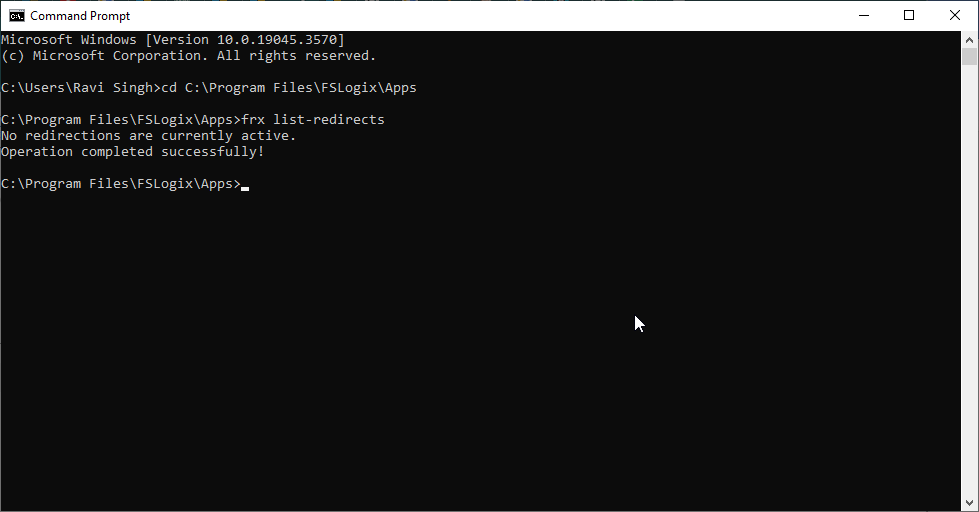
- If you see the above output, the FSLogix is installed successfully and working.
- To find the newly created VHDX container, open File Explorer.
- Then, navigate to the location (VHDLocations) that you set in the registry editor for FSLogix profile containers (see the previous step).
- Double-click the folder for the standard user.
- You should be able to locate and find the newly created VHDX container.
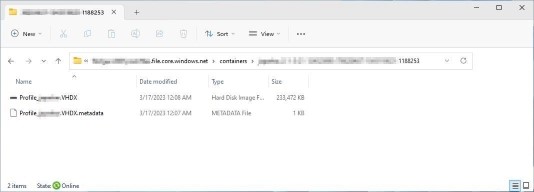
- In case you don't, check the registry key and values. Also, restart the system. If the path to the VHDX is different, make sure to update in the Registry Editor.
Step 4: Copy Roaming Profiles
After creating all three required values in Profiles, you can start migrating the user data from existing roaming profiles to the newly created FSLogix containers. To do this, you can just copy/paste or use the PowerShell scripts to automate the process. This selection depends on your organization's network and security infrastructure and specific requirements.
Below are the steps to use the FSLogixMigrationPrivatePreview migration script to convert multiple user profiles from your existing environment to FSLogix-based profiles at once.
- Download and extract the FSLogixMigrationPrivatePreview zip file.
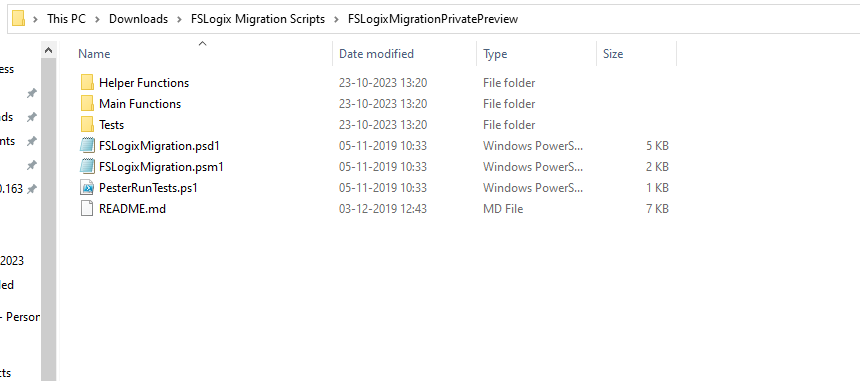
Copy or move the extracted FSLogixMigration folder in the module directory (C:\Program Files\WindowsPowerShell\Modules). - Then, open the PowerShell as administrator and import the module with the following commands:
Get-ExecutionPolicy
Import-Module FSLogixMigration
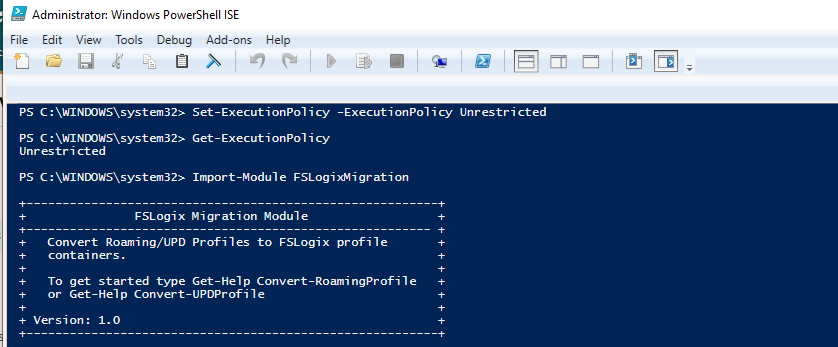
- You will see a welcome message when the module is successfully imported (as shown in the above screenshot).
- Now, you can convert the Roaming Profiles using the following command:

Step 5: Configure, Test, and Validate FSLogix Profile Settings
You can now customize the FSLogix profile settings based on the organization's specific requirements. These include configuring profile size limits, exclusion lists, and other settings. Also, test and validate the functionality of the FSLogix profiles. This will help you ensure that all data and settings are correct as they were and accessible to the users.
How to Troubleshoot Common Issues with Roaming Profile Migration to FSLogix?
The process of migrating Roaming Profiles to FSLogix is complex. Thus, you may encounter issues or errors during the migration process. Below are some common issues and the solutions to overcome them.
- Compatibility Issues - Legacy applications are found to have conflicts and compatibility issues with FSLogix profiles. This can lead to errors and obstruct the migration process. To overcome this, implement application virtualization or use compatibility modes.
- Fragmented Outlook Data Files or Corrupt Profiles - Over time, Roaming Profiles or OST files that store the Outlook profile and mailbox data get too large or oversized and become inconsistent or corrupt. This can lead to consistency issues during the migration process, thus leading to errors. To prevent this, you can use an OST to PST converter software such as Stellar Converter for OST, to extract all the data from the user profile saved in an OST file to PST format. Post-migration, this data can be imported into the Outlook profile on FSLogix using the Outlook import/export wizard.
- Network Bandwidth Limitations - You need decent network bandwidth to transfer the roaming profiles to the FSLogix container. To overcome network issues, you (as an administrator) can schedule migrations in batches and execute them during low-usage periods (late night). Alternatively, you may utilize WAN optimization techniques to optimize network traffic.
Conclusion
By migrating roaming profiles to FSLogix profiles, organizations can get access to numerous benefits that can help them in long term. These include better Office 365 or Office apps (such as Outlook) performance, improved compatibility, and minimal storage requirements.
However, the migration process is complex and requires careful planning for seamless transition. By following the steps shared in this article, you can successfully migrate roaming profiles from an existing virtual environment to FSLogix. We also highlighted the common issues and challenges that you may encounter during the migration process and provided solutions to resolve them.


 9 min read


