


If you have some important lost files from an SSH-enabled Network Attached Storage (NAS) for any reason, which is causing unnecessary delay in your work, you can take the help of an advanced NAS data recovery software. A tool like Stellar Toolkit for Data Recovery can help you easily recover deleted files from a NAS device over the network. In this post, you'll find the various reasons behind data loss in a NAS and see how you can enable SSH protocol on specific NAS devices. You will also get detailed steps to perform data recovery on an SSH-enabled NAS drive.
What are the Reasons for Data Loss in a NAS?
There are several reasons for data loss in an SSH-enabled NAS:
- Accidental file deletion
- Volume formatting
- Forced or incorrect RAID rebuilds
- Abrupt NAS shutdown due to unexpected power outage, system crash, power surges, or overheating
- Defective NAS controller
- Mechanical issue with the member drive/s
- Loose or damaged SATA/cable connections
- Bad sectors on the disk drives
- Corrupted NAS firmware
- Malware/ransomware attacks
Suggested Read: Methods to Avoid Data Loss in NAS
How to Use a NAS File Recovery Software to Recover Data from an SSH-enabled NAS?
The traditional methods of NAS data recovery involve either running complex Linux commands or removing drives from the enclosure and connecting them to another computer in the same order. However, they require a user to be familiar with Linux commands or have technical know-how about handling NAS drives. Hence, they are complex for an average user.
A NAS recovery solution like Stellar Toolkit for Data Recovery doesn't have such requirements. It simplifies the process to recover lost files or folders from an SSH-enabled NAS by establishing a secure connection with the NAS over the same network. No commands or technical expertise required. So, even a person with no prior experience with data recovery can easily recover lost data from a NAS.
The advanced software recovers data of all types – files and folders, media files (audio, video, images, etc.), documents, etc., from Synology, ASUSTOR, and QNAP NAS devices. It can also be used to recover lost or accidentally deleted data from other storage types, like HDDs, SSDs, flash drives, optical media (CDs/DVDs), and more.
In case of an inaccessible or non-booting SSH-enabled NAS, you can easily deploy this NAS data recovery tool on another system and perform data recovery from NAS drives without any challenge.
Now, let's see how this software recovers data from a NAS device in both scenarios.
Scenario 1: Recover Deleted Files from a Booting SSH-enabled NAS
If you have a booting SSH-enabled NAS, use Stellar Toolkit for Data Recovery to recover deleted or lost data from it over the network. Here is what to do:
Step 1: Enable SSH on the NAS Device
SSH is disabled by default on a NAS device. You'll need to first enable it on the storage device to begin recovering data from your NAS using this software.
The location for SSH settings is different for each NAS brand. Follow the steps below:
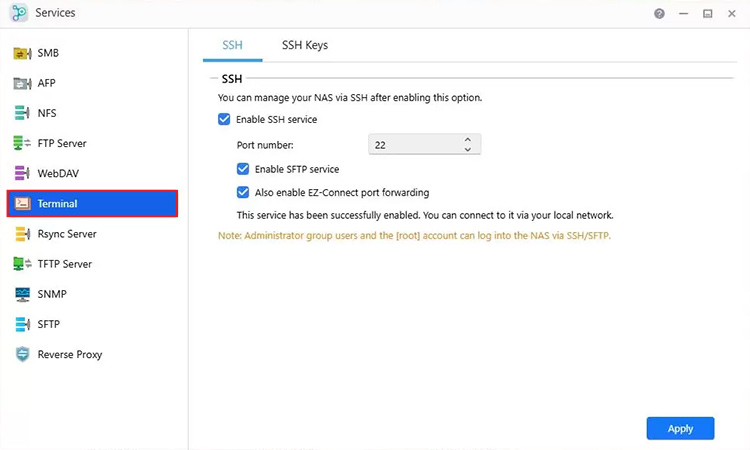
For ASUSTOR NAS Device:
- Log in to the ASUSTOR NAS admin panel from a web browser.
- Click on Services on the home screen.
- In the Services window, click on Terminal in the left pane.
- Select the Enable SSH service option under the SSH tab.
- Click on Apply to save changes.
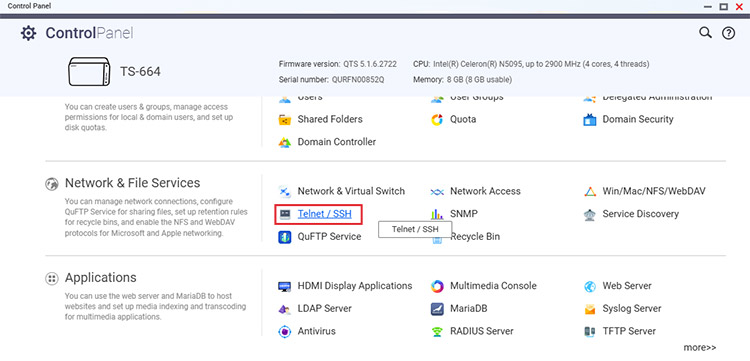
For QNAP NAS:
- Launch a web browser and log in to the QNAP admin panel.
- Go to Control Panel.
- Scroll down to Network & File Services.
- Click on Telnet / SSH.
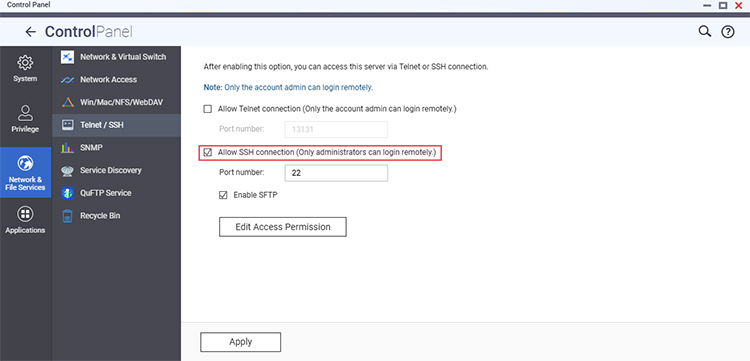
- Select the Allow SSH connections (Only administrators can login remotely) option.
- Next, check the Enable SFTP setting.
- Then, click on Edit Access Permission to add users who can access NAS via SSH.
- Press Apply.
- Again, click on Apply to save changes.
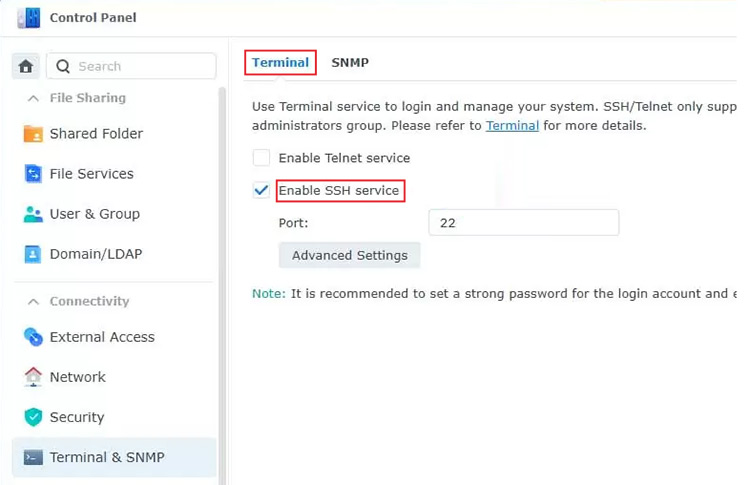
For Synology NAS Device:
- Sign in to your Synology NAS admin panel via a web browser.
- Open Control Panel.
- Click on Terminal & SNMP under Connectivity.
- Check the Enable SSH service option under the Terminal tab.
- Finally, click on Apply.
Step 2: Connect your NAS to Stellar Toolkit for Data Recovery to Recover Files
Now, use the advanced NAS data recovery to scan the SSH-enabled NAS device over the local network. Here is how to use Stellar Toolkit for Data Recovery:
- Download and install Stellar Toolkit for Data Recovery on your system that is connected to your NAS.
- Launch it.
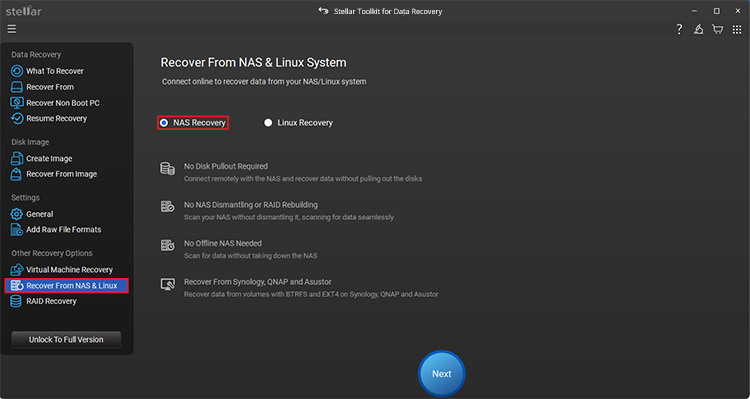
- Select the Recover From NAS & Linux option from the left pane.
- Choose the NAS Recovery option and click Next.
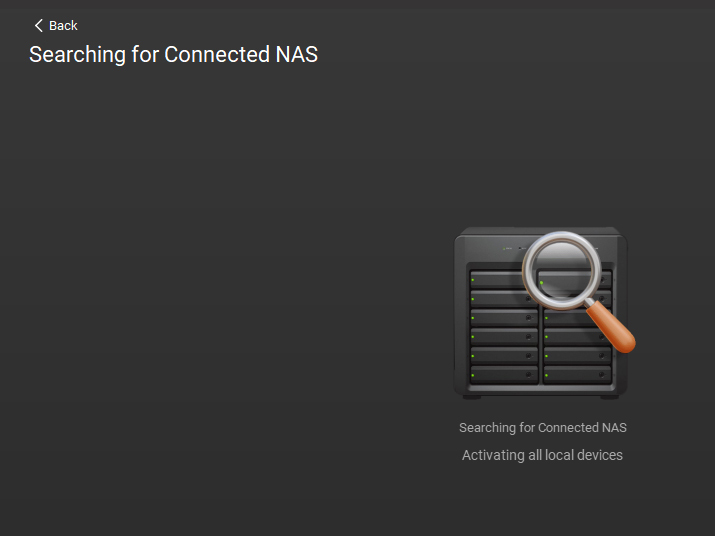
- Wait for the software to search for the available NAS devices on the network.
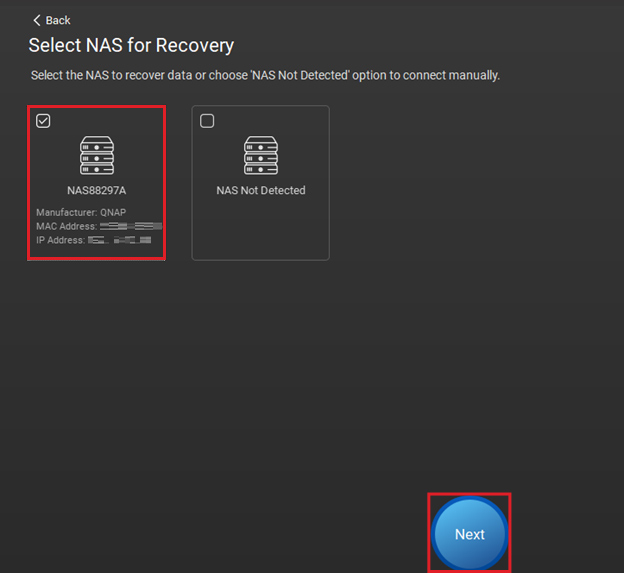
- Select the displayed NAS device and click on Next.
- The Connect NAS Remotely screen will appear. Enter your Username and Password, and click on Connect.

- It will begin connecting to the selected NAS device.
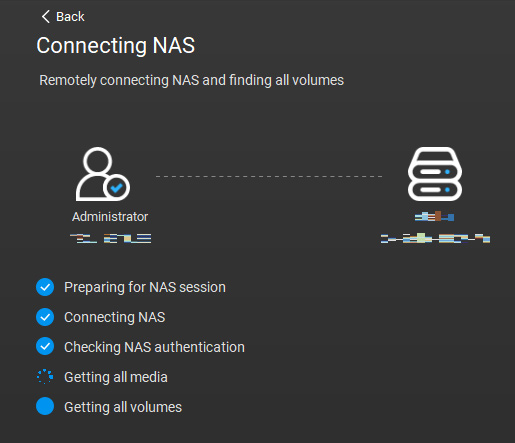
- On the next screen, the software will list all the available volumes in the connected NAS.
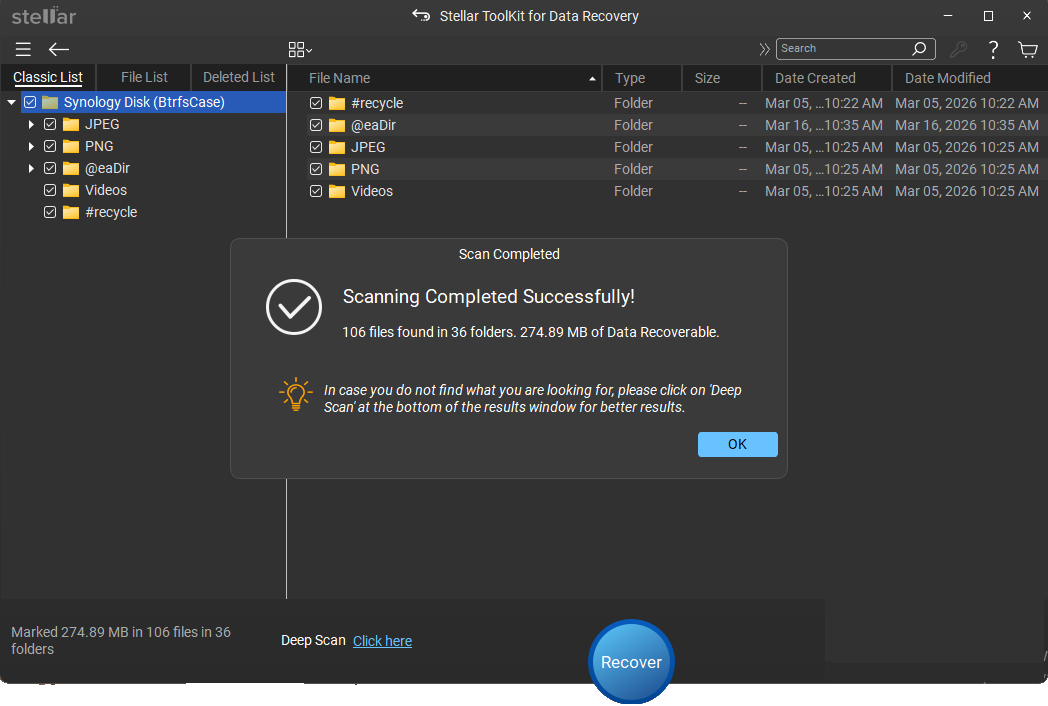
- Select the volume/drive and click on Scan.

- Wait for the software to scan the selected NAS volume. Once the scanning is complete, it will list all the recoverable data and folders in the left pane.
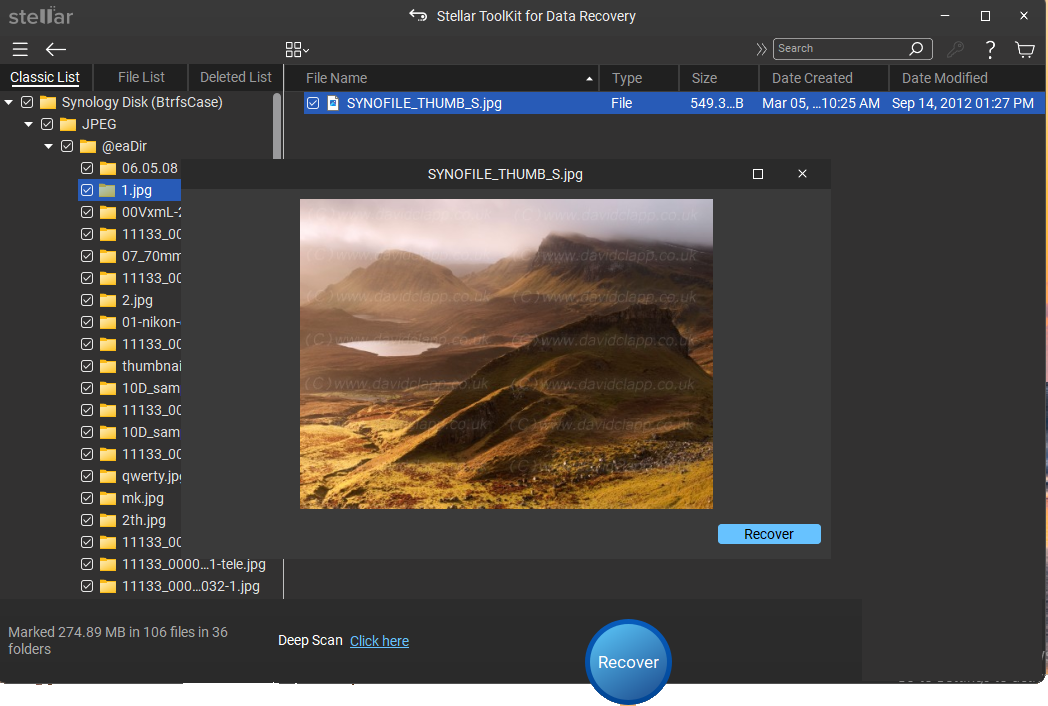
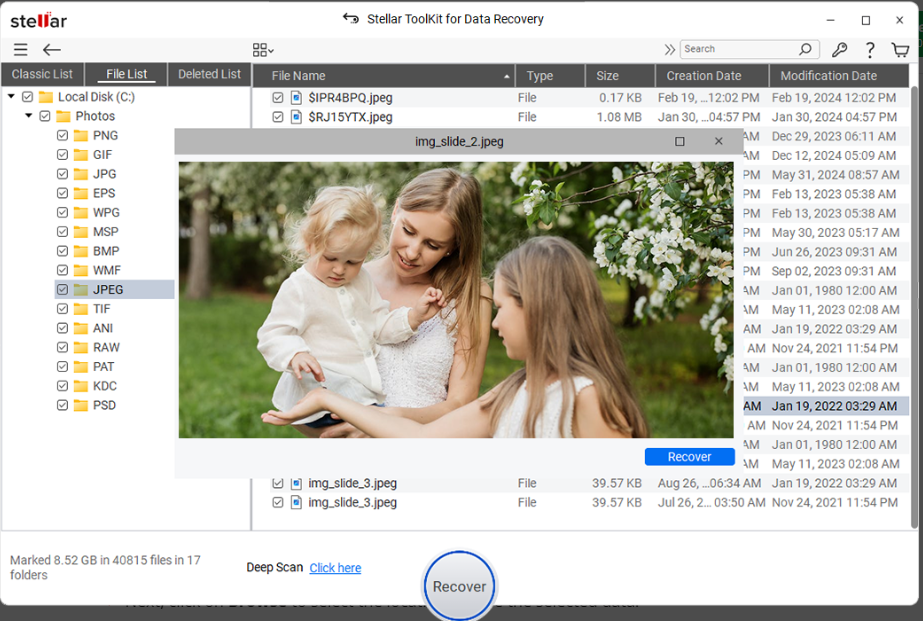
- Now, select any file from the left pane to preview it.
- After you have verified the files, select the ones you want to recover. By default, all files are selected.
- Click on Recover.
- Select the destination path and click on Save.
Scenario 2: Recover Files from a Non-Booting SSH-enabled NAS
If the NAS device is inaccessible or non-booting, then you'll need to disconnect the member drives from the enclosure and connect them to a system via SATA cables. Then, run Stellar Toolkit for Data Recovery to scan the drives for recoverable data. Here's what to do:
Before you proceed
- Power off the NAS until you are ready.
- Label every member drive you disconnect from the enclosure in the correct order.
After doing this, follow the steps below:
- Connect the member drives in the same order to a Windows PC with the help of a RAID controller interface card or SATA cables.
- Now, launch Stellar Toolkit for Data Recovery on the same system.
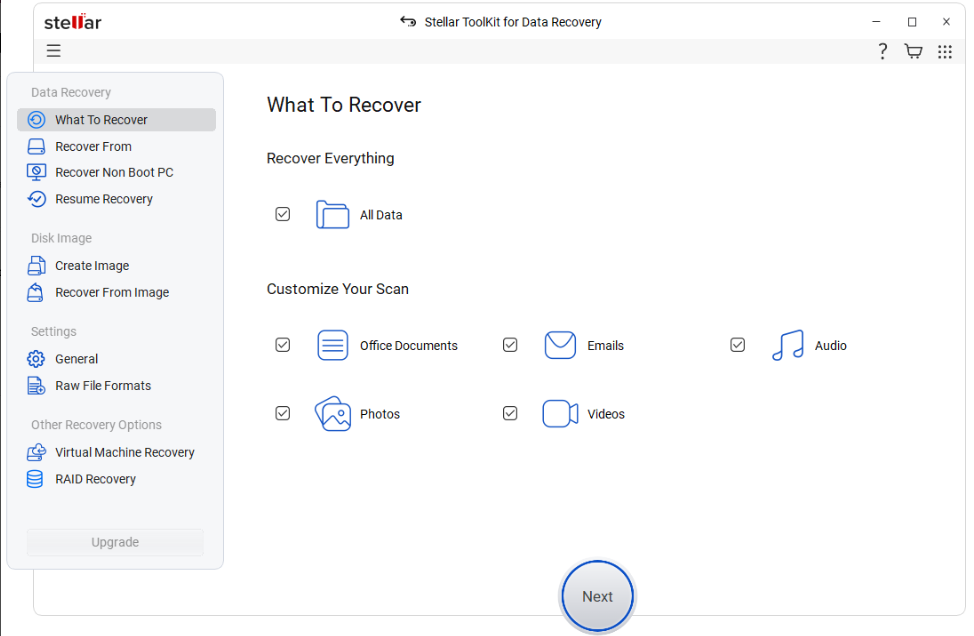
- On the Select What to Recover screen, select the type of data to recover. By default, All Data is selected. Click Next.
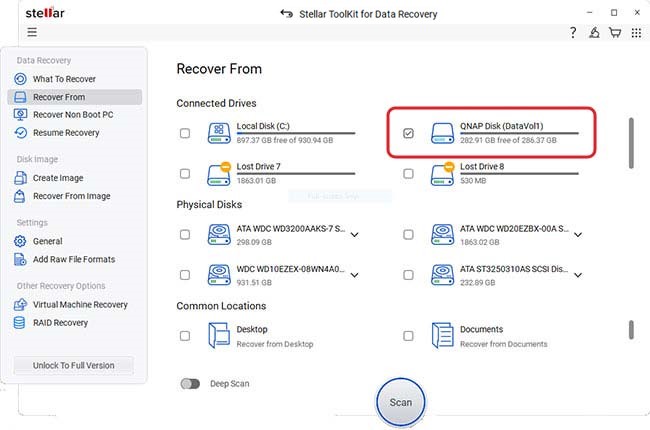
- The Recover From screen will appear. You will see various drives and connected devices.
- Here, the tool will automatically detect the connected drives and display the NAS with its brand name under the Connected Drives section. Click on Scan to proceed.
- The software will scan the connected NAS drives and show the recoverable data.
- After previewing the files, choose the files that you want to recover. Click Recover.
- Next, click on Browse to select the location to save the selected data.
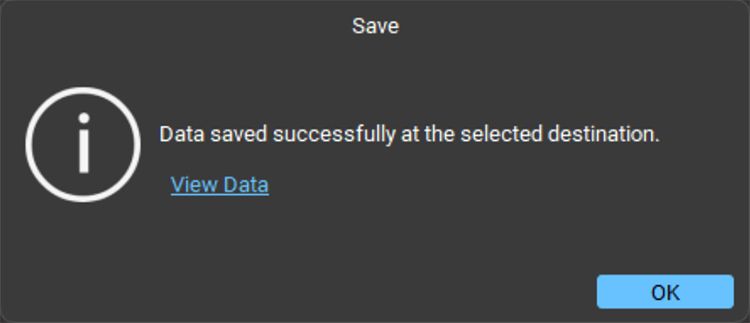
- After selecting the destination, click on Save. The software will start saving the recoverable files at the selected location.
- When finished, it will show the Data saved successfully message.
Conclusion
Conventional ways to recover files from NAS – Linux commands or removing drives – are tricky and require expertise. Moreover, new users may find them difficult to follow. So, if you want to recover files from an SSH-enabled NAS, the best way is to use Stellar Toolkit for Data Recovery – a powerful software that safely recovers data from booting and non-booting (inaccessible) NAS setups without any challenges.
Related Reads
Synology NAS: Data Organization and Recovery
What is RAID and NAS: Key Differences


A passionate writer driven by his interest in everything tech, Keshav Katyal has always been captivated by the latest gadgets since childhood. His interest in technology grew when he got his first gaming console, the Nintendo Game Boy Advanced.


