Data loss happens in a flash. Sometimes, your vital document, video, or photo files may not appear in the Finder window. You may try Finder Search, unhide any hidden Finder items, or look for them in Trash.
Trace Files or Folders Missing from Mac Finder.
1. Can’t Locate a File in Finder?
Need that one excel file urgently that is present in a Finder folder, and you’re bogged down with the sheer volume of items there. Don’t peer at your Finder folder to locate the file. Instead, go for the following fixes:
Fix 1: Search Your File from Finder Search
- In the Finder folder, click the Search box.
- Type the name of the file (or its extension if you can’t remember the name).
- If the file is present in the Finder folder, it’ll show up in the search result.

Fix 2: Search Your File from Spotlight
- Click Command + Space Bar to open Spotlight.
- Type the file name or its extension.
- If the file is present in your Mac, it’ll appear in the Spotlight window

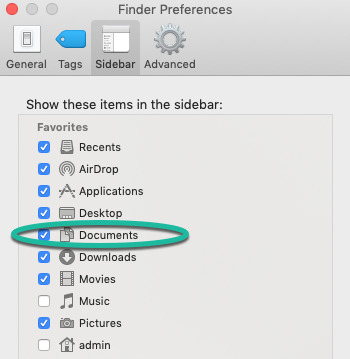
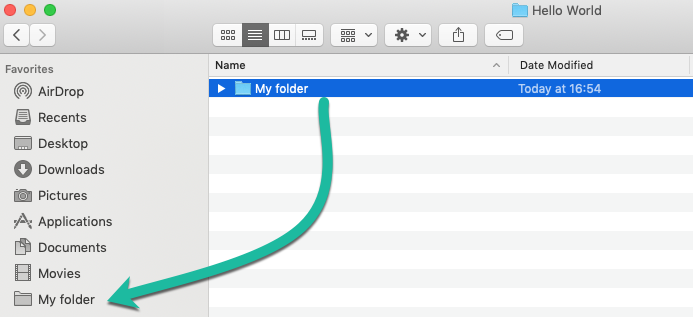
2. Folder Missing from the Mac Finder Sidebar?
You may find a folder missing from your Finder Sidebar. It may be Documents, Applications, or other folders with your valuable files, which you don’t want to lose. Relax; carry out the following fixes:
Fix 1: Select the Folder Checkbox from the Sidebar Preferences
- In the Finder window, go to Menu Bar > Finder > Preferences.
- In the Finder Preferences window, click the Sidebar tab.
- Select the checkbox associated with the missing folder.
Fix 2: Drag and Drop the Folder to the Finder Sidebar from its Stored Location
- Go to the directory where the Finder folder is located (search its location via Spotlight)
- Drag the folder to the desired position of the Finder sidebar.
- Drop the folder when you see a blue insert line.
3. Files Not Appearing in Mac Finder?
In certain cases, the Finder window does not show any files and folders on the right pane. You’re worried as your essential files are lost forever. Calm down; you can try out the following fixes:
Fix 1: Unhide Files on Mac by Using Keyboard ShortcutMake use of the below shortcuts to allow Mac Finder to show hidden files.
- To unhide any hidden items, press Shift + Command + Period keys on the keyboard.
- Use the shortcut as a toggle switch—press them again to hide the files.
- Open Terminal from Finder > Applications > Utilities.
- On the Terminal window, type defaults write com.apple.finder AppleShowAllFiles Yes. Then hit Return.
- To relaunch Finder, type killall Finder. Then hit Return. Alternatively, hold the Option key, right-click the Finder icon from Dock, and then select Relaunch.

Note: Prior macOS High Sierra, use True instead of Yes in the above command line.
Fix 3: Also, Check Your Trash
- Double-click the Trash icon from Dock.
- Find your missing file from the search box.
- Select the file, right-click, and then choose Put Back. Or else, drag and drop the file to Desktop or the required location in Finder.
4. Files Deleted Permanently from Mac Finder?
Sometimes, to free up Mac storage space, you may end up deleting important files through Finder, and also empty the Trash to worsen the situation. Don’t panic, if you’ve the backup of your Mac
Fix 1: Restore Files on Mac by Using Time Machine
- Plug in your Time Machine backup drive, then go to Menu Bar > Time Machine > Enter Time Machine to open Time Machine app.
- Click the up arrow to go past the time when the Finder files were present.
- Select any file, then press Space Bar to preview it. Click Restore to get back the Finder files.
Recovering lost files on macOS is possible even without a Time Machine backup. Here’s how:
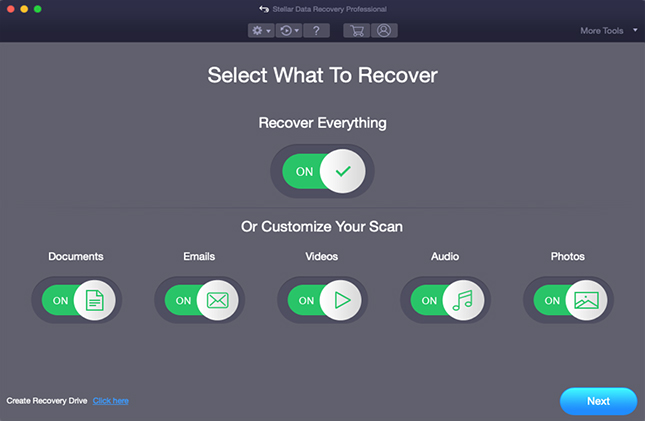
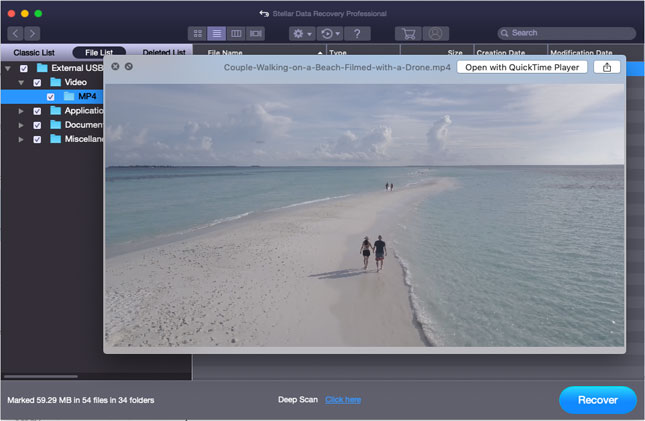
Fix 2: Recover Files on Mac by Using Data Recovery Software
i) Download and install the *free trial of Stellar Data Recovery Professional on your Mac.
ii) Launch the software to interact with its intuitive interface.
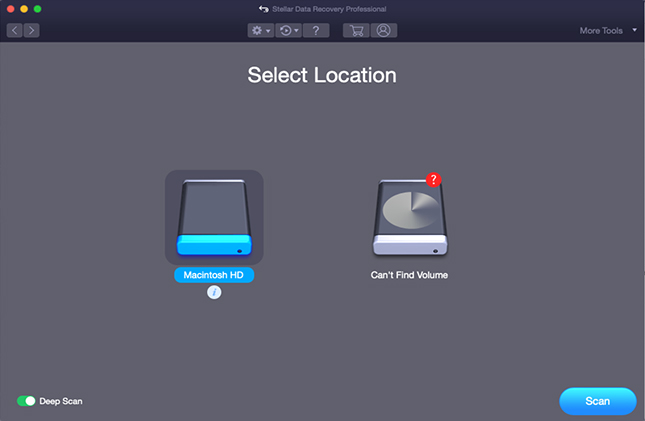
iii) Execute the following 3-step recovery process:
- Select the types of file and location of the drive wherein data loss occurred.
- Scan the selected drive by using Deep Scan then preview the scanned files.
- Recover the scanned files to a different drive location and view to verify.
*Free trial of Stellar Data Recovery Professional is for you if you wish to assess the software by scanning your Mac and previewing the scanned Finder items. The trial software can save the recovered files after activation.
Read More: How to Activate Stellar Data Recovery Professional for Mac?
Why Activate?
- Recover unlimited number of files and their types
- 24 x 5 Free Technical Support
- Add-on Drive Monitor for monitoring Macintosh HD
Conclusion
This article shared a variety of methods to trace and recover missing files and folders from Finder on macOS. Search your Finder files quickly by using Finder Search or Spotlight. Select any unchecked Finder menu items from Finder Preferences for Sidebar. And unhide any hidden Finder data by pressing the Command, Shift, and . (dot or period) keys from your keyboard.
In case you’d deleted your files from Finder, then look for them in Trash. If Trash is empty or does not contain the missing file, then use Time Machine to restore the Finder deleted files. In the absence of backup, the best fix is to use a data recovery software for Mac.
For complete security, easy-to-use interface, and advanced data recovery features, Stellar Data Recovery Professional for Mac can be your first choice. Download the free trial of the software to give it a try. Ensure you could find what you are looking for by using this tool. And once satisfied with the scan result and preview, activate it to unlock all the advanced features.
By using the activated software, you can recover your lost Finder data and live-monitor the temperature, health, and performance of the connected storage drive.


A passionate writer driven by his interest in everything tech, Keshav Katyal has always been captivated by the latest gadgets since childhood. His interest in technology grew when he got his first gaming console, the Nintendo Game Boy Advanced.

 10 min read
-1920.jpg)