Apple’s T2 Security Chip (introduced in iMac Pro in 2017) changed how recent Macs handle data: essentially every MacBook Pro or Air from 2018–2020, plus later iMacs and Mac minis, ships with a built-in encryption engine. This means your files live behind a hardware “vault.” On the plus side, all data on a T2-based Mac is encrypted by default (even with FileVault off). That’s great for security, but it also means data recovery is far more complex when things go wrong. Imagine losing a USB key – you can replace it. Lose the T2 or the logic board? Your data often stays locked away for good.
Apple’s T2 chip is essentially a mini computer on the logic board. It handles secure boot and on-the-fly AES encryption for the SSD, among other tasks. When you save a file, the T2 generates hardware keys to encrypt it automatically, storing those keys inside its secure enclave. Those keys are unique to that exact Mac and are never exposed to the operating system or user software. In practice, this means you never have to “turn on” encryption… it’s always on. However, it also means traditional recovery tricks no longer work. The T2 won’t even let you bypass it by booting from an unauthorized drive, thanks to secure-boot policies.
Common Data Loss Scenarios in T2 Macs
Losing data can happen for many reasons, but the T2 chip affects each differently:
- Hardware/SSD failure: If the SSD controller or T2 itself fails (e.g. liquid damage, burnt board), recovery is usually impossible. You cannot recover your data without those original keys on the T2 chip.
- Software/OS issues: If there are no hardware issues, and your Mac is simply crashing or rebooting, you can use the recovery mode to recover your files, reinstall macOS (without erasing), or try the Target Disk Mode. Since the hardware is intact, a working T2 still decrypts data during recovery.
- Accidental deletion: Deleting files on a T2 Mac works the same as on any Mac… the only catch is that the deleted data is heavily encrypted in nature. A good Mac recovery software can still find and restore these files but as long as you run it before data gets overwritten.
- Forgotten passwords or locks: The T2 chip also handles Activation Lock (tying the Mac to an Apple ID). Losing your login or recovery key on a locked machine often means you simply can’t get back in… effectively rendering the machine (and your files) useless without Apple’s intervention.
- No Backups: With T2 Macs, not having a backup is especially risky. Apple itself warns: if you forget passwords or keys and lack a backup, “your files and settings will be lost forever”.
Why Recovery is Hard on T2 Macs?
Because of the T2’s design, losing data on a T2 Mac can be brutal if there’s hardware damage. Apple’s own tech community notes: “If the T2 firmware is corrupted or the Logic Board is bad, then there is no way to recover the data since the data is encrypted by the hardware that is controlled by the T2 chip.” In other words, if the T2 or board “fried,” your files are effectively locked away forever. Even cloning the drive or plugging it into another machine won’t help… the keys are bound to the original chip. But there is a catch to it - Target Disk Mode.
Use Target Disk Mode to Access Files from a T2 Mac
When a T2 Mac won’t boot up but the hardware is still functioning, Target Disk Mode becomes your golden bridge to retrieve precious files. It essentially lets one Mac act as an external hard drive for another. As long as the T2 chip and logic board are intact, you can use this method to access the internal drive via another Mac… with encryption handled automatically during transfer.
- Connect the two Macs using a compatible USB, USB-C, or Thunderbolt cable. If either Mac is running macOS 11 or later, you must use a Thunderbolt cable.
- Put the source Mac into Target Disk Mode (this is the one you’re recovering data from):
- If it’s powered off, start it while holding the T key.
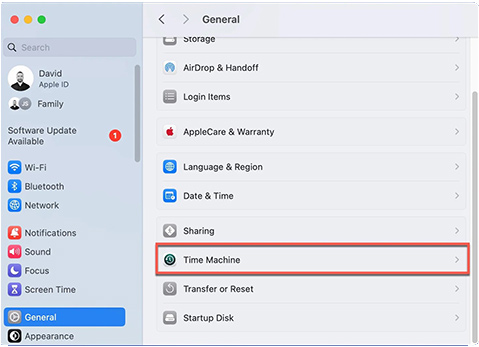
- If it’s powered on, go to Apple menu > System Settings > General > Startup Disk, then click Restart in Target Disk Mode.
- Wait for the disk icon from the source Mac to appear on the desktop of the second Mac. This means Target Disk Mode has successfully mounted the drive.
- Open

- Transfer files by dragging them to a safe location on the working Mac, preferably an external drive if you’re planning further recovery or scanning.
- Eject the disk: Control-click the mounted volume in Finder and choose Eject [volume name].
- Shut down the source Mac by pressing the power button, then disconnect the cable.
How to Mitigate T2 Data Loss Issues
The best solution to any data loss problem is prevention and good habits:
- Back up religiously. Time Machine, iCloud, or other backup services are your safest bet on a T2 Mac. If the internal drive fails, a backup on an external drive or cloud can save you.
- Use secure boot settings carefully. In System Preferences > Security, you can allow booting from external media. Enabling this may give you more recovery options later (at the cost of a tiny bit of extra risk).
- Keep macOS updated. Apple sometimes releases fixes for T2 reliability issues. Ensuring your firmware and OS are current can prevent odd corruption that might lock you out.
- Recover to a separate disk. Whenever you attempt a recovery scan or copy, write the recovered files to an external drive, never back onto the same T2 drive. This avoids overwriting data you still need.
One helpful tool for T2 Macs is using Target Disk Mode – it leverages the T2 chip itself to decrypt data. Some users also ask Apple Store or tech support to “revive” or “restore” a T2 firmware (via Apple Configurator), which can fix a misbehaving chip – but beware: the “restore” option will wipe the SSD completely. Always treat these extreme measures as last resorts.
DIY Recovery Steps on a T2 Mac
If you lose data on a T2-powered Mac:
- Check for Backups: First, restore from Time Machine or iCloud if possible. Time Machine works normally on T2 Macs (it simply stores encrypted copies of your files). If you have a recent backup, recovery is straightforward and bypasses the T2 entirely.
- Safe/Recovery Boot:
- Professional Data Recovery: If none of the above works (especially if the T2 or SSD is damaged), your last resort is a data recovery lab. Warning: most labs will tell you upfront that T2 encryption makes recovery unlikely. Apple even recommends services like DriveSavers or Stellar Data Recovery lab, but notes that “in many situations … it is impossible to recover data from a T2 Mac” because it “requires the logic board to be functional”. In short, if the hardware has failed, labs may not succeed. Labs struggle not only because of encryption itself, but because the T2 chip keeps the keys locked inside the chip and in case the logic board or T2 fails altogether, those keys are gone, and no lab can brute-force or reconstruct them.
DIY Mac File Recovery Software
Fortunately, modern data recovery programs can handle T2/M1 Macs and APFS. An efficient and advanced Mac Data Recovery tool can let you scan the drive, preview what’s recoverable, and then recover it… all on your own computer. The ideal ones offer a free trial: you install the software, let it scan your T2 Mac’s drive, and it will display a list of found files (photos, documents, etc.) without costing you a dime. Once you see your files, you can decide whether to purchase the full version to save them.
This approach is very user-friendly – no need to physically remove the drive or send it to a lab. The software handles the encryption in the background, scanning for lost APFS data while you simply click through a wizard interface. However, as the software leverages T2 chip’s decryption in real time, the prerequisite for this process to work is that the logic board should be intact and MacOS should be working.
In short, you are getting an easy-to-use solution that supports T2 encryption and allows you to verify this recovery success before even spending a single penny. A web search will point you to such a tool but make sure that it's compatible with the latest macOS, APFS, and Apple’s security chips, such as Stellar Data Recovery for Mac.
How to Avoid Getting Locked Out (Prevention Tips)
Since prevention beats recovery every single time, here are essential steps every T2 Mac user should implement to avoid finding themselves in a data recovery nightmare:
- Set Up Multiple Backup Systems: Don't rely on just one backup method at all. Configure Time Machine for automatic daily backups, enable iCloud Drive sync for your Documents and Desktop folders and go ahead for a third-party cloud service like Dropbox or Google Drive.
- Enable FileVault with Secure Recovery Keys: While T2 Macs encrypt data automatically, enabling FileVault adds an extra security layer. More importantly, store your FileVault recovery key somewhere safe but separate from your Mac. Write it down and keep it in a secure location… not on the same desk as your computer.
- Configure External Boot Options Safely: Access Startup Security Utility (⌘-R at boot) and allow booting from external media. For Apple Silicon Macs, go to Recovery > Utilities > Startup Options. This gives you more recovery options if your main drive fails. Just remember this setting requires administrator authentication, so don't wait until disaster strikes to enable it. You can always disable it later for maximum security.
- Monitor SSD Health Regularly: Check your drive's health using Stellar’s Drive Monitor. T2 chips can't prevent hardware failures, and early warning signs can help you backup important data before complete failure occurs. Replace drives showing early warning signs rather than waiting for catastrophic failure.
- Practice Good Digital Hygiene: Keep macOS updated to patch T2 firmware bugs, avoid force shutdowns which can corrupt encryption keys, use surge protectors to prevent electrical damage, and never ignore system warnings about drive health or encryption issues.
- Test Your Recovery Plan: Regularly verify that your backups work by trying to restore a few files. Test Target Disk Mode with another Mac if available.
Knowing your recovery options work before you need them eliminates the panic factor when real problems occur.
Conclusion
Apple’s T2 chip is like a double-edged sword for Mac users: it quietly encrypts your drive in hardware to guard against attackers. In practice, losing the T2 or its board can mean losing your data. The key is to treat a T2 Mac with caution: always back up your data, and if you do lose files, try recovery steps quickly while the Mac still works. If the chip and board are intact, you can try the above methods. But if the hardware has failed, even professionals admit the task is nearly impossible.
With that said, you don’t have to panic. In many cases, you can save yourself with a good DIY recovery tool and regular backups. And next time, you hear “T2,” just remember: it keeps your Mac locked up tight… for better and for worse. Always have a current backup, and when you need to retrieve lost files, let the right software do the work.


Pallavi is a literature graduate turned content strategist, specializing in data recovery. She creates insightful, user-friendly content to help people rescue their data from hard drives, SSDs, memory cards, and more. When she’s not decoding tech for everyday users, she’s curled up with a book - or secretly planning her next adventure.
 10 min read
-1920.jpg)