Transferring large volumes of data across different platforms can get tricky, especially if you’re moving it from a PC to a Mac. For this, first you’d have to make sure that your Mac and PC are on the same network. Secondly, you will have to establish a connection between both the computers, configure the sharing options, and change file permissions to make the process even easier.
Sounds too complicated, right? Well, do not worry, we’re here to simplify it for you. If you’re someone who wants to switch over from a PC to a Mac, or simply need to transfer files between computers this guide is for you. We will introduce you to all the probable methods to simplify the process, so stick around till the end.
Preparing for a Seamless Transfer: The Do's and Don'ts
Even before you begin and migrate data from your PC to Mac, you need to perform some preparatory steps:
- Make sure your Windows PC and Mac are both updated with the most current software.
- Connect both the systems to the same network and ensure that the connection is secure. Alternatively, you can even use an Ethernet cord and connect them directly.
- Close all the unnecessary programs on your computer, and turn off any antivirus, firewalls, or VPN so that they cannot disrupt the transferring process.
- Ensure your Mac has sufficient storage capacity to hold data that is being transferred.
How to Transfer Files from Windows to Mac?
There are a lot of ways to transfer files from PC to Mac. Nevertheless, you have to select one that suits the type and the size of the files that you are going to transfer. If you are ready to transfer all of your PCs data, Apples Migration Assistant would be the ideal tool to utilize in order to accomplish this. Furthermore, Mac and Windows both support built-in file transfer tools to enable you to transfer files directly from the offered folders.
If you just have to send small files, email would be the most convenient, and large files can be sent easily through cloud storage providers. External storage media, such as portable HDDS, and SSDs can be utilized as well, but make sure that they are formatted beforehand.
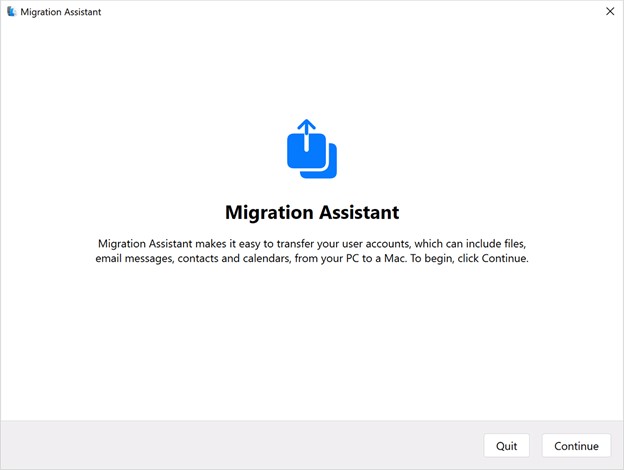
Method 1: Transfer Files with Migration Assistant
Migration Assistant is a built-in utility on Mac, through which you can migrate files, emails, user accounts and system settings from one machine to another. To migrate data, you need to install Windows Migration Assistant 3 (for macOS Sonoma 14.3.4 or later) on your Windows PC and have both your computers connected to the same network.
Note: Migration Assistant allows you to transfer files from Windows to Mac but not vice versa
Here's the full breakdown:
Step 1: Launch Migration assistant on both computers.
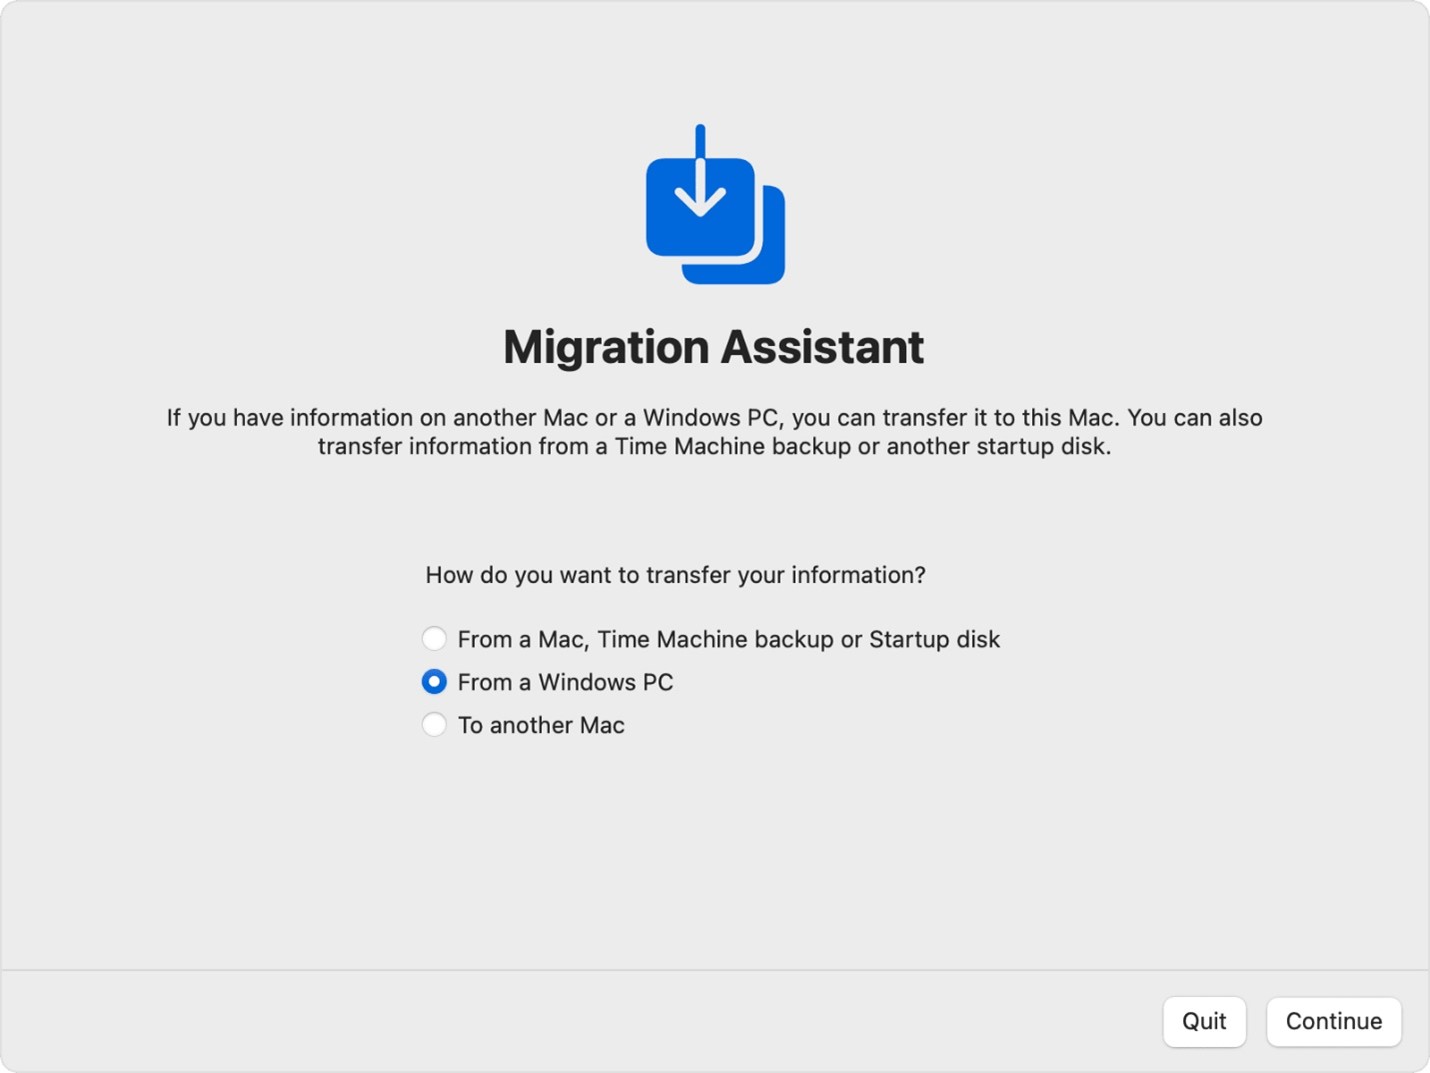
Step 2: On your Mac, follow the on-screen instructions until you are asked to select how you'd like to import your information. Select From a Windows PC and click Continue.
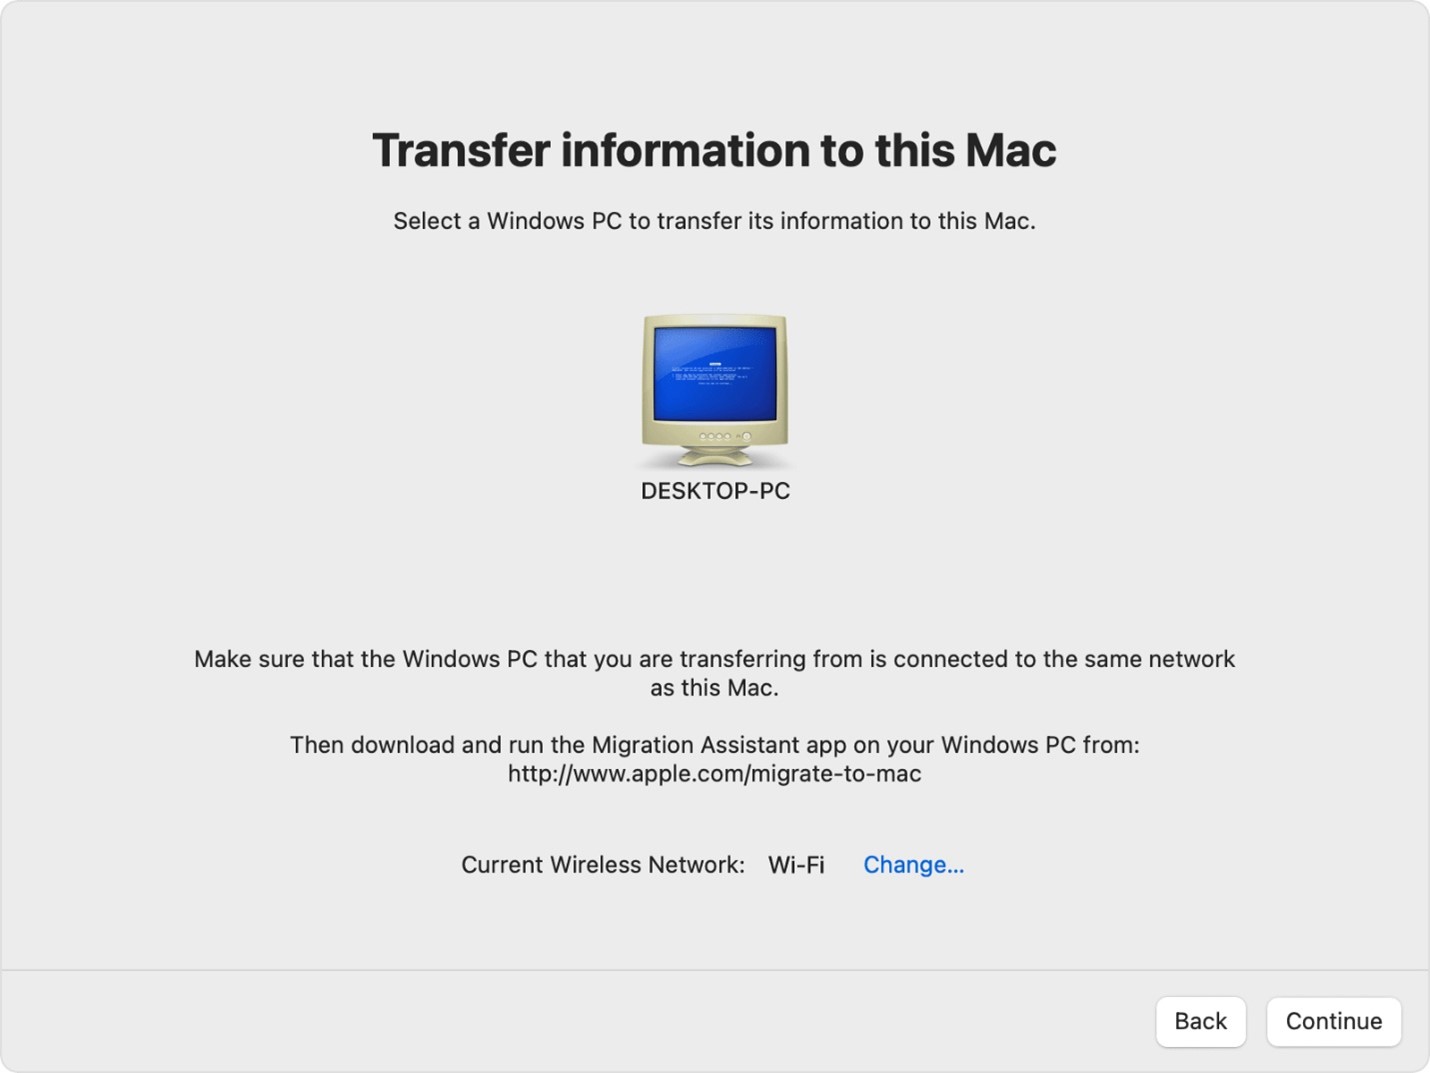
Step 3: On your Mac, select the icon of your PC and click on Continue.
Step 4: On the Windows machine, follow the instructions on the screen until you are prompted to enter the code displayed on the Mac.
Step 5: After entering the code, the two devices will be paired.

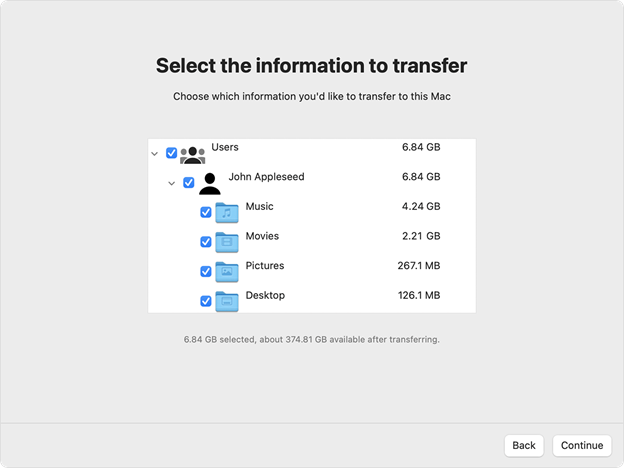
Step 6: Now, select all the file types you want to transfer and click on Continue.
Step 7: After the transfer is completed, close migration assistant on both the computers. Now you can log into your Mac and verify whether the transfer is successfully completed.
Method 2: Transfer Files by Using File Sharing
Another way to transfer files between a Mac and a PC or vice versa is through the built-in File Sharing of each computer. This also means networking each computer. This is how to do it:
Step 1: Open System Settings on your Mac and go to General > Sharing.
Step 2: Switch on the File Sharing feature and then press on the (i) icon next to it.
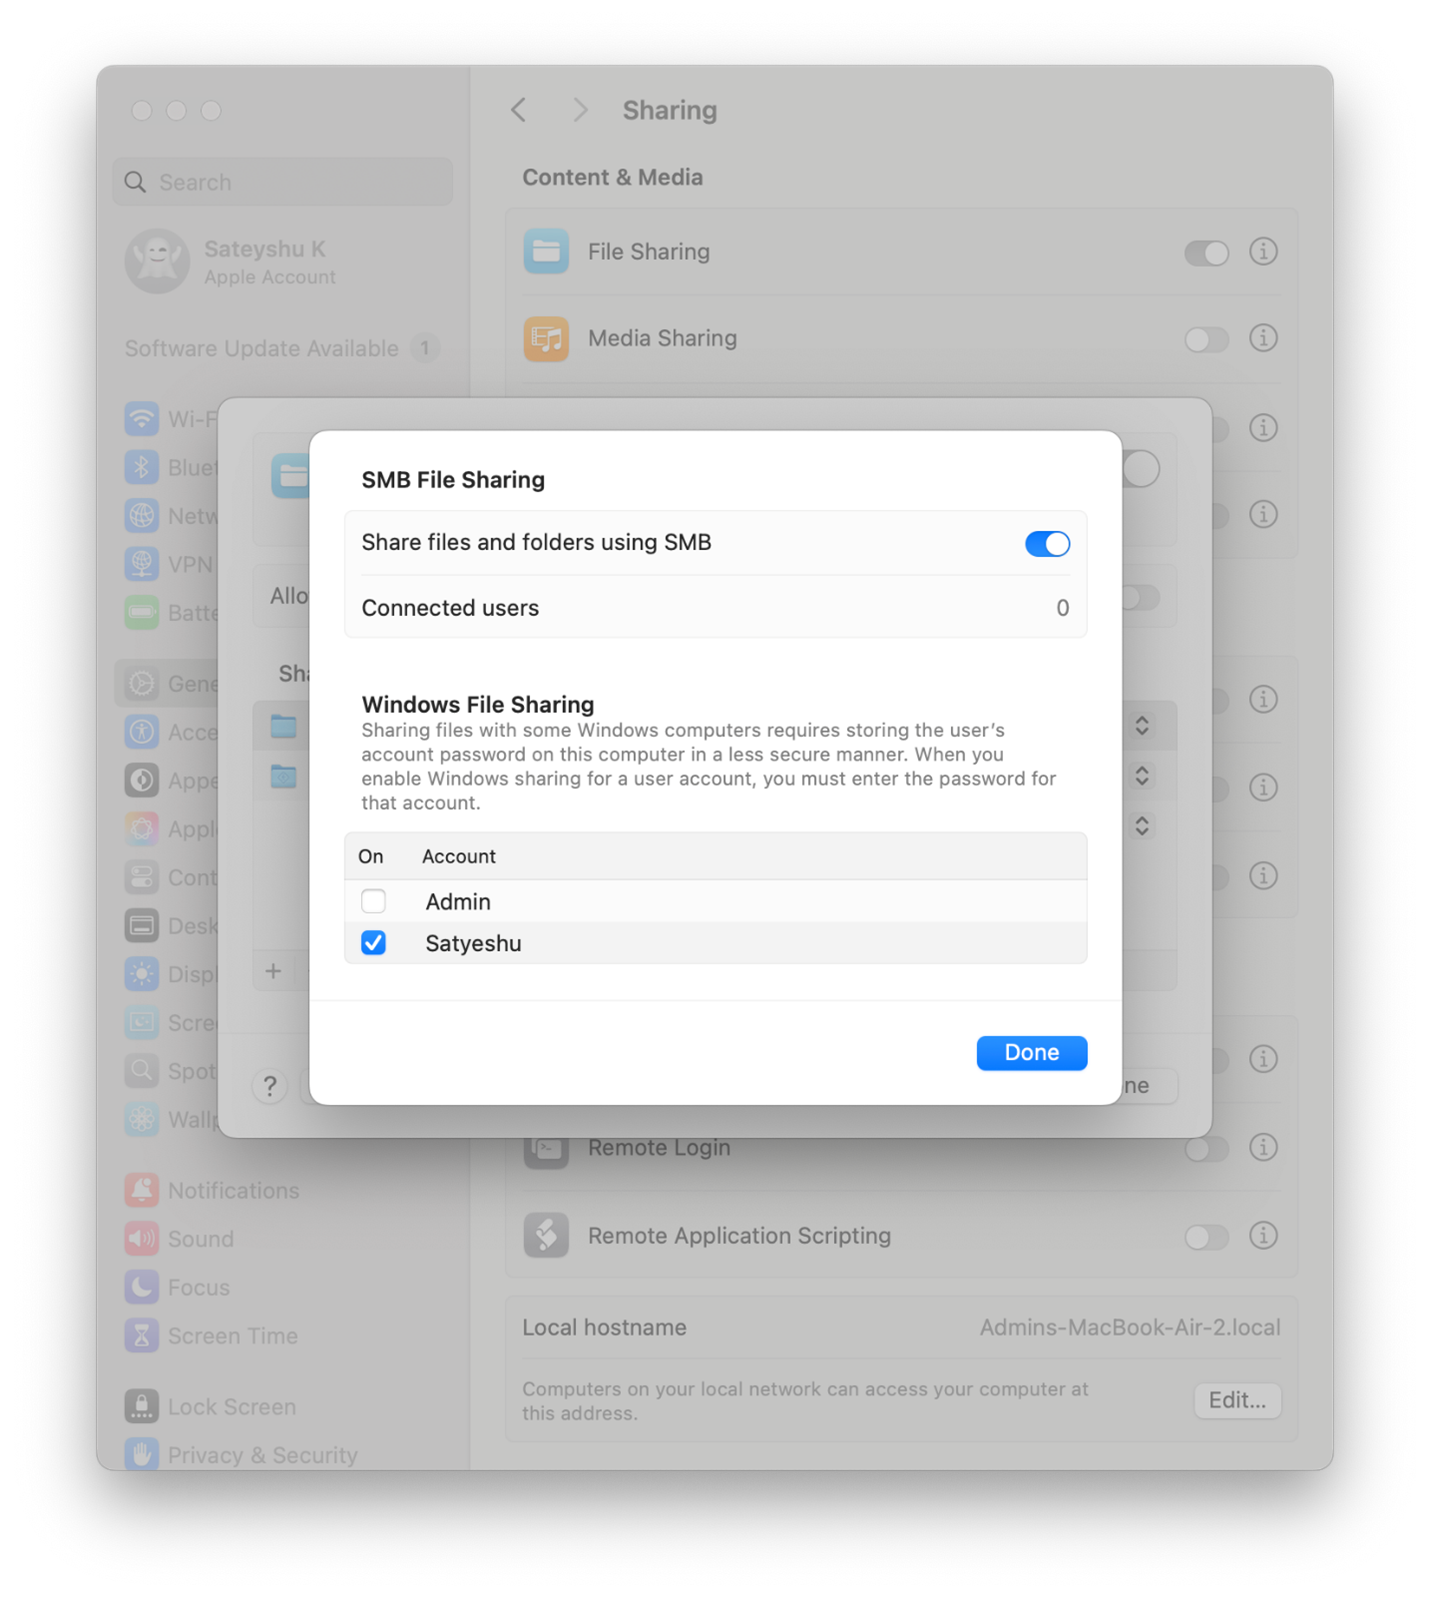
Step 3: Click on Options, at the left, to display the SMB File Sharing window.
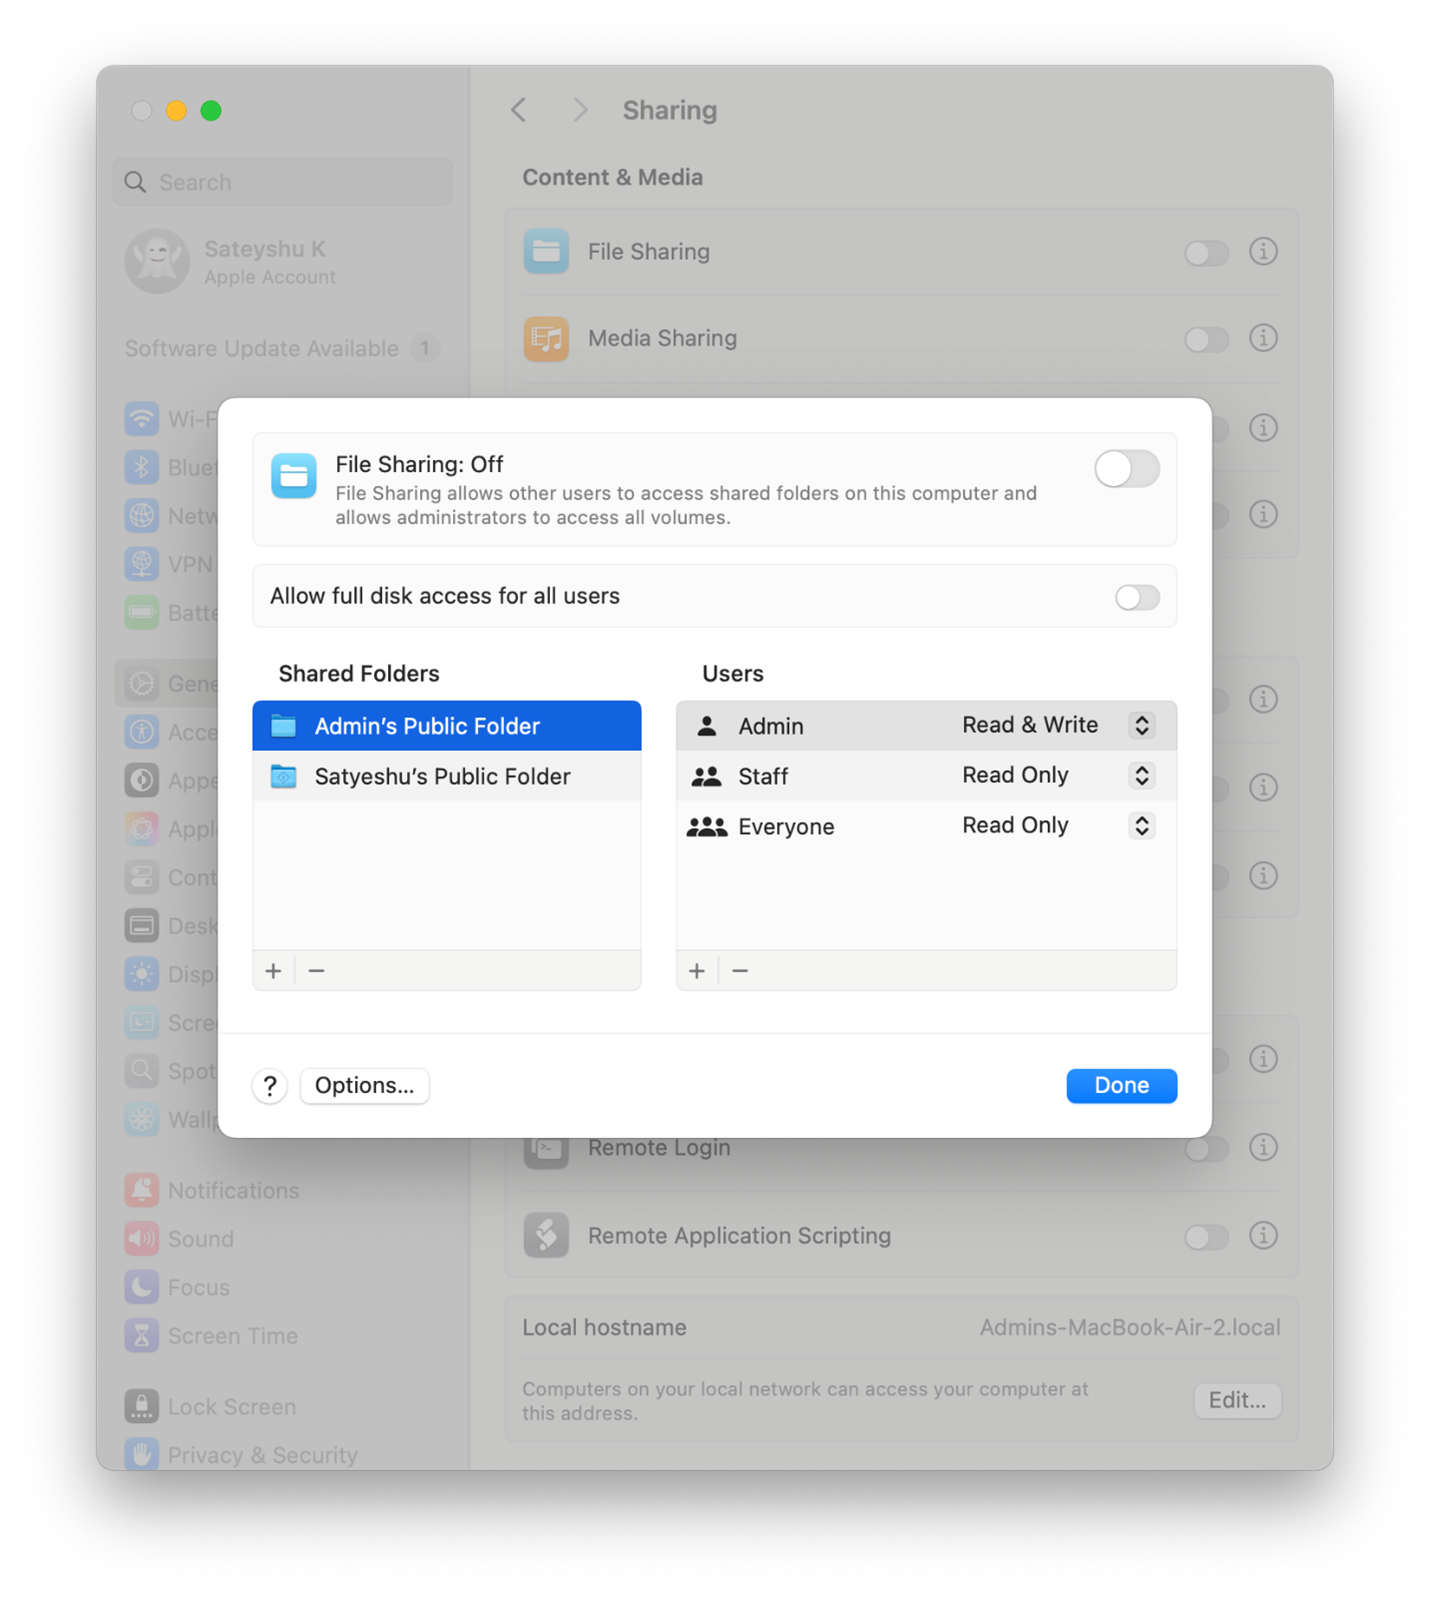
Step 4: Turn on Share file and folder using SMB settings.
Step 5: Proceed to Windows File Sharing and ensure you check the box beside the account whose files you need to access on Windows. Input the credentials and click OK.
Step 6: At last, click Done to proceed.
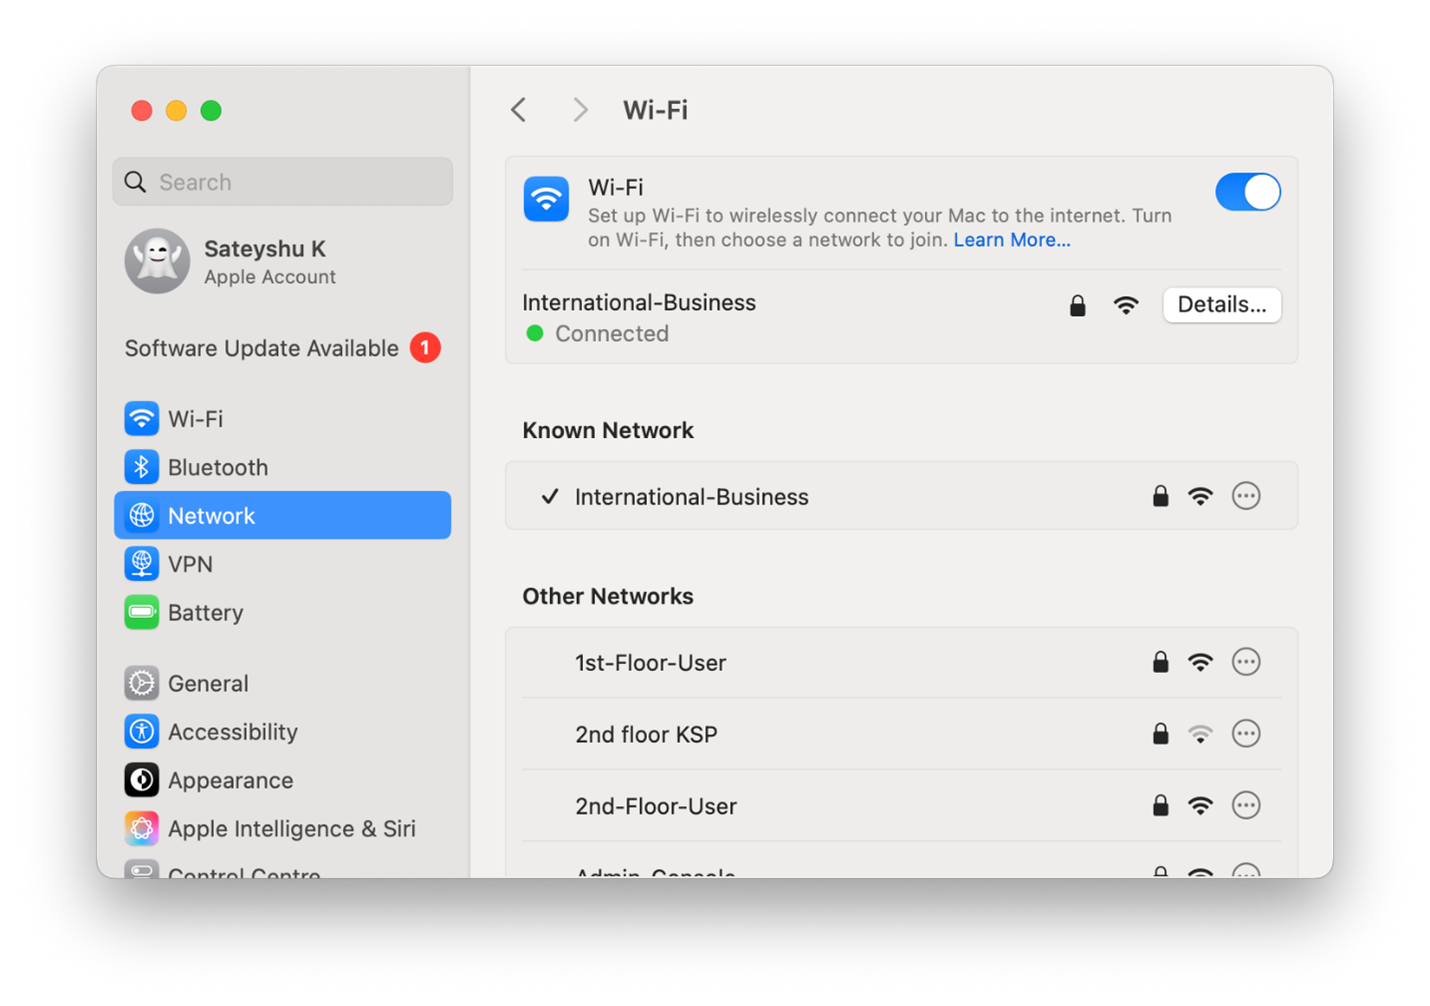
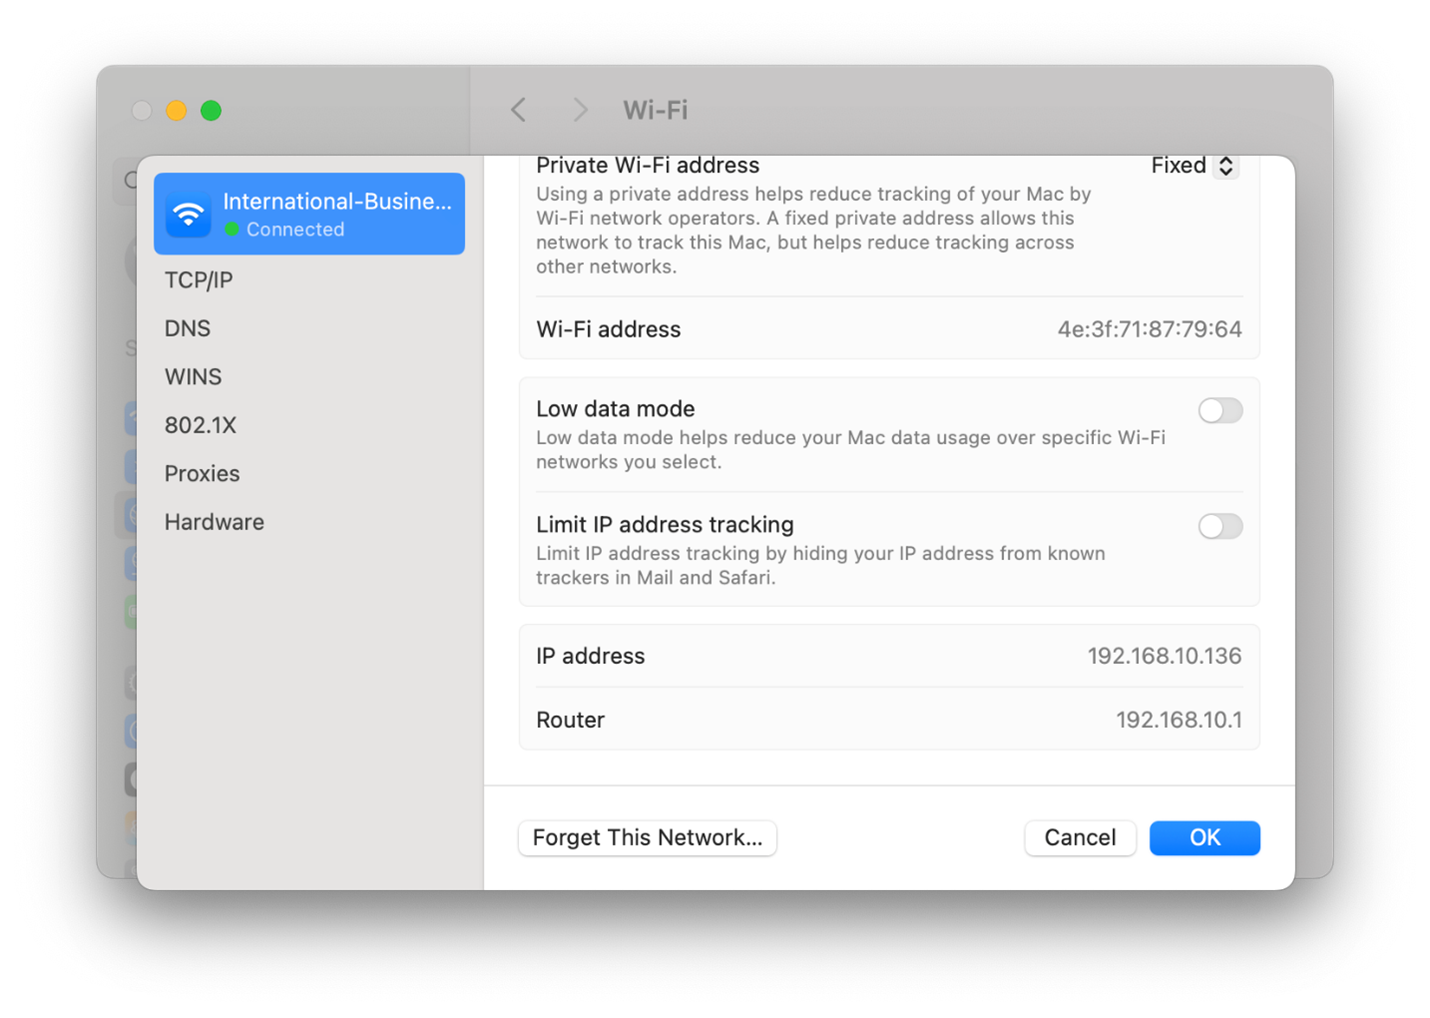
Step 7: Next, you need to copy the IP address of your Mac. For this, press Command + Space to launch Spotlight search. Now, go to System Settings > Network > Wi-Fi and click on Details.
Step 8: Scroll down and copy the IP address listed below.
Step 9: Next, open File Explorer on your Windows PC.
Step 10: Enter your Mac IP address in the address bar and hit Enter.
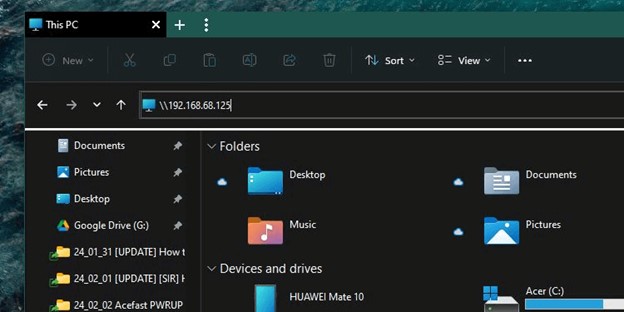
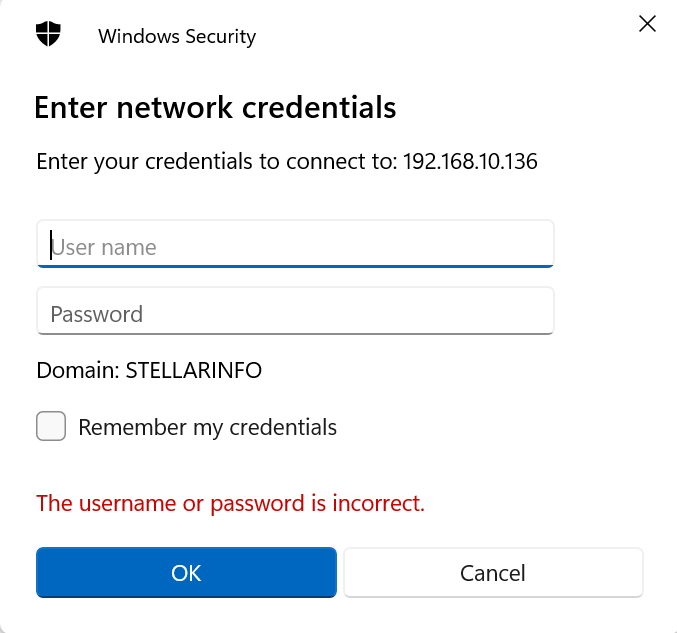
Step 11: Enter the Mac user's username and password.
Step 12: You can now access the shared folder on your Windows PC. Simply copy and paste the files to transfer them to the Mac.
Method 3: Transfer Files Using Cloud Storage
Cloud storage programs like Dropbox and Google Drive enable you to place your files in remote servers and access them from nearly any location. After installing and configuring such services on your machines, your files will be synchronized automatically.
Now all you need to do is drag the files from the directory of Windows into the cloud storage directory, and they will be accessible from your Mac. When you install a cloud storage service like Google drive or Dropbox, the macOS creates a folder in your Home Directory. To access them, simply press Command + Space to launch Spotlight and search for “Dropbox” or “Google Drive.” Spotlight will locate the folder for you.
Method 4: Transferring Files Using External Storage Medium
One of the simplest ways of file transfer from a Windows to a Mac system, or vice versa, is by the use of an external HDD or USB flash drive. You simply copy your files on and off the drive. Just make it exFAT so it functions perfectly with both systems and is capable of handling large file sizes.
Although this plug-and-play approach lacks real-time syncing, it's highly accessible. If you're going this route, think about storage capacity and physical wear and tear to make sure the drive is suitable for your use on each machine. You can also consider alternatives, such as SSDs for improved transfer rates or balance the advantages of various file systems for your particular use cases.
Note: If you’re using Time Machine on Mac, the backup drive should not be used interchangeably between both Windows and macOS.
Can Data Get Lost When Copying Files from Windows to Mac?
Yes, there are chances you could lose data when copying files from Windows to Mac, especially when you’re copying it to an external hard drive and the connection gets disrupted. Most people transfer data using external storage devices because it is one of the least complicated methods.
But if you fail to format your storage device according to the correct file system format, then you will experience a file system error. The error is expected to leave you with a corrupted directory system and your data may be rendered inaccessible.
In this scenario, we recommend using Mac data recovery software – Stellar Data Recovery Professional for Mac. It is capable of detecting the file types and recovering corrupted files by restructuring the file system, so you can recover even files that have lost their original directory paths or names.
Summing Up
You can transfer Windows files to Mac when switching from PC to Mac or to coordinate the workflow. In order to accomplish this task, you have many options among which are Migration Assistant, File sharing, cloud storage, and external storage drives. Each has advantages and disadvantages, so choose an option, which is most suitable for your own individual needs.


Rishabh is a senior content specialist at Stellar Information Technology, where he writes about comprehensive data care solutions.

 6 min read