Why APFS Snapshots Help and Sometimes Hurt Recovery

We’ve all been there. That heart-stopping moment when you realize you’ve just sent a critical project folder to the Trash and in a fit of digital hygiene emptied it immediately. In the old days of mechanical hard drives and HFS+, this was the start of a very bad day. But today, on modern Macs running the Apple File System (APFS) you might just be a terminal command away from salvation.

When Apple introduced APFS with macOS High Sierra, they weren’t just rearranging the furniture, they rebuilt the entire house. They moved away from the rigid structures of the 30-year-old HFS+ to a modern, fluid architecture designed for the era of flash storage and massive data loads. At the center of this new architecture is the APFS Snapshot. Snapshots allow near-instant rollbacks to previous states. But here is the paradox: the very technology that makes restoring a file instant for a user can make recovering data a nightmare for a professional engineer if the drive fails. This post dives into the technical underbelly of APFS snapshots to explain why they are simultaneously the best and worst thing to happen to data recovery.

What Are APFS Snapshots?

To understand why snapshots behave the way they do, we have to look under the hood of the file system. It’s not magic… it’s just metadata. So let’s have APFS screenshots explained for you right here.

An APFS snapshot is just a read-only and point-in-time representation of a volume. When a snapshot is created, the system actually locks the state of that file system metadata.

Time Machine creates local snapshots automatically usually once an hour even if your external backup drive isn't connected. System updates also trigger them while just ensuring that if a macOS update goes sideways, you can revert to the pre-update state without reinstalling the OS. Now to answer the question “Can APFS screenshots recover files,” we shall have to go to the roots of this.

Feature HFS+ (Legacy) APFS (Modern) Impact on Recovery
Write Strategy Update-in-Place Copy-on-Write (CoW) APFS reduces partial overwrite corruption but increases fragmentation significantly.
Time Resolution 1 Second 1 Nanosecond APFS allows for precise forensic timelines but requires 64-bit analysis tools.
Inode Numbers 32-bit (CNID) 64-bit Drastically reduces ID reuse, aiding in file tracking but complicating legacy tool compatibility.
Snapshots None (Mobile Time Machine hacks) Native, Block-level APFS enables instant rollbacks but creates ""ghost space"" where deleted files consume storage.
Space Management Fixed Partitions Dynamic Containers Multiple volumes share free space, making ""disk full"" scenarios complex to manage.
Encryption FileVault 2 (Layered) Native (AES-XTS/CBC) APFS encryption is deeply integrated; metadata encryption makes raw recovery nearly impossible without keys.

How Snapshots Work at File-System Level

The magic trick that allows APFS to create a snapshot of a large drive in less than a second is the Copy-on-Write (CoW) mechanism.

In traditional file systems, if you edited a document, the system would just overwrite the old data blocks with the new data. In a CoW system like APFS, the system just never overwrites that live data of ours. When you save changes to a file, APFS finds free space, writes the new data there and then updates the file system's metadata tree (the B-tree) to point to the new block. The old block is then marked as free.

When Snapshots Help Recovery

When the system is healthy, snapshots are nothing short of miraculous for data protection. They provide a layer of resilience that feels seamless to the user.

  • Protection Against Logical Mistakes: The most common data loss scenario is not a drive failure but actually it is a "user failure." You accidentally delete a presentation or overwrite a script with just any blank file. Because those APFS snapshots are read-only and immutable, the data blocks for that deleted file still exist on the drive as long as a snapshot that is referencing them remains. You can enter Time Machine, browse the "local" history and just restore the file instantly without needing to fetch data from an external drive or cloud server.
  • Reduced Data Loss After OS Updates or System Modifications: We all fear that "spinning beach ball of death" during a macOS update. Apple actually uses snapshots to mitigate this risk. Before the update applies to new system files, it takes a snapshot of the current system volume. If the update fails or maybe renders the Mac unbootable, the system can boot into Recovery Mode and just revert to that pre-update snapshot.
  • Consistency for Backups (APFS Snapshot vs Time Machine): Files are constantly changing while the backup software runs. APFS snapshots solve this by actually freezing the state of the volume. Time Machine creates a snapshot first then backs up that data of ours from the snapshot rather than the live volume. This ensures that the backup is consistent so that you just don't end up with a database that is half-written or a file that is locked and skipped.
  • Fast Volume State Reversion: Beyond single files, snapshots allow for the reversion of an entire volume. This is particularly useful for developers or testers. You can take a snapshot, install a suspicious beta app, test it, and then roll back the entire volume to the pre-install state in seconds.
     

Now that we know how good APFS is, let's just find out why APFS recovery fails, well at least sometimes.

When Snapshots Hurt or Complicate Recovery

Here lies the crux of the problem. While snapshots are great for accessing old data on a healthy drive, they are terrible for recovering data from a damaged or filled-up drive. The mechanisms that make them efficient also make them fragile and structurally complex. Let’s just understand it through a simple table.

Problem What You Encounter Cause of the Issue
Snapshot Retention blocks Space Reuse You delete 100s of GB, empty Trash, but “About This Mac” still shows disk full. A local snapshot is holding the deleted blocks so the files still take space.
Files are Scattered (high fragmentation) Large files (VMs, databases) become slow or corrupted when recovered. APFS uses copy-on-write so saved files move around; one file can be split across many blocks.
Data Lost after Snapshot Deletion (TRIM) You delete a snapshot, then realize you need the old files but they’re gone. When snapshots are removed, SSDs often run TRIM which zeroes cells, irrecoverable on most SSDs.
Broken Links / Confusing Metadata Recovery tools pull junk or partial files; files look mixed-up. APFS can reference the same block from live system + multiple snapshots/clones, you need the B-tree/checkpoint history to rebuild files.
Old recovery tools fail Tools say “files not found” or recover corrupted results. Legacy HFS+/NTFS tools don’t parse APFS snapshots and metadata trees, so they misinterpret used space.
Accidental deletion (no snapshot) You delete files, empty the Trash, and neither Time Machine nor local snapshots exist. Recovery tools find nothing or only meaningless fragments. Blocks were trimmed or reallocated (SSD TRIM or overwrite) and metadata/history needed to re-link files is gone.
Accidental deletion (snapshot existed but was thinned/deleted) You delete a folder, then manually thin snapshots or run a cleanup, later you need the files and recovery fails. The snapshot that referenced the original blocks was removed; TRIM or block reuse cleared the underlying data.
Low disk space during active work System constantly warns “disk full” while you’re working; autosaves or app caches fail, background snapshots keep being created and prevent cleanup. Automatic snapshots and app temporary files compete for the same free space, snapshots can temporarily hold deleted blocks so space never appears free.
SSD with TRIM enabled You delete data then immediately try file-carving/recovery. Recovery tools return no usable files. TRIM tells the SSD the blocks are free and firmware zeros or wipes them, making software recovery impossible on most consumer SSDs.
External backup present and current You accidentally delete files locally but have a recent external Time Machine or clone. You restore quickly from the backup. External backups keep an independent copy outside local snapshots. Recovery relies on backup currency and integrity.
Open file handles / running apps hold data You delete a file but the app still shows it or continued writes happen. Disk space doesn't free until app quits or system restarts. Live file descriptors and copy-on-write behavior let data remain referenced by the running process even after user-level deletion.

Real-World Scenarios

To illustrate the difference, let’s look at two scenarios involving the same user, "Alex."

  • Scenario Where Snapshots Help: Alex is editing a 4K video project. He accidentally deletes the "Raw Footage" folder and empties the Trash. Panic sets in. However, he realizes his Time Machine is set to automatic. He opens the folder in Finder, enters Time Machine, and sees the "local snapshot" taken 15 minutes ago. He hits Restore. Because the blocks were never actually deleted (thanks to the snapshot), the file system simply re-links the folder.

Recovery time: 2 minutes.

Cost: $0.

  • Scenario Where Snapshots Hurt: Alex’s Mac is running low on space. He gets a "Disk Full" warning. He deletes the 50GB "Raw Footage" folder to make room. The free space doesn't increase because a snapshot is holding it. Frustrated, he searches online and finds a terminal command to "thin" local snapshots. He runs it. The system deletes the snapshots. The APFS frees the blocks and marks them as reusable space. Five minutes later, Alex realizes he deleted the wrong folder. He runs a basic recovery tool. The tool finds nothing. The snapshot is gone and the data blocks have been wiped by the SSD.

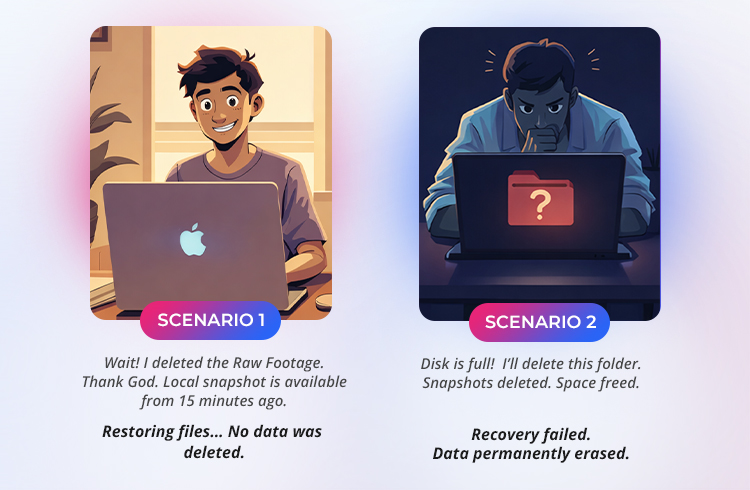
Recovery: Impossible.

Lesson: Local snapshots can be a lifesaver. They allow instant cost-free restores and yet they can also mask disk usage. Also, always check for and manage snapshots before freeing large amounts of space.

APFS Snapshots vs. Traditional Backup Methods

It is vital to distinguish between a snapshot, a backup and a clone as users often conflate them.

  • Snapshot: A local, metadata-based "freeze" of the drive. It lives on the source drive. If the drive dies, the snapshot dies with it. It is not an archival copy… its lifespan is tied to available disk space.
  • Backup (Time Machine): A copy of files moved to a separate physical device. If your Mac explodes, the data exists elsewhere.
  • Clone: A bootable bit-for-bit copy of the drive on a separate disk.

The danger lies in treating snapshots as backups. They are temporary conveniences not permanent archives. If your APFS container corrupts, you lose access to both your live data and your snapshots.

Implications for Data Recovery Professionals

The shift to APFS has forced the data recovery industry to evolve or die.

  • Forensic Considerations: Forensic investigators love snapshots. They provide a timeline of user activity that is hard to fake. By mounting snapshots from different times, an investigator can see exactly when a suspect deleted an incriminating file. It reconstructs the "chain of custody" of digital evidence directly from the drive's metadata history.
  • Live Systems vs. Post-Failure Systems: On a live, bootable system, snapshots are accessible via Disk Utility. However, on a system that won't boot (Post-Failure), accessing snapshots is difficult. If the volume structure is damaged, the snapshots are locked inside an encrypted container. Professional recovery requires repairing the container structure just enough to unlock the volume and harvest the data.
  • Snapshot Management Before Recovery: A critical rule for professionals: Never delete snapshots to free space before attempting recovery. It sounds obvious but IT technicians often try to "fix" a slow or full Mac by purging snapshots unknowingly destroying the very historical data the client wanted to recover.

Best Practices for Users to Avoid Data Loss

How do you live with APFS without getting bitten by the snapshot mechanism?

  • Don’t Rely on Snapshots Alone: The 3-2-1 backup rule still applies. Snapshots are "Copy 0." You still need Copy 1 (Time Machine on external drive) and Copy 2 (Cloud backblaze/iCloud). If your logic board fails, your local snapshots are gone forever.
  • Monitor Disk Space: Keep at least 15-20% of your SSD free. If you run the drive to 99% capacity, you risk corruption that no software can fix.
  • Use Official Snapshot Restore Paths: Avoid moving massive amounts of data (like terabytes) all at once if you have active snapshots, as this forces massive CoW activity and fragmentation. If you need to revert, use the official macOS Recovery "Restore from Time Machine" interface rather than hacking away with Terminal commands unless you know exactly what you are doing.

Recommendations for Recovery Labs & Tools

When the DIY methods fail and the drive is just corrupted, standard utilities like Disk Utility's "First Aid" often give up. This is because they are designed to maintain a healthy file system and not salvage a broken one.

  • Snapshot-Aware Analysis Tools: Modern recovery demands a professional Mac data recovery software that can parse the APFS omap (Object Map) and the Snapshot Metadata Tree. These tools can identify "orphaned" blocks of data that the live file system has forgotten but a snapshot still remembers.
  • Prioritizing Block Preservation: For recovery labs, the first step is always imaging the drive. But with APFS, you must image the entire container, not just the visible volume. The snapshots live in the container's free space. Failing to capture the "empty" space of a container means you fail to capture the snapshots.
  • Using Native macOS Tools: Sometimes the best tool is built-in. Commands like listlocalsnapshots / and diskutil apfs list. Snapshots give a raw view of what is really happening on the disk, often revealing recovery points that the Finder interface hides.

Conclusion

APFS snapshots offer users with an unprecedented level of protection against those "oops" moments of daily life as they just allow us to undo mistakes with the click of a button. However, this convenience definitely comes at a cost. The structural complexity of Copy-on-Write and the retention of those "ghost" data blocks of ours make the file system more prone to fragmentation and harder to reconstruct when you go for those traditional methods.

For the casual user, snapshots are just a helpful safety net. But when that net breaks or when the partition map collapses or the drive refuses to mount… those standard recovery methods often hit a wall. The scattered nature of APFS data means that simple file carving just won't work… you need a tool that can reconstruct those complex B-tree maps and locate those fragmented pieces of data too.

When the file system map is broken, you need a professional-grade Mac data recovery tool, like Stellar Data Recovery for Mac, to rebuild that B-tree and extract your files.


Was this article helpful?
FAQs
If a snapshot exists from before you deleted the files you can restore them, but if no snapshot exists or it was removed the files are gone. Sometimes a Mac data recovery software can help but maybe not on SSDs after TRIM.
No. Snapshots live on the same drive as your data and are not a substitute for an external or cloud backup.
Because local snapshots or running apps actually may still reference the deleted blocks so macOS doesn’t reclaim the space until those references are just removed.
No. Always keep an external Time Machine disk or cloud copy because snapshots can be thinned, corrupted or just lost if the drive fails.
TRIM tells the SSD actually to erase freed blocks quickly which makes software recovery nearly impossible afterward and prevents a Mac data recovery tool from finding intact files.
Stop writing to the drive, check Time Machine/local snapshots and maybe restore if available and only then try Mac data recovery software or a professional lab recovery service if needed.
About The Author
Table of Contents

WHY STELLAR® IS GLOBAL LEADER

Why Choose Stellar?
  • 0M+

    Customers

  • 0+

    Years of Excellence

  • 0+

    R&D Engineers

  • 0+

    Countries

  • 0+

    PARTNERS

  • 0+

    Awards Received

BitRaser With 30 Years of Excellence
Technology You Can Trust
Data Care Experts since 1993
google-trust
×