You may need to create separate user accounts on Mac if there are multiple users working on it. Doing so brings in customization of personal settings and preferences for each of them. With dedicated user accounts in place, you can also prevent unauthorized access to your confidential files on the same system while allowing other users to log in as guests.
But all that being said, managing user accounts on macOS can often become confusing. This is why you need to understand the process clearly beforehand, so that new accounts can be created without problems and without impacting the settings of other user accounts.
Let’s try to understand how to create a new user on Mac, how to delete a user on Mac, and a few other important things.
Creating a User Account on Mac
You can create multiple user accounts on Mac and switch between them. Follow these steps to get started:
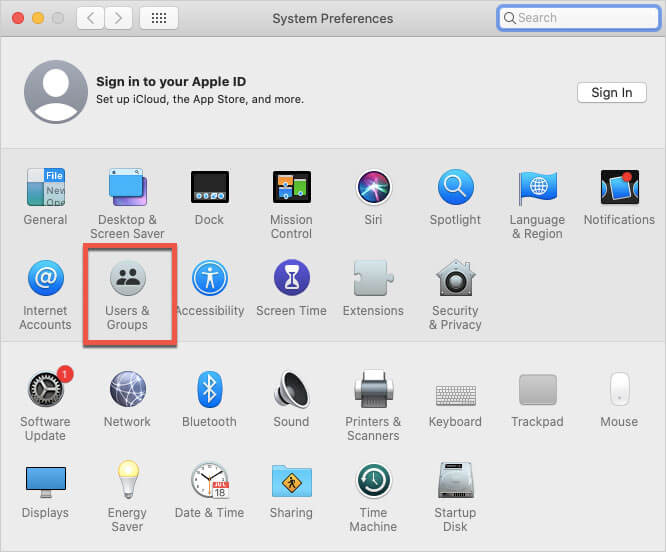
- Navigate to the Apple menu by clicking on the Apple icon on the top left corner of the screen. Thereafter, look for System Preferences in the dropdown menu that opens. After that, click on the Users & Groups option.
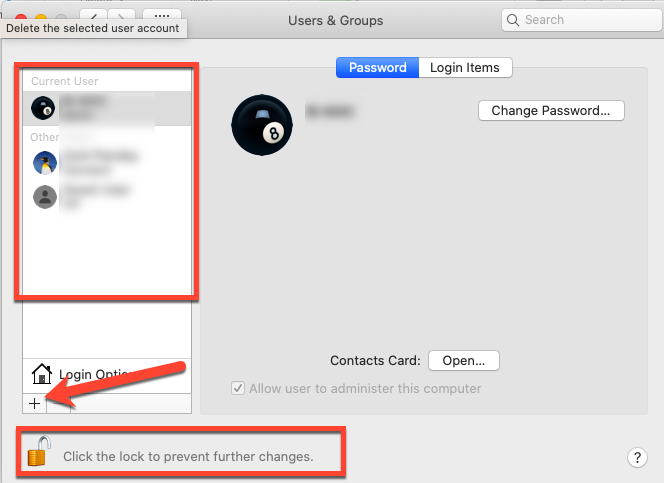
- Provide your system password, then go to the list of users, and click on Add (+) button.
- Open the pop-up menu of the New Account and select the type of user. You’ll get these options to choose from:
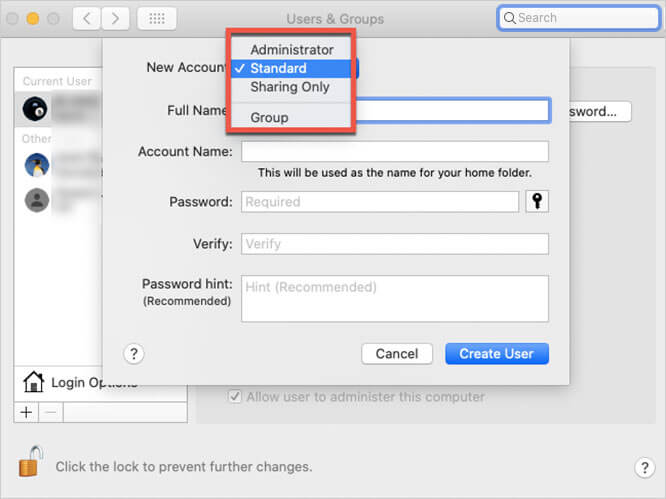
- Administrator: An administrator is able to add and manage all the other users, install applications, and edit settings.
- Standard: Standard users can install applications and adjust their own settings, but they cannot add or edit the settings of other users. Standard users are created by the administrator.
- Sharing only: Sharing-only users are able to access shared files from anywhere, but they can't login or alter any of the computer's settings. This kind of account is also created by the administrator.
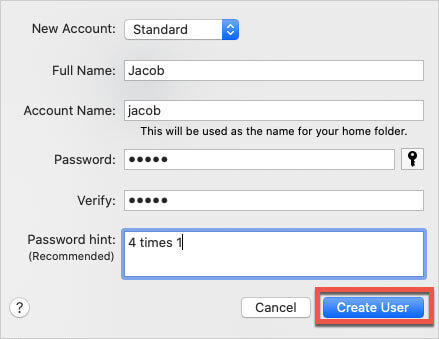
- When prompted, enter the new user’s full name and an account name will be automatically generated. If you want to use a separate account name, do so now since you won't be able to alter it afterwards.
- Create a new password for the user and also create a hint for remembering the password. Then continue by clicking on Create User.
- You can also do any of the following, depending on the type of user you create:
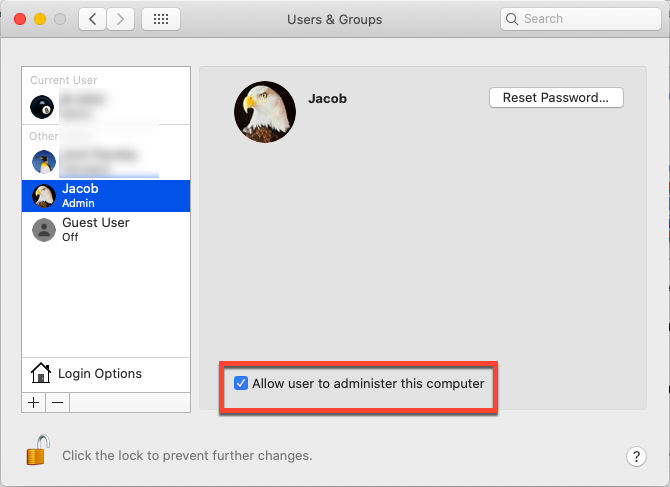
- Select Allow user to administer this computer. This is recommended to be done only for an administrator.
- Select Allow users to reset a password using Apple ID. This is recommended to be done only for an administrator.
- Use sharing preferences, specify if the user can transfer your data and share your screen in the Sharing options.
Customize your Login Experience
After you have created a user account, you can log into it with the help of these steps:
- Go to the Apple menu -> System Preferences -> Users & Groups.
- Click on Login Options. You might see a small padlock sign at the bottom of the window which says Click the lock to make changes. Clicking on this lock will let you view the options you can use to personalize your login experience.
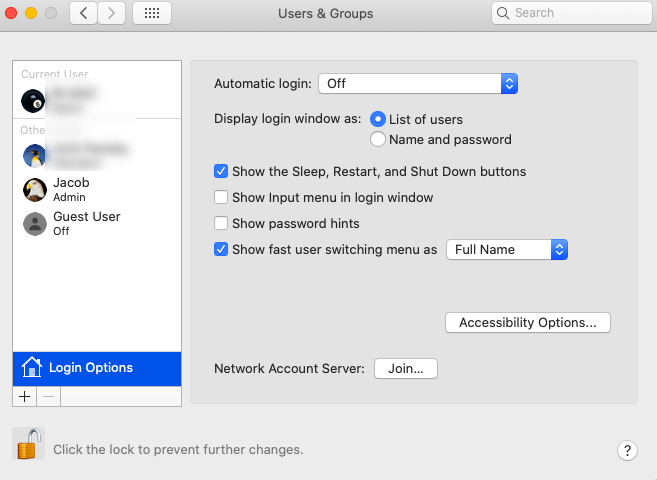
- Click on the lock. When prompted, enter the administrator password to unlock the Preferences section.
- If you wish to allow a user account to automatically login when the Mac starts up, click the Automatic login pop-up menu, choose that user account, and select On. Else select Off. If you choose Off, when Mac starts up, you’ll see a window showing a list of all user accounts from which you can choose which one to log into.
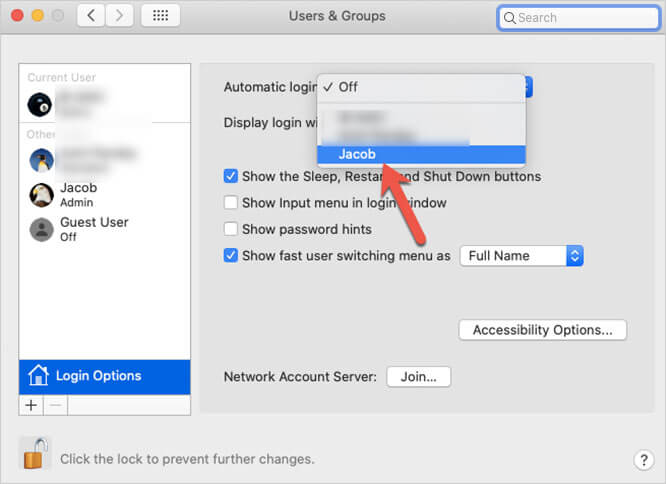
Note: The changes you make to Automatic login options are reflected the next time you start up the Mac. Automatic login allows any user to access your Mac by simply restarting it. So, be careful not to set an administrator account to automatically log in at startup.
How to Save Files Specific to a User Account?
The procedure to save personal files on the Mac is the same as usual. But of course, every user may want to prevent unauthorized access to their personal files or you as an administrator may want to prevent other users from accessing system files. So, you can set the access permissions for different users with respect to specific files and folders. This will ensure that the core system settings are not accidentally modified by any unintended user.
Here’s how you can assign permissions to specific users:
- Select the file or folder for which you want to set permission. Then, go to Apple menu and click File -> Get Info.
- Expand the information under Sharing and Permissions by clicking on the arrow. If the lock at the bottom-right is locked, click it to unlock. You will need an administrator password for this if you are not the owner of the file or folder.
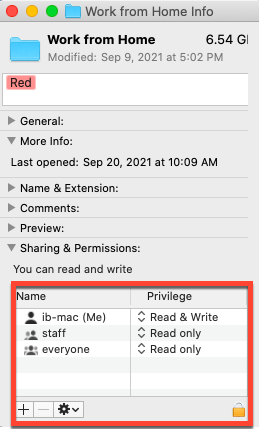
- In the sharing and permissions window, under the Name column, click a user’s account name and then choose a privilege setting from the pop-up menu. You can choose and alter one of these settings:
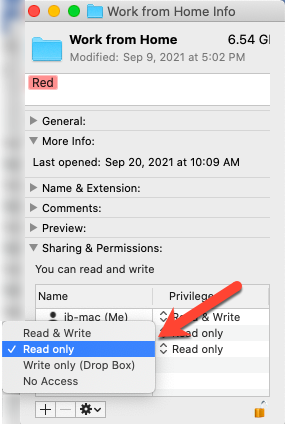
- Read & Write: Allows the user to open the file/folder and edit it.
- Read Only: Allows the user only to open the file/folder but not edit it.
- Write Only (Drop Box): Allows the user to drop files into a drop box (this is basically a folder). The only action that users can do is save files to it, but they can’t open the drop box to see which other files exist in it. Only the owner of the drop box can open it.
- No Access: Blocks all access to the file/folder.
- You will find several other options to alter file/folder access permissions, like apply permissions to specific files in a folder, change an item’s owner, etc. in the same pop-up box of Get Info.
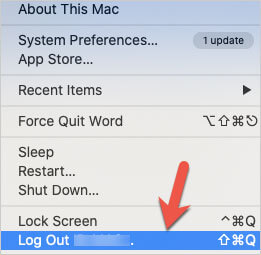
How to Log Out of your Mac User Account?
After you’ve finished working on your Mac account, as a good practice, you should log off to enable other users to work on the system. Here’s how you can go about it:
- Close all open applications and launch the log-off window using the shortcut Shift + Command + Q on the keyboard.
- Click the Log Out option.
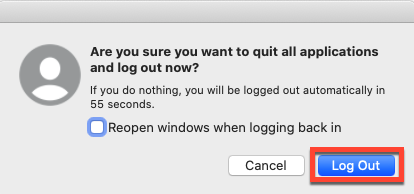
- Alternatively, you can use the key combination Shift + Option + Command + Q without viewing the log-off window. The recommended option is to log out from the Apple icon menu.
How to Backup your Mac User Account?
Backing up your data is very important, especially if your Mac is prone to abrupt crashes. Also, doing it makes sure your data stays safe even if someone else accidentally formats the hard drive or deletes a volume/partition.
Here's how you can back up your entire Mac user profile:
- Log in as a local administrator and not with the user account you'd like to back up.
- Launch the Disk Utility.
- Navigate to the File -> New -> Disk Image.
- Choose your home directory. It should be named something like /Users/[username]. Then click on the Image button, give the image a new name, choose a destination where you wish to save it (external hard drive recommended), and also select if you want the image to be encrypted.
- Click on the Save button to save the disk image.
The disk image you’ve just saved can act as the restore point for your Mac user profile and account settings, in case something happens to the system.
Alternatively, backup your Mac with the Time Machine application.
How to Delete your User Account?
If you’re no longer using your Mac profile, it may be a good idea to delete it to free up disk space. Here’s how you can delete your user account:
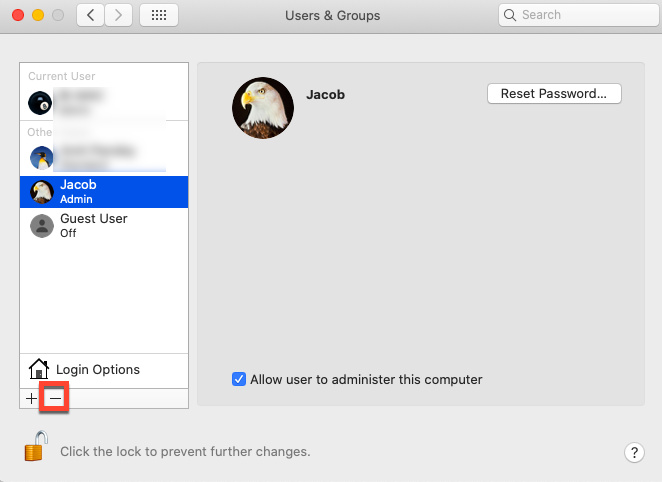
- Navigate to the Apple menu -> System Preferences, and then select the Users & Groups on your Mac.
- Click on the padlock icon at the bottom left to make changes to user profiles.
- Choose the user you want to remove and click on the Remove button (a minus sign) underneath the user list.
- You will see a prompt asking for permission to delete, along with a few options. Please select an appropriate option and click on Delete User.
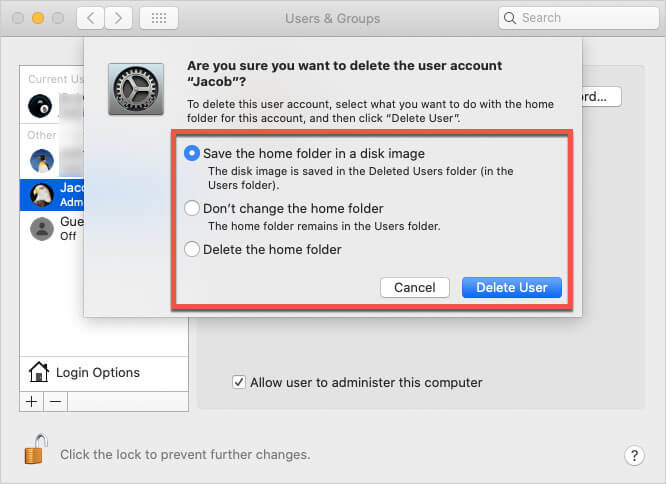
These steps will help you delete user accounts from your Mac. You should, however, know that using these steps, you won't be able to delete the users who are currently logged in to the system.
The decision to delete a Mac user account should only be taken after careful planning and backing up the data. If due to some reason, you’ve deleted your account without a backup or perhaps an administrator has deleted your account without informing you in advance, you could face the risk of data loss.
The good news, however, is that there are a couple of easy ways to recover data lost due to a deleted Mac user account.
How to Restore a Deleted User on Mac?
1. Use the .DMG file:
The data about every user account on Mac is saved in a dedicated .DMG file on the storage drive. This file can be used to restore deleted user’s home folder on Mac if needed. Here are the steps you need to follow:
- Go to the Dock, open Finder, and select your Mac's storage drive.
- Open the user’s directory and click on the Deleted Users folder. Thereafter, navigate to the .DMG file.
- Copy all of the files from here and make a new directory which has the name same as the terminated account.
- Then open this newly created directory and paste all the files there.
- Click on the Create User button then continue by clicking on the Use Existing Folder button in the pop-up window.
- After restarting your Mac, login into the user account.
All the data that was deleted will be restored to the newly created account.
2. Use Stellar Data Recovery for Mac
If the preceding solution doesn’t work, you can use a data recovery software for Mac to recover the lost data. Stellar Data Recovery Professional for Mac is one of the best tools for recovering data from a variety of Mac devices and storage drives quickly and securely. The application also retrieves files from a damaged Mac and works flawlessly on macOS Ventura, Monterey, Big Sur, Catalina, and earlier versions. Here are the steps to recover the data by using the software:
- You can download and install Stellar Data Recovery Professional from the below link.

- Then, launch the software.
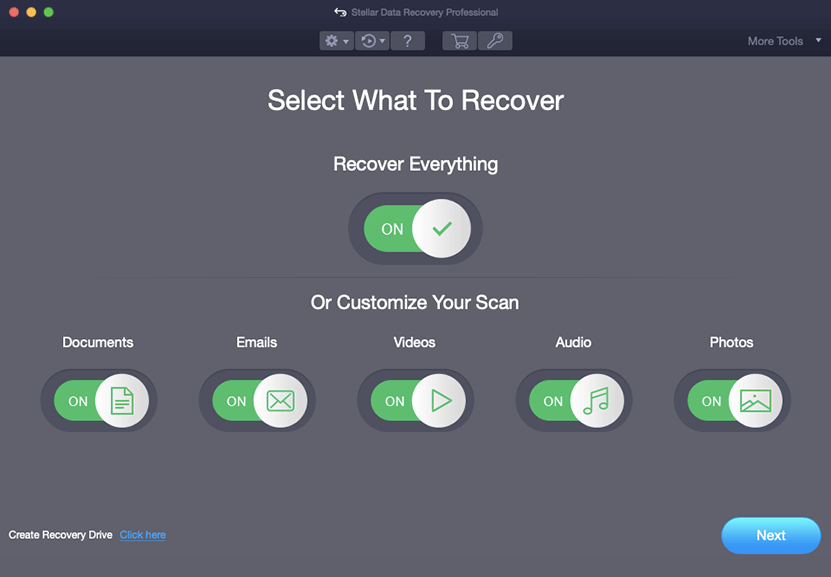
- Select the data type you want to recover by toggling on the respective button and then click on the Next button.
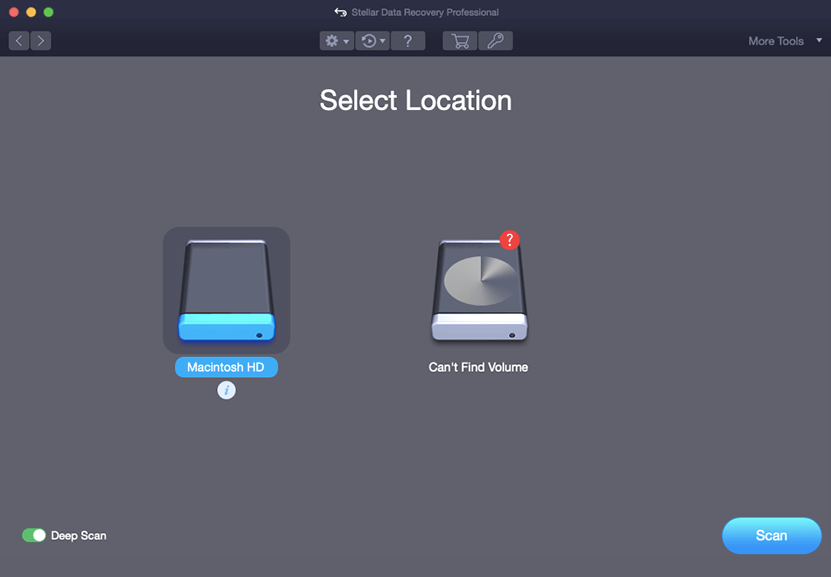
- Select Macintosh HD as the drive for recovery.
- Then turn on Deep Scan and continue by clicking on the Scan button.
- Once the scan completes, you can preview the recoverable files. Then, select the files you wish to recover. Click on the Recover button to save the files to a desired location.

At this point, you should have a fully functioning Mac user account, without any missing files or lost data.
Conclusion
User account management on Mac is a straightforward process, but only if it’s handled the right way. In this post, we have shared the easiest techniques to add, delete, and restore Mac user account. In case you lose any files or information when performing these functions, don’t hesitate to use Stellar Data Recovery Professional for Mac to perform a full data recovery.


 10 min read
-1920.jpg)