Summary: RAID data recovery is a process of restoring lost or deleted data from a broken, crashed, degraded, formatted, or corrupt and inaccessible RAID array volume(s). In this guide, we will take you through a step-by-step guide to perform RAID 0, RAID 5, and RAID 6 data recovery in your organization safely—without using any hardware RAID controller.
RAID arrays are an advanced storage solution that assures data safety in an organization and helps maintain business continuity. However, this doesn’t mean RAID-based storage solutions such as NAS are failure-proof.
While some popular RAID configurations like RAID 5 and RAID 6 can withstand up to one or two disk failure respectively, they can’t protect against logical failures often caused by hardware or software failure and human errors.
Accidental deletion, virus or malware infection, sudden system shutdown, power surges, controller malfunction, disk errors, etc. are some common errors that can lead to data loss from a Redundant Arrays of Independent Disks (RAID).
A common misconception and popular belief about RAID arrays is that the data on RAID doesn’t require backup. But the fact is that RAID is nor a backup neither an alternative to backups, and data on RAID requires backup.
How to Perform Enterprise RAID 0, RAID 5, and RAID 6 Data Recovery
RAID data recovery is a tedious process and requires expert solutions and help. In this guide, we will help you get back every bit of recoverable data from popular RAID arrays without using any hardware RAID controller.
The software we are using is Stellar Data Recovery Technician—by Stellar®, a pioneer in providing expert data care solutions with over 25 years of experience.
This powerful RAID data recovery tool can reconstruct a broken or corrupt RAID for data recovery even if the critical RAID parameters—required for RAID rebuild—are unknown.
Steps to recover Deleted Files from a RAID array
To recover lost or deleted data from a missing or deleted RAID volume, follow these steps:
- Free download and install Stellar Data Recovery Technician software
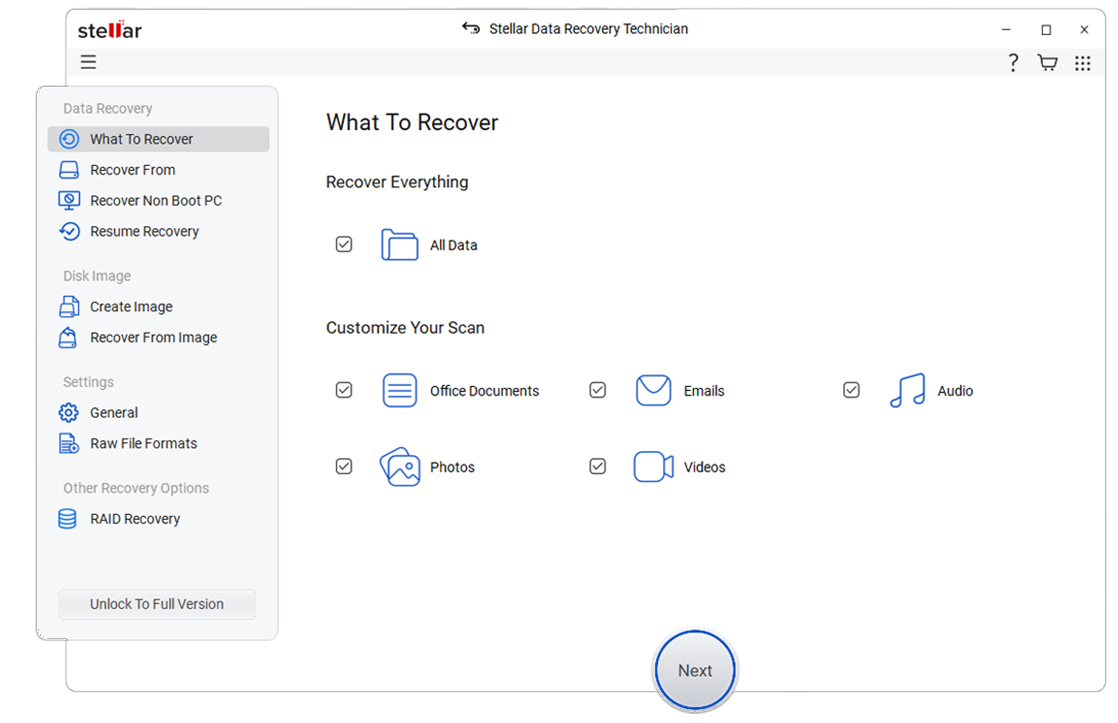
- Click ‘All Data’ or choose the specific file type you want to recover and click ‘Next.’
- Choose the RAID volume under ‘Connected Drives’ list and click ‘Scan.’
- After the scan, you can click on a file to see its preview before recovery or choose the file from the scan results
- Click ‘Recover’ and then click ‘Browse’ to choose a save location
- Click ‘Start Saving’
Steps to recover Data from Failed, Corrupt, or Crashed RAID Array
Rebuilding a broken, crashed, or corrupt RAID is nearly impossible. A failed RAID requires reconstruction from scratch after formatting all RAID drives in the array. However, before rebuilding your broken RAID array, you can recover your data from the RAID by using Stellar Data Recovery Technician.
The powerful RAID data recovery software can rebuild virtual RAID—even if RAID parameters are unknown or not provided—and facilitates data recovery from a failed, broken, and crashed RAID 0, RAID 5, and RAID 6 arrays.
Follow these steps to recover data from a logically broken RAID,
- Remove all drives from the RAID array and connect them to a working PC via SATA cables or use SATA to USB converter
- Launch Stellar Data Recovery Technician software
TIP: Choose ‘Monitor Drive’ to check the SMART status and disk health of your connected RAID drives. If the health is poor or SMART status displays a warning sign, immediately stop and clone the affected disk.
- Close the Drive Monitor utility after cloning or checking the disk health (if running) and relaunch the Stellar Data Recovery software
- Choose ‘All Data’ or select specific file types and click ‘Next.’
- Click ‘RAID Recovery’ and click ‘Scan.’
- On the next screen, select the RAID tab at the top left and then click on the connected RAID drive from the list and move it to ‘Move hard drives up/down for disk order’ list box
- Use the up or down arrow buttons adjacent to the list view box and arrange disks in sequence as they were in the respective RAID stack
- Enter the required RAID parameters or choose ‘Don’t know …’ from the respective options if you don’t know the required RAID parameters
- After adding and selecting the RAID parameters, click ‘Build RAID.’
- Wait until the software reconstructs your RAID volume or probable RAID volumes if you didn’t know or entered required RAID parameters
- After RAID construction is finished, click on ‘Show Volume List’ button to view the reconstructed RAID volume(s)
- Choose the RAID volume from the list and click the ‘Scan’ button
- After the scan, if the desired files are not found, click ‘Click here’ link at the bottom of the software to initiate a thorough scan based on file-signatures
- Post scan, you can click on a file to see its preview and then choose the files and folders that you want to recover
- Then click ‘Recover’ and then ‘Browse’ to choose a save location where you want to save the recovered files
- Click ‘Start Saving’ to save selected files and folders at your desired location
IMPORTANT NOTE: In case the RAID volume is not displayed in the list, skip to the next section for the Steps to recover data from missing RAID volume.
Steps to recover Data from Missing RAID Volume
Sometimes, due to severe corruption or logical error, you may lose access to one or more RAID partitions in an array. In such a case, you don’t have many options but to reformat the lost volume in order to regain access to it. However, before regaining access, you can leverage the Stellar Data Recovery Technician to recover data from the lost partitions,
After launching Stellar Data Recovery Technician, choose files to recover and then select ‘RAID Recovery.’
- Then click ‘Scan’ and then choose the RAID type
- Enter the RAID parameters or choose ‘Don’t Know …’ and click ‘Build RAID.’
- After RAID reconstruction, click ‘Show Volume List.’
- Choose the physical disk from the list and click ‘Scan.’
- Select the physical/virtual RAID drive and click ‘Search.’
- After the initial search, if the RAID volume is still not found, click ‘Deep Scan.’
- Then select the RAID volume and click ‘Scan.’
- After the scan, click ‘Click here’ link at the bottom left to begin a deep scan
- Click ‘Recover’ and then click ‘Browse’ to choose a save location
- Click ‘Start Saving’ to save the selected files at your desired location on the system or external drive
Conclusion
RAID data recovery is possible with backup and enterprise RAID data recovery solution such as Stellar Data Recovery Technician. Data loss from RAID can happen due to reasons such as accidental deletion, malware or virus infection, power surge, and more.
In such situation, you can utilize your RAID backups to restore lost files and data. And in the absence of backup, use a powerful DIY RAID data recovery software from Stellar®.
The software can help you recover deleted files from RAID 0, RAID 5, and RAID 6 arrays and facilitates data recovery from a degraded, crashed, failed or corrupt RAID arrays.
This DIY RAID recovery software works even when you don’t know or forget the critical RAID parameters required for RAID reconstruction. Leverage the software in your organization to recover data lost from a RAID 0, RAID 5, and RAID 6 array without those expensive hardware RAID controllers with complete privacy.


 6 min read