After installing the Exchange Server 2016 or 2019, it’s important to configure the Client Access Services on the Mailbox Server to allow internal or external client connections. Client Access Services are a part of Mailbox Server responsible for all authentication and client connections, such as Outlook, Mobile ActiveSync devices, etc. Without configuring the Client Access Services, users won’t be able to connect to the mailbox and send or receive emails.
In this article, we have shared the steps to configure various client access services in Exchange Server to allow external clients or users to access their mailboxes and send/receive emails.
Steps to Configure the Client Access Services
In Exchange Server, you can configure the following Client Access services:
- Virtual directory
- ActiveSync mobile device
- Mail flow
- Certificates
- Malware protection
- Outlook Anywhere
Below are the steps to configure these Client Access Services on your Exchange 2016 or 2019 Mailbox Server.
Step 1: Determine the Namespace
Before configuring the Client Access Services, you must determine the namespaces (internal and external URLs) you will be using for clients to connect to the server. You can use the same or existing namespaces on your old Exchange Server. However, if you want to use a different namespace for a new server or set up the server for different sites, you need to define new namespaces and update or add them to the DNS records.
Using a single server, you can have a single or common namespace. However, if you have multiple sites or servers at various locations, you may require multiple namespaces—for instance, webmailuk.yoursite.com for the UK location.
By default, the URLs are defined by the setup when you install Exchange Server. To check or update the current URLs, you can log in to Exchange Admin Center or use the PowerShell cmdlet. However, the process is quite slow.
A quicker way is to use the GetExchangeURLs.ps1 PowerShell script to view the current URLs and ConfigureExchangeURLs.ps1 script to update the new URLs or namespaces.
.\GetExchangeURLs.ps1 -Server
servername /servername
For instance,
.\GetExchangeURLs.ps1 -Server Exchange16
For single server:
.ConfigureExchangeURLs.ps1 -Server Exchange16 -InternalURL mail.stellarinfo.com -ExternalURL mail.stellarinfo.com -AutodiscoverSCP autodiscover.stellarinfo.com
For multiple servers:
.ConfigureExchangeURLs.ps1 -Server Exchange16IN,Exchange16UK -InternalURL mail.YourDomainName.com -ExternalURL mail.YourDomainName.com
For different Autodiscover namespace:
.ConfigureExchangeURLs.ps1 -Server Exchange16IN,Exchange16UK -InternalURL mail.YourDomainName.com -ExternalURL mail.YourDomainName.com -AutodiscoverSCP autodiscover.YourDomainName.com
Check the updated namespaces:
.\GetExchangeURLs.ps1 -Server Exchange16
Step 2: Import SSL Certificate
If you have migrated from the older server, you can export the SSL certificate and import it into your new server. You may also get an SSL certificate from a trusted Certifying Authority (CA).
Export SSL Certificate from Exchange 2013 or Later (Source Server)
The steps to export SSL certificate are as follows:
- Open File Explorer and create a new folder in C: drive volume.
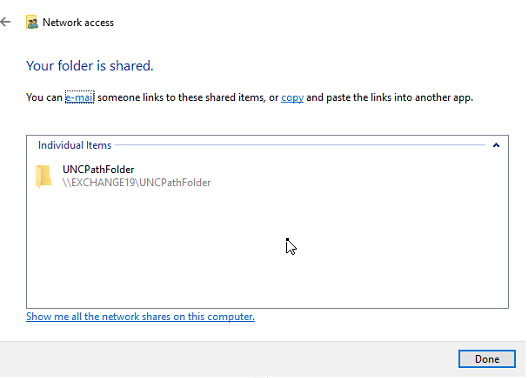
- Right-click on the folder and choose to Give access to > Specific people…
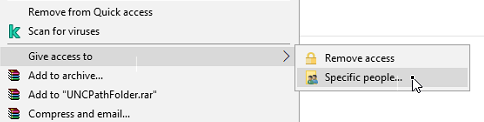
- Add administrator as owner and click Share. This will create a shared path location. Next, you need to create the same folder in the destination Exchange Server.
- Log in to Exchange Admin Center (EAC) and navigate to servers > certificates.
- Choose the source server from the dropdown and select the SSL certificate.
- Click three dots (more) and choose Export Exchange certificate.
- Enter the UNC path location (folder name) with pfx. You may enter a password to secure or encrypt the SSL certificate and click OK.
- This will export and save the SSL certificate at the selected location.
Import SSL Certificate in Exchange 2013 or Later (Targeted/Destination Server)
To import the SSL certificate, follow these steps:
- Copy the SSL certificate from the source server to the destination server under the UNC folder.
- Open EAC and go to servers > certificates.
- Click on the three dots (more) icon and choose Import Exchange certificate.
- Enter the UNC folder path with pfx. Then, enter the password and click Next.
- Choose the certificate and click Finish.
This will import the SSL certificate. The steps to import an SSL certificate remain the same if you have already received from Certifying Authority. To request a certificate from Certifying Authority, follow these steps:
- Open EAC and go to servers > certificates and click the +
- Choose Create a request for a certificate from the certificate authority and type a friendly name for the certificate. You may also request a wildcard certificate.
- Click Next.
- Click Browse and choose the server (destination server).
- Choose the domain names you want to include in the certificate, such as YourDomain.com or autodiscover.YourName.com, and root domain. You can add them and may remove other unnecessary domains.
- Fill in your organization details and choose the UNC path to save the certificate with the .req
- Click Finish.
- To receive a certificate and import it, you must submit this .req file to a Certifying Authority, such as GlobalSign or DigiCert.
The next step is to enable the certificate for Exchange Client Access Services. For this,
- Select the imported certificate and click the edit (pencil)
- Under Services, choose services for which you want to enable the certificate.
- Click Save.
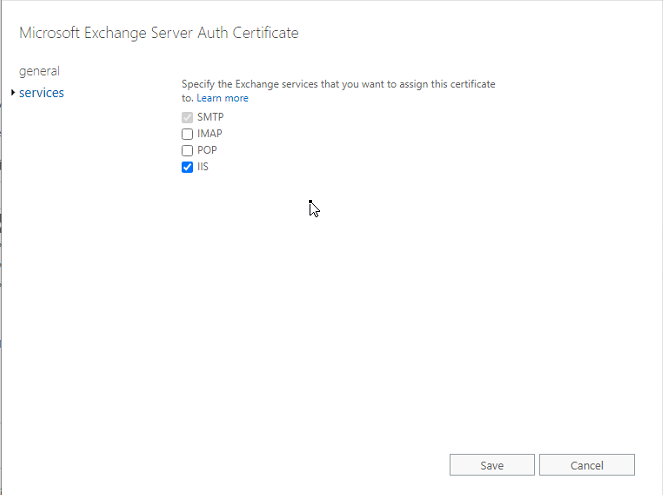
- Click Yes to confirm.
- Once done, restart the IIS for changes to take effect.
At this stage, you have successfully configured all the Client Access services (mentioned earlier in the article).
You may now move mailboxes from the old server to your new Exchange Server 2016/2019. You can use the Exchange Admin Center (EAC) to create migration batches or use a specialized migration tool, such as Stellar Migrator for Exchange. The software offers a faster, more reliable, and convenient way to move mailboxes with minimal effort.
Stellar Migrator for Exchange automatically maps source and destination mailboxes, and it also allows you to create new mailboxes on the target server and modify mailbox mappings as needed. With the tool, you don’t need to manually recreate databases and users beforehand, as it simplifies and automates much of the process. In addition, you can migrate user mailboxes directly to an Office 365 tenant, making it ideal for hybrid and cloud migrations.
For complete instructions, refer to this step-by-step guide to migrating Exchange Server.
Conclusion
Client Access Services are an important part of Exchange Server deployment or migration, as they enable users to connect to their mailboxes and send/receive emails. This article helps you configure the Client Access Services in Exchange Server 2016 and Exchange Server 2019. Once configuration is complete, you can seamlessly move mailboxes from your old Exchange Server to the new one using the EAC batch migration or the Stellar Migrator for Exchange.


 4 min read