Migrating from local Exchange Server to Microsoft 365 platform is not just enabling the service and start using it. You must ensure a number of things, such as security, email delivery, and compliance, to use the Office 365 services smoothly. Apart from these, you need to ensure that the migration has been successful, all the data has been migrated, email flow is smooth, and security services are in place to ensure that the email service will not be interrupted. In this article, we will be discussing how you can ensure ‘mail delivery after migrating the services to Office 365’ from a local Exchange Server.
Steps to Ensure Mail Delivery to Office 365 after Migration
Below are some steps that you need to perform to ensure that email delivery is correct after migration to Office 365.
Update the DNS Records
After the tenant has been created, the data has been migrated, the domains have been verified, and the users, public folders, shared mailboxes, groups, and rules have been created, the next step is to update the DNS records to ensure that the emails will be delivered and sent from Office 365.
The important record is the MX (Mail Exchange) record, which is responsible for receiving emails for the domain. Although other MX records might exist on the DNS zone of the domain, you must ensure that the MX record provided from Office 365 is on the highest priority in the list. The MX record can be tested with the nslookup command (see the below example).
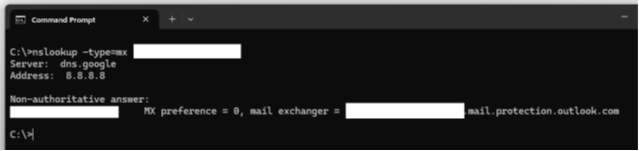
This will confirm that the MX record is pointing to Office 365.
To get the DNS records to be configured on the DNS hosting of the domains, open the Microsoft 365 admin center.

In the admin center, click on the Settings tab and then click on Domain. After that, you need to click on the link near the domains to finalize the setup. Here, you will see all the records needed for a domain to be finalized on Office 365. Such records include the MX records and other CNAME and TXT records to ensure the auto discovery processes, and other records which include SPF, DMARC, and DKIM.
After these records have been created, the setup of domain in Microsoft 365 would confirm that the records have been created. This will allow emails to be redirected to Office 365.
Check the SPF Record
The SPF (Sender Policy Framework) is essential for other domains and server to accept emails, coming from the setup. This record will trace back to the SPF record to ensure that the emails being sent to the domain are really coming from legitimate source of the domain. Here is an example of an SPF record.
v=spf1 include:spf.protection.outlook.com -all
If there are multi-function devices or services which are sending emails as the domain in Office 365, you must ensure that these are listed in the SPF record. If this is not done, emails will not be delivered or the IP address could be blacklisted. To include the public IP addresses to the SPF record, you can add them (see the below example).
v=spf1 ip4:203.0.113.42 include:spf.protection.outlook.com -all
In the above example, we have added an ip4 section with a fictitious IP address. You can remove the address and replace it with your public IP address.
If there are multiple IP addresses, you can add them (see the below example).
v=spf1 ip4:203.0.113.42 ip4:198.51.100.24 include:spf.protection.outlook.com -all
To test the SPF record and confirm it, you can run the following command.

You can also use other online tools to test the SPF record, such as EasyDMarc or DMarcly.
Check the DKIM Records
The DKIM (DomainKeys Identified Mail) record is an email authentication method to verify that the email received is not modified or altered in transit. The DKIM records are CNAME records which must be added from the DNS hosting options. After the records have been added, you can verify and enable the service from the Office 365 portal in the Security and Compliance portal. For this,
- Open the Microsoft Defender Portal using the URL security.microsoft.com.
- Open Policies and Rules / Threat Policies/ Email Authentication Methods.
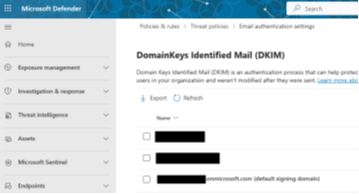
If the services are enabled without any issues, the records are complete and successful.
Confirm All the Data has been Migrated
After migration, it is important to ensure that all the data from the Exchange Server has been migrated successfully. This would involve checking the migration sheet and ensuring that all the mailboxes and public folders have been migrated. However, this can be a bit tricky and involve a number of resources and checks.
Migrating data is crucial for a successful migration. Migrating several mailboxes, public folders, and groups can be tricky as it would involve scripting and other methods. These challenges might hinder the migration.
Alternatively, you can look at third-party Exchange migration tools to facilitate the migration process. One such tool is Stellar Migrator for Exchange. It is a complete migration tool that can migrate user mailboxes, user archives, shared mailboxes, disabled mailboxes, and public folders. The tool is an error-free solution with zero data loss and minimal downtime. It offers a complete solution to migrate from local Exchange Server to Microsoft 365 and vice-versa. It can also be used for Microsoft 365 to Microsoft 365 migration. It has incremental migrations and automated email matching which will give you assurance that all the data is migrated and nothing is left behind.
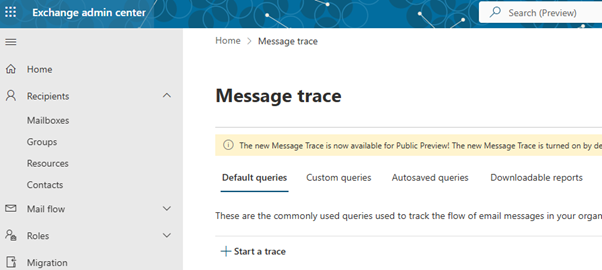
Monitor the Email Flow
After the above is done, you need to monitor the email flow. You should test some users to ensure that emails are being received and sent, and also test that all the multi-function devices and other devices are sending emails. You should also make use of the Message Trace to ensure that if there are any error or delays. You can access the Message Trace from the Exchange Admin Center of Office 365.
Conclusion
Ensuring the success of a migration requires careful attention to post-migration tasks. Neglecting these tasks will lead to unforeseen complications during and post migration. Such issues may disrupt or delay the project. A proactive approach helps mitigate risks and ensures a smooth transition and success. You can follow the above steps to ensure mail delivery to Office 365 after migration from a local Exchange Server.


 6 min read