Internet Information Services or IIS is a web server from Microsoft that runs on Windows and serves requested web pages or files. On the other hand, a virtual directory is a path you specify in Internet Information Services or IIS and map application to the physical directory containing the application's content on your local or remote server.
When you install Exchange Server, the setup automatically configures these IIS virtual directories, which includes,
- Autodiscover
- Exchange Control Panel (ECP)
- Exchange Web Services (EWS)
- MAPI
- Exchange ActiveSync
- Online Address Book (OAB)
- Outlook Web App (OWA)
- PowerShell
If you encounter errors while accessing these services or web pages, it could be due to a problem with the IIS virtual directories.
Further, IIS virtual directory errors can lead to problems, such as,
- Connectivity issues with ECP, OWA, etc.
- Blank screen problem
- Page errors, such as ECP HTTP 500 error
- Missing files
- Permission issues
- Obstruct email access via web
- ECP runtime error (web.config configuration file)
However, administrators can use the IIS Manager, Exchange Admin Center (EAC), or Exchange Management Shell (EMS) on the server to view, alter, or reset the properties of these virtual directories and fix any issue with the IIS virtual directories.
In this article, you will learn steps to view, configure, reset and recreate Exchange IIS virtual directories to fix common issues and resolve IIS virtual directory errors.
Methods to Fix IIS Virtual Directory Errors
Most IIS virtual directory errors can be resolved by resetting or recreating them using Exchange Management Shell. However, to recreate IIS virtual directories for OWA or ECP, you must remove the existing virtual directories.
However, before we proceed to the troubleshooting steps, let's quickly discuss steps to view and configure IIS virtual directory properties using Exchange Admin Center (EAC).
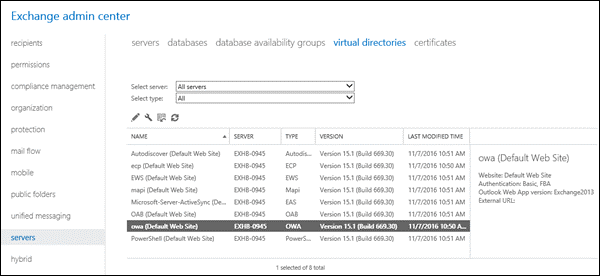
- Login to EAC and navigate to servers> directories.
- Select the virtual directory you want to view or configure. The properties, such as Website, Authentication, Web version, External URL, etc., are listed in the right pane.
- If you have more than one Exchange Server setup, you can choose the Exchange Server from the drop-down to view or configure the virtual directories.
- Select the virtual directory from the list and click the Edit icon to view and configure the IIS virtual directory properties.
- You can now add or change the Internal or External URLs to access the web page, such as Outlook Web App (OWA), from internal or external networks. The default value is https://_.ServerFQDN._/owa
- Similarly, you can customize and configure other options, such as 'authentication', 'features,' and 'file access,' etc.
You may also use Exchange Management Shell (EMS) to view the Virtual Directory properties. The syntax is as follow,
Get-OWAVirtualDirectory
The cmdlet displays a summary list of all OWA web virtual directories on all Exchange Servers in your organization. For more information, refer to this Microsoft Guide.
Method 1: Reset and Recreate IIS Virtual Directory using EAC
If the web or IIS virtual directory is not working as it should or displaying errors, you can try resetting it. When you reset a Virtual Directory, the directory is deleted and recreated with default settings. However, any customize settings are lost.
The steps are as follow,
- Login to EAC and navigate to servers> virtual directories.
- Choose the virtual directory you want to reset, such as OWA.
- From the toolbar, click on the Reset icon.
- A Warning page will open. Enter the UNC path to save and backup the current virtual directory settings.
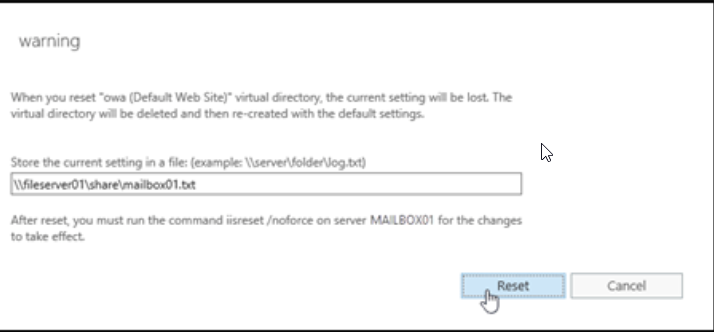
- Then click the 'Reset' button. Repeat the steps to reset other virtual directories.
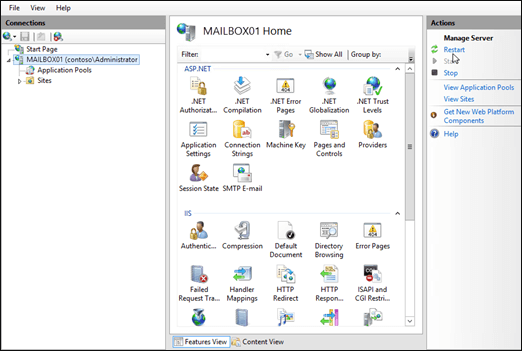
- Now open IIS Manager. You can use the Server Manager or press Windows + Q, type inetmgr, and choose Internet Information Services (IIS) Manager from the list to open the IIS Manager.
- Choose the server in IIS Manager and then click the 'Restart' option listed under the Action pane.
You may also execute the following command in an elevated Command Prompt window to restart IIS.
net stop w3svc /y
net start w3svc
After the restart, check the web page you want to access. This should fix the IIS virtual directory error.
Method 2: Recreate Exchange IIS Virtual Directories using EMS
You may also use the Exchange Management Shell (EMS) to recreate all virtual directories. As mentioned earlier, you need to remove the Virtual directory to recreate it. The steps are as follow,
Open EMS as administrator and then execute the following commands to recreate IIS virtual directories in Exchange
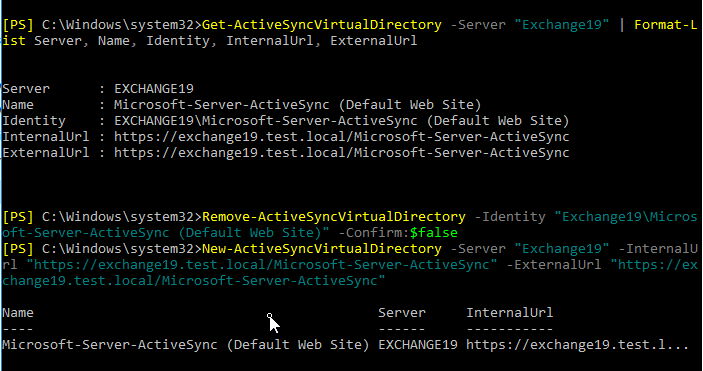
Recreate Exchange ActiveSync virtual directory
Get-ActiveSyncVirtualDirectory -Server "ServerName" | Format-List Server, Name, Identity, InternalUrl, ExternalUrl
Remove-ActiveSyncVirtualDirectory -Identity "ServerName\Microsoft-Server-ActiveSync (Default Web Site)" -Confirm:$false
New-ActiveSyncVirtualDirectory -Server "ServerName" -InternalUrl "https://mail.xyz.com/Microsoft-Server-ActiveSync" -ExternalUrl https://mail.xyz.com/Microsoft-Server-ActiveSync
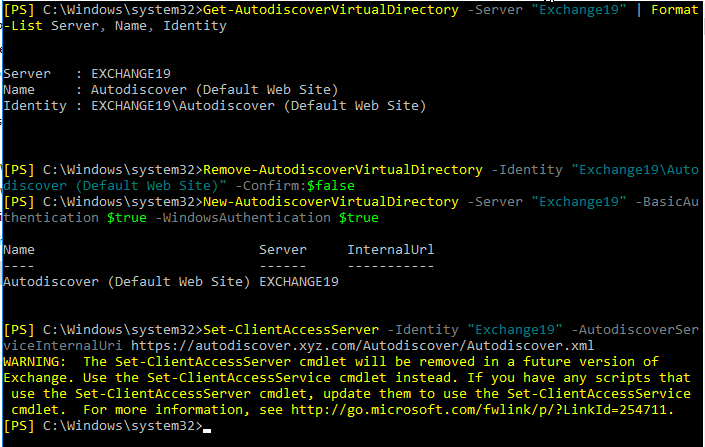
Recreate Autodiscover virtual directory
Get-AutodiscoverVirtualDirectory -Server "ServerName" | Format-List Server, Name, Identity
Remove-AutodiscoverVirtualDirectory -Identity " ServerName\Autodiscover (Default Web Site)" -Confirm:$false
New-AutodiscoverVirtualDirectory -Server " ServerName" -BasicAuthentication $true -WindowsAuthentication $true
Set-ClientAccessServer -Identity " ServerName" -AutodiscoverServiceInternalUri https://autodiscover.xyz.com/Autodiscover/Autodiscover.xml
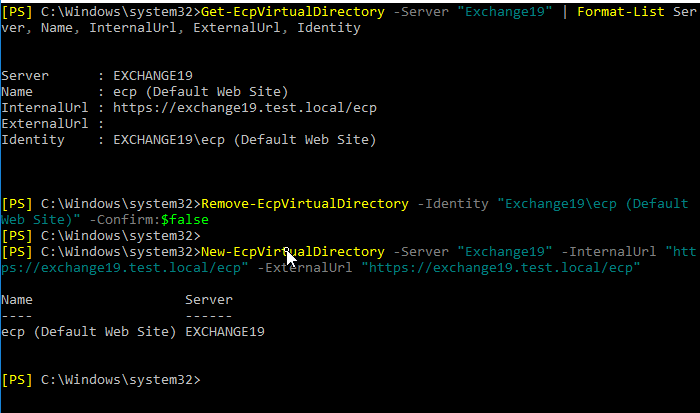
Recreate Exchange Control Panel (ECP)
Get-EcpVirtualDirectory -Server "SERVERNAME" | Format-List Server, Name, InternalUrl, ExternalUrl, Identity
Remove-EcpVirtualDirectory -Identity "SERVERNAME\ecp (Default Web Site)" -Confirm:$false
New-EcpVirtualDirectory -Server "SERVERNAME" -InternalUrl "https://mail.xyz.com/ecp" -ExternalUrl "https://mail.xyz.com/ecp"
Recreate Exchange Web Services (EWS)
Get-WebServicesVirtualDirectory -Server "SERVERNAME" | Format-List Server, Name, InternalUrl, ExternalUrl, Identity
Remove-WebServicesVirtualDirectory -Identity "SERVERNAME\EWS (Default Web Site)" -Confirm:$false -Force
[New-WebServicesVirtualDirectory -Server "SERVERNAME" -InternalUrl "https://mail.xyz.com/EWS/Exchange.asmx" -ExternalUrl "https://mail.xyz.com/EWS/Exchange.asmx"

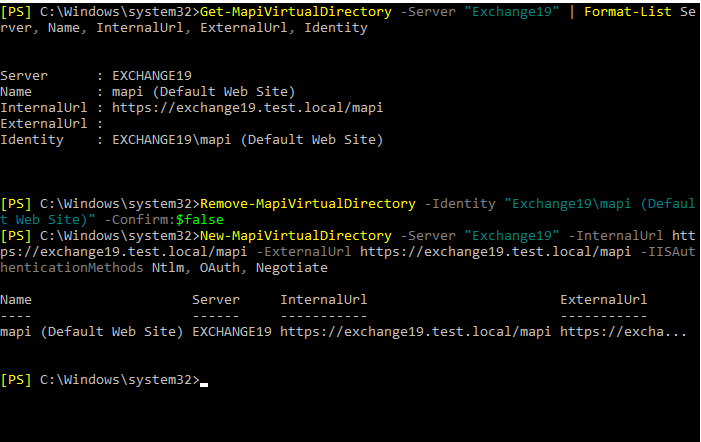
Recreate MAPI
Get-MapiVirtualDirectory -Server "SERVERNAME" | Format-List Server, Name, InternalUrl, ExternalUrl, Identity
Remove-MapiVirtualDirectory -Identity "SERVERNAME\mapi (Default Web Site)" -Confirm:$false
New-MapiVirtualDirectory -Server "SERVERNAME" -InternalUrl https://mail.xyz.com/mapi -ExternalUrl https://mail.xyz.com/mapi -IISAuthenticationMethods Ntlm, OAuth, Negotiate
Recreate Exchange ActiveSync
Get-ActiveSyncVirtualDirectory -Server "SERVERNAME" | Format-List Server, Name, Identity, InternalUrl, ExternalUrl
Remove-ActiveSyncVirtualDirectory -Identity "SERVERNAME\Microsoft-Server-ActiveSync (Default Web Site)" -Confirm:$false
New-ActiveSyncVirtualDirectory -Server "SERVERNAME" -InternalUrl "https://mail.xyz.com/Microsoft-Server-ActiveSync" -ExternalUrl "https://mail.xyz.com/Microsoft-Server-ActiveSync"
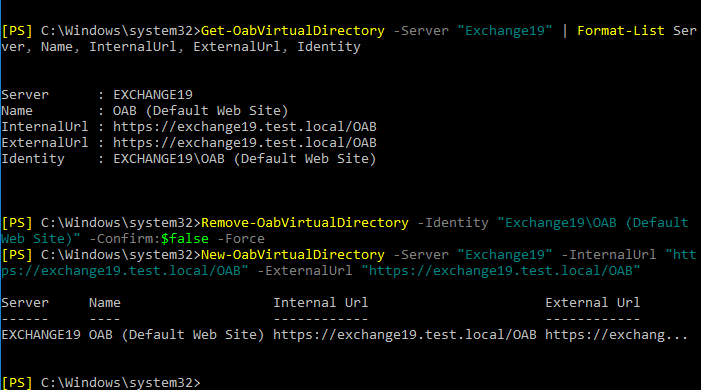
Recreate Online Address Book (OAB)
Get-OabVirtualDirectory -Server "SERVERNAME" | Format-List Server, Name, InternalUrl, ExternalUrl, Identity
Remove-OabVirtualDirectory -Identity "SERVERNAME\OAB (Default Web Site)" -Confirm:$false -Force
New-OabVirtualDirectory -Server "SERVERNAME" -InternalUrl "https://mail.xyz.com/OAB" -ExternalUrl https://mail.xyz.com/OAB
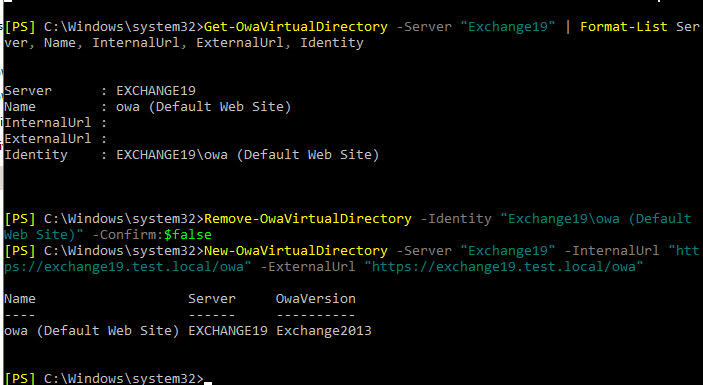
Recreate Outlook Web App (OWA)
Get-OwaVirtualDirectory -Server "SERVERNAME" | Format-List Server, Name, InternalUrl, ExternalUrl, Identity
Remove-OwaVirtualDirectory -Identity "SERVERNAME\owa (Default Web Site)" -Confirm:$false
New-OwaVirtualDirectory -Server "SERVERNAME" -InternalUrl "https://mail.xyz.com/owa" -ExternalUrl "https://mail.xyz.com/owa"
Recreate PowerShell
Get-PowerShellVirtualDirectory -Server "SERVERNAME" | Format-List Server, Name, InternalUrl, Externalurl, Identity
Remove-PowerShellVirtualDirectory -Identity "SERVERNAME\PowerShell (Default Web Site)" -Confirm:$false
New-PowerShellVirtualDirectory -Server "SERVERNAME" -Name Powershell -InternalUrl https://www.mail.xyz.com/PowerShell -ExternalUrl https://mail.xyz.com/PowerShell -RequireSSL:$false
In case you encounter an error while removing or recreating PowerShell VirtualDirectory, run the following command and then execute the above commands to remove and recreate PoweRShell virtual directory.
Add-PSSnapin Microsoft.Exchange.Management.PowerShell.SnapIn

Then restart the IIS. You may also reboot the server for the changes to take effect.
To verify, open EAC and go to servers> virtual directories.
Conclusion
Hopefully, the methods discussed in this article helped you fix the IIS virtual directory errors and restore the web services. But if the IIS virtual directory reset fails to fix the error or you are experiencing errors while recreating the virtual directories, refer to this workaround by Microsoft to fix the problem.
However, if you still can't fix the IIS virtual directory errors, we recommend you set up a new Exchange Server and move mailboxes from your current server to the new server. You may export the mailboxes by exporting them to PST via EAC or EMS or use a third-party EDB converter tool such as Stellar Converter for EDB. The software can help you expedite the mailbox transfer process. It can export up to 4 mailboxes simultaneously directly from your current Exchange Server database (offline) to the new Exchange Server database in a few clicks. Use the software to minimize downtime and restore critical web services.


 4 min read