Autodiscover is an Exchange Server service that helps clients, such as Outlook, to automatically resolve and find the Exchange Web Services or EWS endpoint URL. The service was introduced with Exchange Server 2007 and Outlook 2007 release to help clients automatically establish the connection with the user mailboxes on Exchange Server and configure the user profile on Outlook clients in Windows, macOS, or supported mobile devices with minimum steps.
Once the client is connected to your Exchange messaging environment, the Autodiscover service allows the clients to access the Exchange Server features, such as Unified Messaging (UM), Cached Exchange Mode, and Offline Address Book (OAB), etc.
If the Autodiscover service is not configured properly, users may encounter connectivity issues and fail to configure their email accounts in the Outlook client.
How to Configure Autodiscover Service in Exchange Server
When you install and set up an Exchange Server, it automatically creates an auto-discover virtual directory in Internet Information Store (IIS). At the same time, a Service Connection Point (SCP) object is also created in the Active Directory containing the Autodiscover Service URL.
Below we have discussed the steps to configure the namespace, internal and external URLs, and the internal Autodiscover URL in Exchange Server.
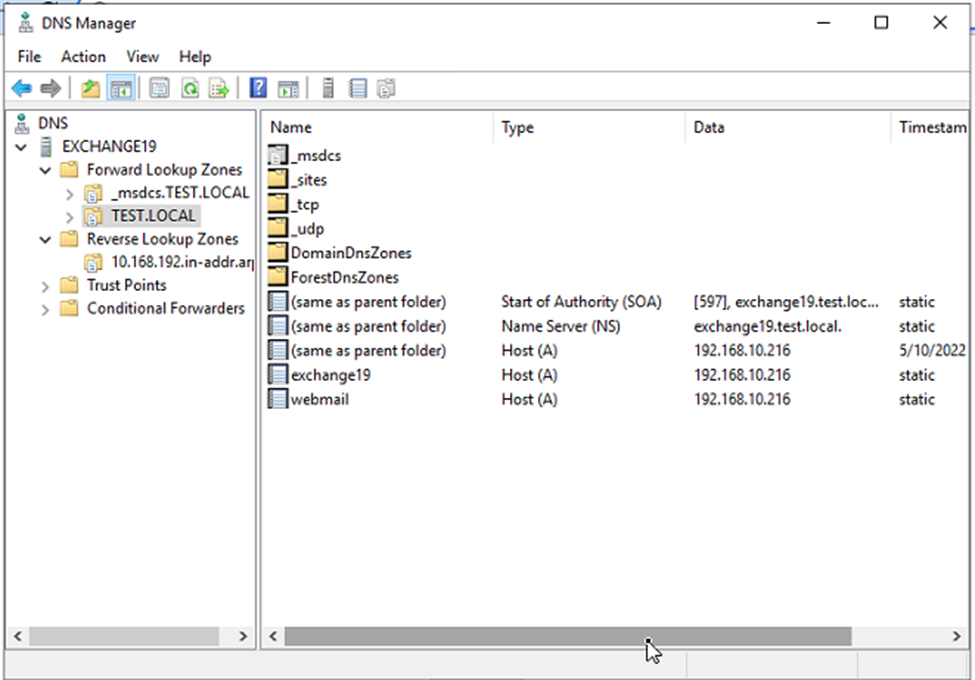
Step 1: Configure DNS
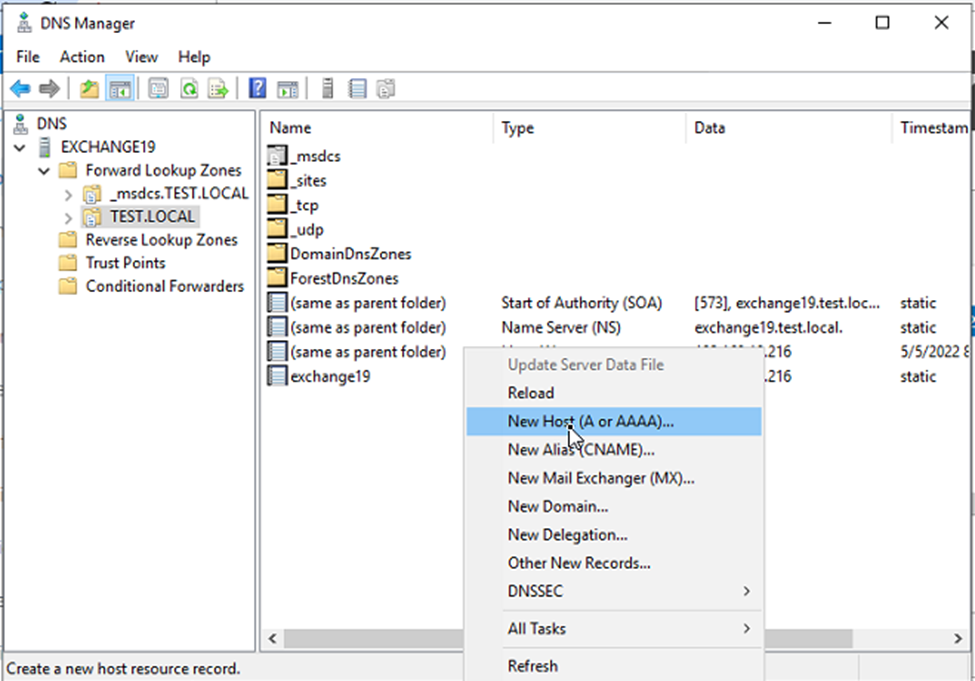
- Open the Server Manager and click on Tools > DNS.
- Click on Forward Lookup Zones and then on your domain name.
- Right-click on the empty area and choose New Host (A or AAAA)…
- Type the name, such as mymail, webmail, or anything you prefer. The FQDN will automatically update to the name.yourdomain.com.
- Click the Create associated pointer (PTR) record checkbox and click OK.
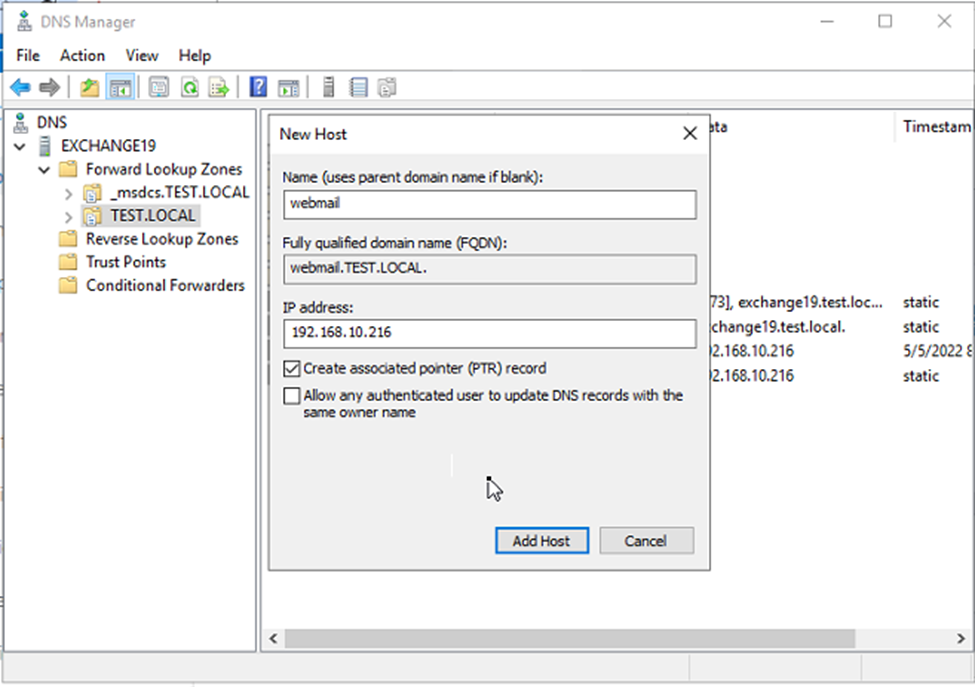
- This will create the A host record for the FQDN you will be using as an internal Autodiscover URI.
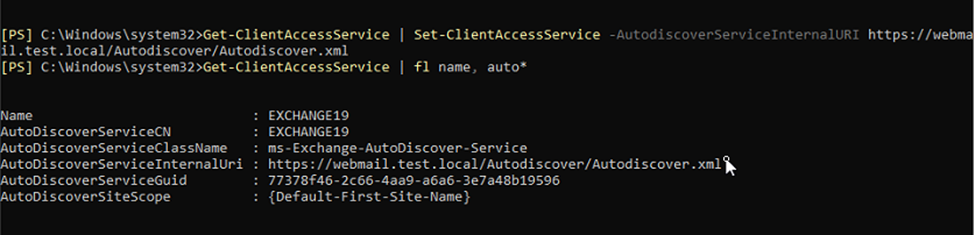
Step 2: Configure Internal Autodiscover URL
Using the Get-ClientAccessService and Set-ClientAccessService cmdlets, you can update the internal Autodiscover URL. To find the current internal Autodiscover URL, run the following command:
Get-ClientAccessService | format-list name, auto*

Now execute the following command by replacing the FQDN you added as A record in the earlier step.
Get-ClientAccessService | Set-ClientAccessService –AutodiscoverServiceInternalURI https://webmail.test.local/Autodiscover/Autodiscover.xml
Then check and verify if the AutodiscoverServiceInternalUri has changed or not using the following command.
Get-ClientAccessService | format-list name, auto*
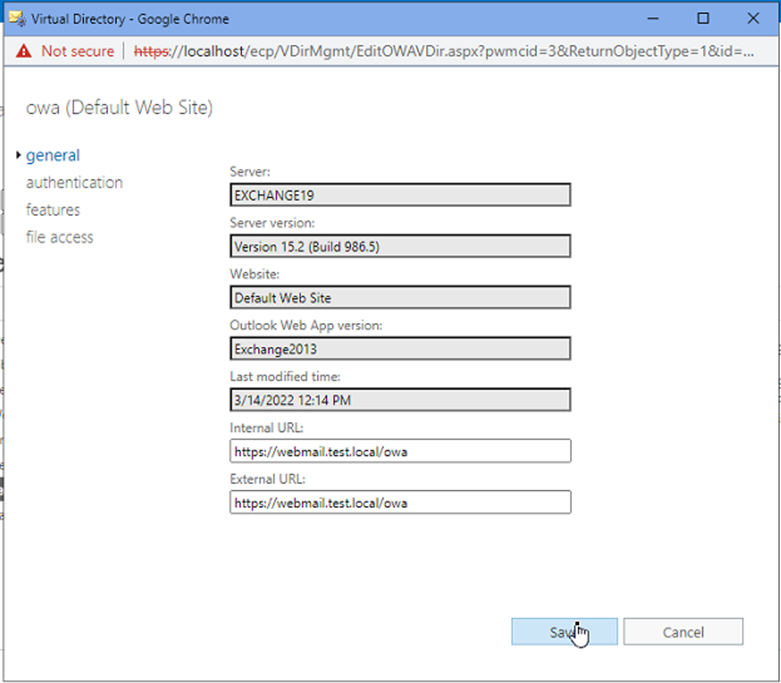
Step 3: Configure Internal and External URLs
You also need to update or configure your internal and external URLs for Autodiscover to work.
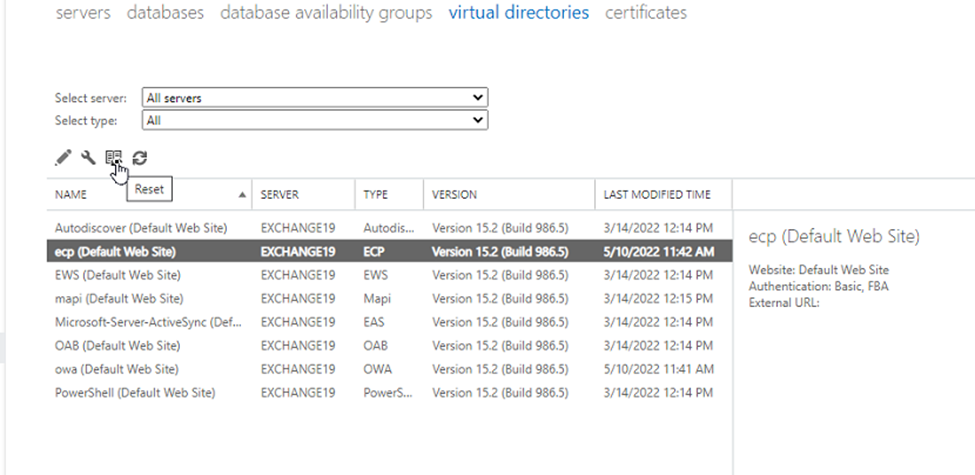
Log in to the Exchange Admin Center and go to servers > virtual directories.
Double-click on the owa (Default web site) and enter the updated URL in the Internal URL and External URL fields.
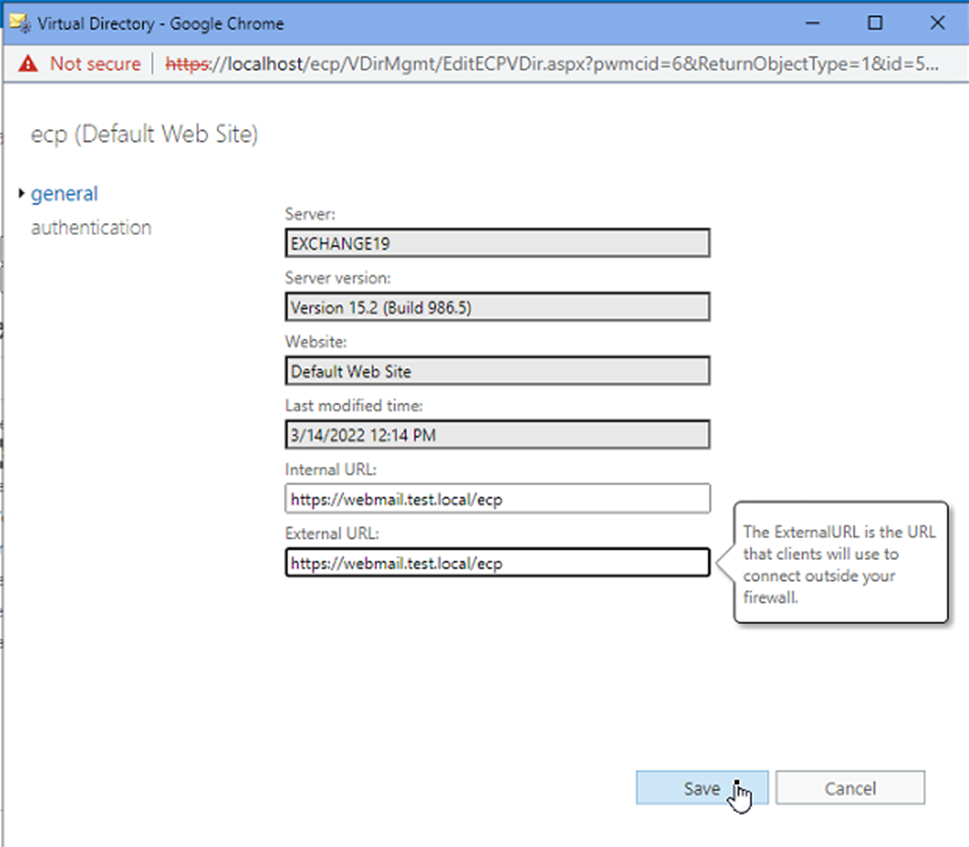
Similarly, update the ecp, oab, mapi, ews, Microsoft-Server-ActiveSync, and powershell virtual directories (Default web site) Internal and External URLs.
You may also execute the following commands to update all virtual directories' internal and external URLs.
Set-owaVirtualDirectory -Identity 'SERVER\owa (Default Web Site)' -InternalUrl 'https://webmail.test.local/owa' -ExternalUrl 'https://webmail.test.local/owa'
Set-EcpVirtualDirectory -Identity 'SERVER\ecp (Default Web Site)' -InternalUrl 'https://OWAHOSTNAME/ecp' -ExternalUrl 'https://OWAHOSTNAME/ecp'
Set-ActiveSyncVirtualDirectory -Identity 'SERVER\Microsoft-Server-ActiveSync (Default Web Site)' -InternalUrl 'https://webmail.test.local/Microsoft-Server-ActiveSync' -ExternalUrl 'https://webmail.test.local/ Microsoft-Server-ActiveSync'
Set-OabVirtualDirectory -Identity 'SERVER\oab (Default Web Site)' -InternalUrl 'https://webmail.test.local/oab' -ExternalUrl 'https://webmail.test.local/oab'
Set-AutoDiscoverVirtualDirectory -Identity 'SERVER\AutoDiscover (Default Web Site)' -InternalUrl $null -ExternalUrl $null
Set-EwsbVirtualDirectory -Identity 'SERVER\ews (Default Web Site)' -InternalUrl 'https://webmail.test.local/ews' -ExternalUrl 'https://webmail.test.local/ews'
Set-MapiVirtualDirectory -Identity 'SERVER\mapi (Default Web Site)' -InternalUrl 'https://webmail.test.local/mapi' -ExternalUrl 'https://webmail.test.local/mapi'
Set-PowershellVirtualDirectory -Identity 'SERVER\Powershell (Default Web Site)' -InternalUrl 'https://webmail.test.local/Powershell' -ExternalUrl 'https://webmail.test.local/Powershell'

After configuring the URLs, reset IIS and restart the Microsoft Exchange Transport Service for the changes to take effect immediately.
To reset IIS, run the IISRESET command in EMS.
To restart the Microsoft Exchange Transport Service, press Windows+R, type Services.msc, and press the Enter key. Right-click on Microsoft Exchange Transport and choose Restart.
You can now access the OWA and other services via the newly configured Autodiscover URL.
However, if anything goes wrong or the changed URL does not work, you can reset the virtual directories using the following steps:
- Select the virtual directory under servers > virtual directories and click the Reset icon.
- Enter the path to save the log.txt file with the complete file name and click Reset.
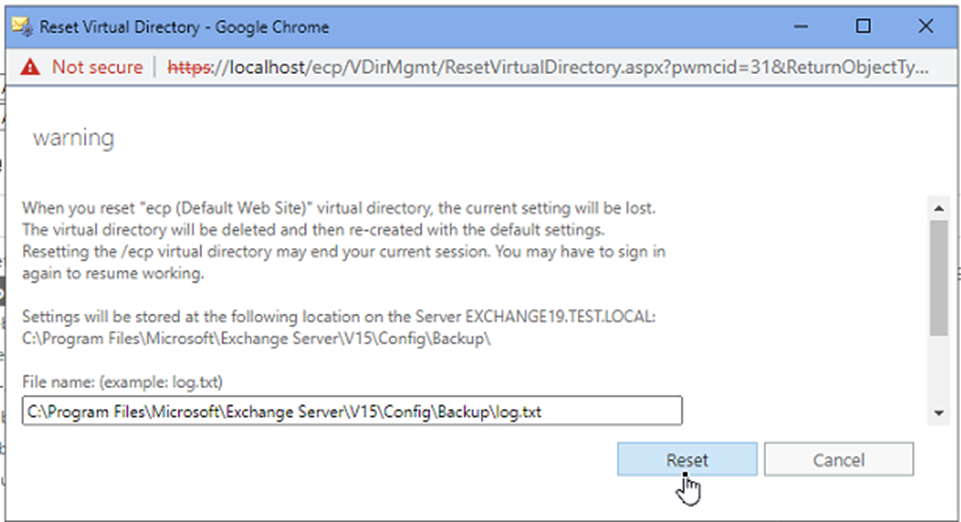
This will recreate the virtual directories to the original and fix the issue.
You can test whether Autodiscover is working or not by using the Microsoft Remote Connectivity Analyzer tool.
Step 4: Move Mailboxes
Once you have configured the Autodiscover service, DNS, and internal/external URLs, you can create new mailboxes for users. However, if you are upgrading from a lower Exchange Server version, you can migrate mailboxes from the older Exchange to this newly set up server. You can either move the mailboxes manually or use a specialized Exchange migration tool, such as Stellar Migrator for Exchange.
The software helps migrate mailboxes from the old Exchange Server directly to the new Exchange Server with ease. It supports all major Exchange Server versions, including 2010, 2013, 2016, and 2019.
Conclusion
Without the Autodiscover service or with incorrect Autodiscover configuration, clients may fail to locate the server or connect to the mailboxes—resulting in error messages and disruptions. By following the steps discussed in this article, you can configure the Autodiscover service correctly and update the internal and external URLs across various virtual directories. Once the configuration is complete, test the connectivity thoroughly before creating or migrating mailboxes.


 4 min read