Microsoft Outlook allows the users to encrypt email in Outlook 2013, 2016, and other Outlook versions to protect the privacy of email message. There are three methods to do it, which we have explained in this article.
Why do You need to Encrypt Email in Outlook?
A few reasons why you should encrypt emails in Outlook are:
- Encrypting Outlook emails ensures privacy of the messages. Even if a hacker is able to hack an encrypted email, they can’t read it.
- Many global organizations need to follow compliance standards that require encryption of data. For instance, CFPB, CJIS, and HIPAA require data encryption.
- Outlook email encryption also helps in authenticating senders and spotting phishing emails.
How to Encrypt Email in Outlook?
There are three ways to encrypt email in Outlook 2016, 2013 and other versions.
Method 1: Using Digital Certificates (S/MIME)
Secure/Multipurpose Internet Mail Extensions (S/MIME) is a technology that allows you to encrypt emails with asymmetric cryptography. You can encrypt email in Microsoft Outlook with this technology by digitally signing the emails before sending them.
The following are a few things you need to know about the S/MIME method:
- The method works only if the email recipient uses Outlook or any other S/MIME compatible email application.
- Both sender and the recipient must purchase, install, and share encryption certificates.
- You can’t apply the S/MIME method for recipients that use free email services, such as Gmail and Hotmail.
How to Encrypt MS Outlook Emails using S/MIME?
To encrypt Outlook emails using the S/MIME technology, follow these steps:
- Launch Outlook and open the File menu.
- Go to Options > Trust Center > Trust Center Settings.
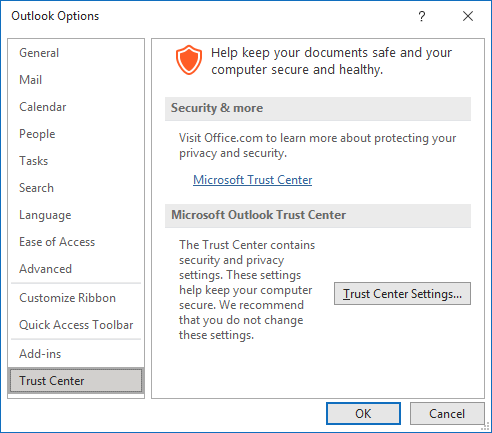
- In the Trust Center window that opens, open the Email Security tab in the left pane.
- Under the Encrypted email section, click the Settings button. The Email Security window will open.
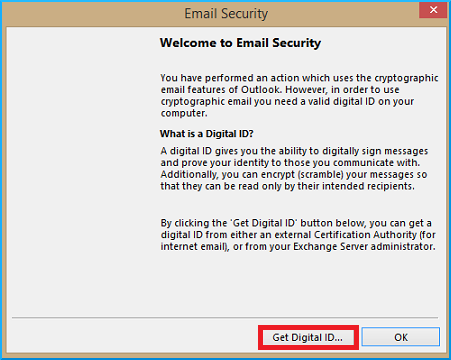
- Click the Get Digital ID button to purchase a new certificate. If you already have a certificate, go to the Digital IDs (Certificates) section and click Import/Export.
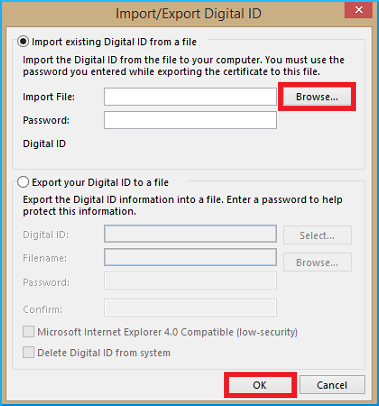
- In the new window that opens, click the Browse button and provide the digital certificate’s location (usually has the file extension .pfx). Enter the certificate’s password and click OK.
- In the next window, click the Set Security Level button and select Medium. Then click OK.
- Click OK in the Trust Center window to close it.
Your digital certificate is now installed in Outlook. The recipients also need to install digital certificates to receive encrypted Outlook emails sent by you.
How to Send an Encrypted Email?
For sending encrypted emails to contacts, you need their digital certificate. If the contacts have already obtained their encryption certificate and sent you a signed copy of the same, you can follow these steps:
- Open the digitally signed email sent by your contact.
- Right-click the sender’s name and select the Add to Outlook Contacts option. Ignore if the contact is already added to Outlook Contacts.
- Open Outlook Contacts.
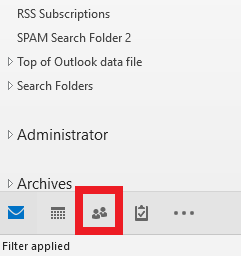
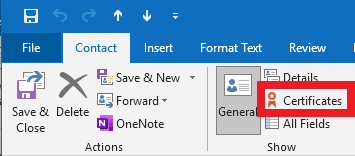
- Double-click the contact to open their contact card. Under the top menu, click Certificates. This will display a list of certificates that Outlook can use to encrypt messages. If you see at least one certificate, you may proceed.
Sending Encrypted Emails
To encrypt email in Outlook 2016 and send it to a contact, follow these steps:
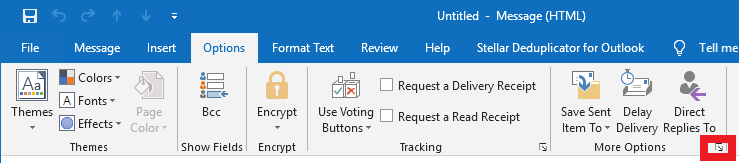
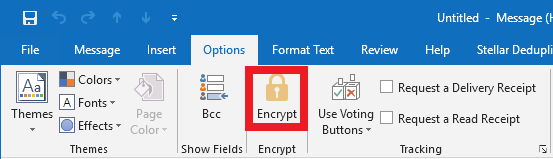
- Click New Mail under the Home tab. In the new message window, click the Options tab.
- In the More Options section, click the small arrow icon in the bottom-right corner.
- In the Properties window that opens, click the Security Settings button.
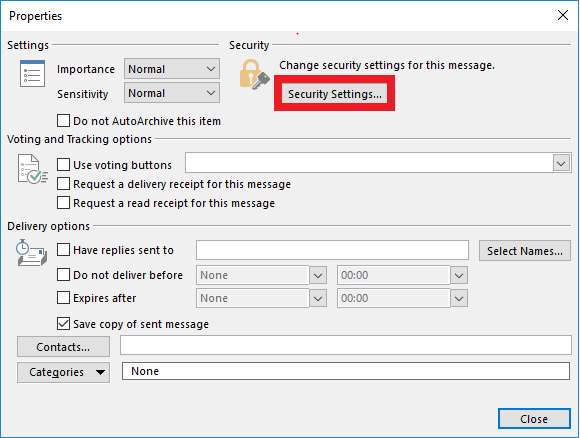
- In the Security Properties window, select the option Encrypt message contents and attachments.
Note: Email subject is not encrypted when you encrypt email in Outlook. So, avoid sharing sensitive information in the subject field.
- Click OK to close the window. Then click Close to close the previous window.
- Send the message.
Method 2: Using Office 365 Message Encryption (OME)
The Office 365 message encryption allows you to encrypt emails for all email addresses. The receiver doesn’t need to have any encryption certificates installed.
To use OME, you need to fulfill the following requirements:
- You need to use a Microsoft email account only. This would be the email account that you set up for your Office 365 subscription.
- The receiver will need to perform a few additional steps (mentioned below) when they receive your email to read the message.
- You need to have any of the following products: Microsoft Enterprise E3 or E5, Office 365 Enterprise E3 or E5, Office 365 A1, A3, or A5, Microsoft 365 Business, or Office 365 Government G3 or G5. Office products that organizations generally use - Office 365 Business Premium and Office 365 Business Essentials, don’t support OME. However, you can upgrade your existing plan to one that supports OME by visiting www.office.com and signing in with Office 365 admin account.
To check if OME is available to you or not, follow these steps:
- Visit www.outlook.com and log in using your Office 365 account.
- Start composing a new email.
- If the Encrypt button in the menu is accessible (not grayed out), it means OWE is available to you.

How to encrypt email in Microsoft Outlook using OME?
To encrypt emails by using OME, follow these steps:
- Under the Home tab, click New Email.
- In the new message window, open the Options tab and click the Encrypt button.
- After Outlook has applied the encryption, it will display a message notifying the same.
- Compose the email and send it.
Additional Steps That Recipient Needs to Take
If you use OME to encrypt emails in MS Outlook, then the recipient has to take a few additional steps after receiving your email to read the message. This is because, the receiver doesn’t get the actual email. Instead, they receive a message that looks like:
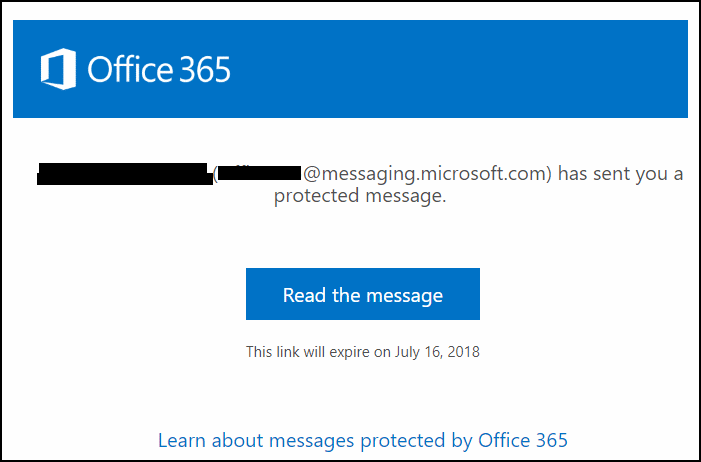
The receiver has to click the Read the message link that opens a web page on which they need to sign in with their email ID. After that, they receive an email from Microsoft Office 365 Message Encryption (MicrosoftOffice365@messaging.microsoft.com). This email has a passcode that the receiver has to enter in the web page to authenticate their identity. Only then can they see the actual email they have received.
Method 3: Using Third-Party Encryption Add-ins
The above two methods to encrypt email in Outlook 2013 are time-consuming and require technical knowledge. If you want a simpler method, then you can use encryption add-ins to encrypt Microsoft Outlook emails.
You can use third-party add-ins to encrypt emails in any email account that you are using in Outlook. For instance, you can apply encryption to a free email account provided by Gmail, Yahoo, etc.
There are many Outlook add-ins that you can use to encrypt messages, such as:
- Encryptomatic OpenPGP
- Trend Micro Email Encryption
- Encryo Outlook Addin
The working of most of the add-ins is same. You need to install the add-in and then restart Outlook. The add-in will create a new menu or a button in the Outlook menu bar which you can use to encrypt emails.
Which Method is the Best?
All the three methods have their own advantages and disadvantages. These are highlighted in the table below.
| Feature | S/MIME | OME | Add-Ins |
| Supported Email Accounts | Many | Only Office 365 Exchange Online account | Many |
| Setup Difficulty | Hard | Easy | Easy |
| Number of clicks to send encrypted emails | 6 clicks | 3 clicks | 1 clicks |
| Forwarding email possible for receiver | No | Yes | Yes |
| Cost | High | High | Low |
| Overall difficulty in implementation and use | High | Moderate | Low |
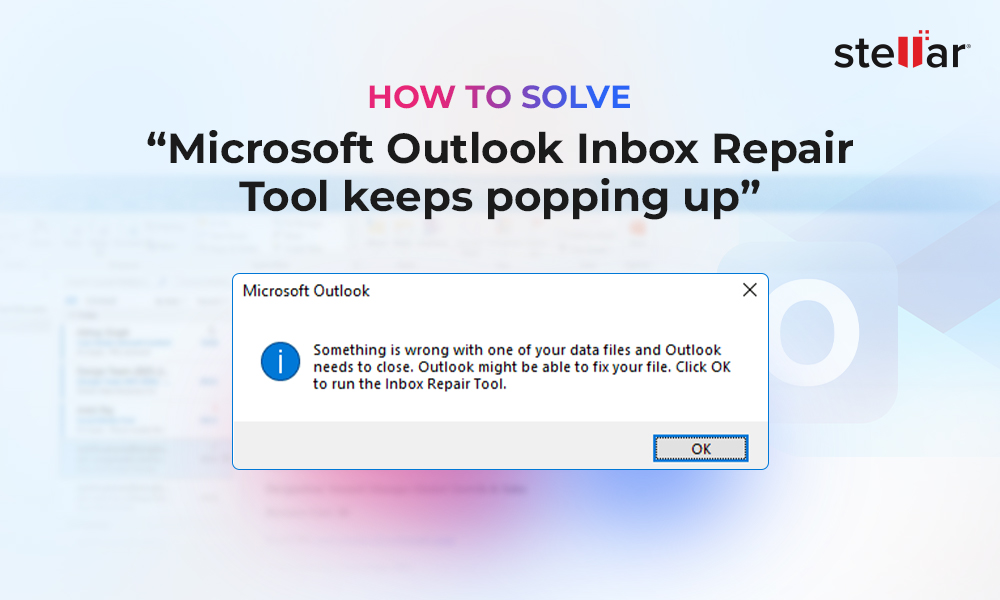
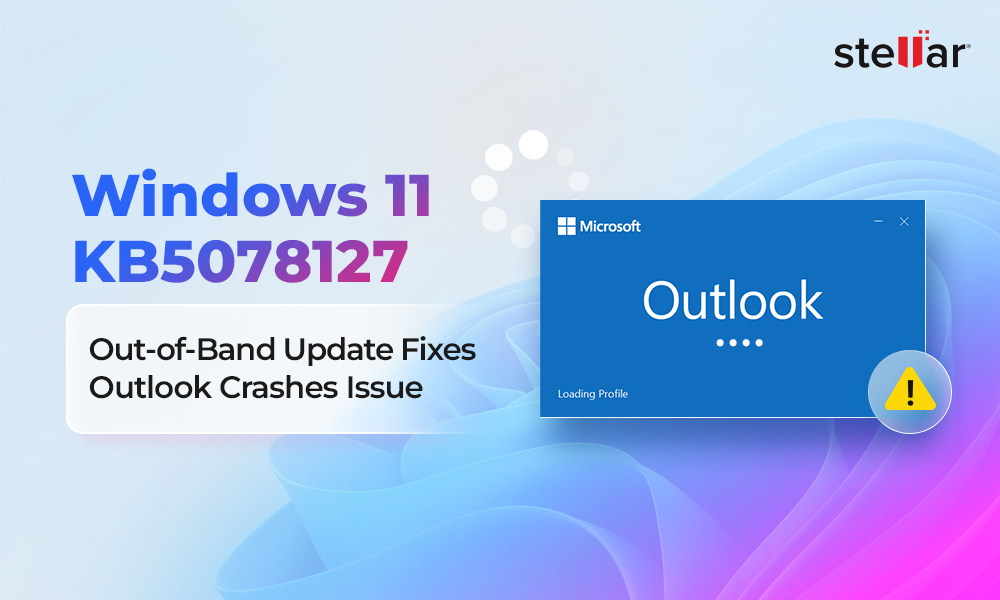
Issues with Opening/Sending Encrypted Emails in Outlook?
Sometimes, Outlook users face troubles in sending or receiving encrypted emails in Outlook. They may receive errors such as the one below:

If you are facing issues after encrypting emails in Outlook 2016, 2013, etc., then follow these steps:
- Verify that the changes made in Outlook.
- Run Outlook in safe mode and see if the problem is resolved. If the problem is fixed, it means an incompatible add-in is causing the issue. Remove this add-in and restart Outlook.
- Install the latest Outlook and Windows updates.
If the error is still not resolved, then repair the Outlook data file (PST) with ScanPST.exe. If the utility fails to repair the PST file, you can use an advanced Outlook PST Repair tool. Stellar Repair for Outlook is one such application that can repair severely corrupt or damaged Outlook data files without any issues.

Conclusion
It’s important to encrypt emails in Outlook to prevent data theft. You can encrypt email in Outlook 2019 and other versions using any of the three methods we have explained above. However, make sure you fulfill the method’s requirements before you proceed. The S/MIME and OWE methods require technical know-how. Alternatively, you can use a third-party Outlook add-in to encrypt your emails in a single click.


 5 min read