-610.jpg&url=https://www.stellarinfo.com/article/how-to-use-diskpart-command.php)


DiskPart is a command-line utility that helps you perform multiple actions, such as create, extend, and shrink drive volumes. It is available for all the versions of Windows OS, including Windows 10, 8.1, 8, 7, Windows Server 2023, 2019, 2016, 2012 R2, 2012, and 2008. You can use this utility to manage both Basic disks and Dynamic disks. Similar to the Disk Management utility, you can manage your hard drive partitions using DiskPart Command Interpreter.
Before you start using DiskPart, here’s what you need:
First, list and select the objects to give focus in the DiskPart utility. Doing so will let you type any command and act on the object (drive partition). You can list the available drive partitions and determine their number or letter using the following commands:
- List Disk – This command displays all the disks on your system.
- List Volume – It shows all the volumes on your system.
- List Partition - It shows the partitions on the disk with a focus on the system.
- List vdisk – It shows the virtual disks on your Windows system.
After this, you’ll be set to use DiskPart commands.
Popular DiskPart Commands
DiskPart lets you perform multiple tasks. The commands are executed one after another, and the previous operation results appear in the next process. Also, each time you type a command, you need to press the ‘Enter’ key. Let’s check out some common DiskPart commands and their usage.
| Commands | Usage |
| Active | This command lets you set the disk’s partition with focus as active. |
| Assign | It allows you to assign a drive letter or mount point to the volume with focus. |
| Create | It creates a partition on a disk, a volume on one or more disks, or a virtual hard disk (VHD). |
| Delete | It deletes a partition or a volume. |
| Extend | It extends the volume or partition with focus and its file system into free (unallocated) space on a disk. |
| Format | It formats a disk to accept Windows files. |
| Shrink | It reduces the size of the selected volume by the amount you specify. |
Note: It’s recommended to back up your hard drive data before executing DiskPart commands to prevent permanent data loss.
How to Use DiskPart Commands?
Now, let’s discuss the steps to perform all the common DiskPart commands.
1. Active Partition Command
Setting a drive partition as active can help you resolve multiple problems, such as ‘Reboot and Select Proper Boot Device Error,’ ‘Unable to Reset Your PC. A Required Drive Partition Is Missing Error,’ etc. To mark a partition as Active, follow the given steps:
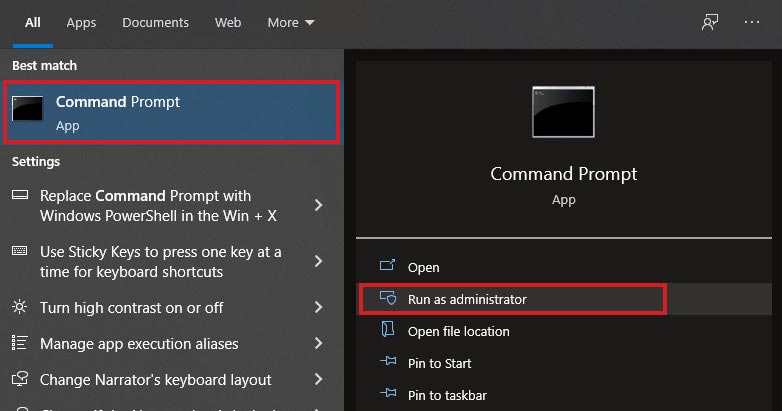
- Type cmd in Windows Search box to open Command Prompt and run it as administrator.
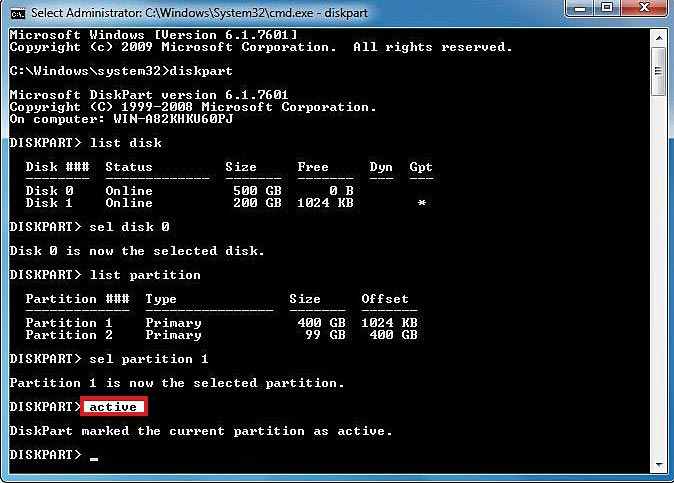
- In the elevated window, type diskpart and hit Enter.
- Next, type list disk and click Enter.
- The list of partitions will appear on the screen.
- Type list disk (with its drive letter) and hit Enter.
- Now, type the list partition and press Enter.
- Now, type special partition (with the partition number) and press Enter.
- Finally, type active and press Enter.
- Restart your PC and see if the partition is active.
2. Assign Drive Letter Command
If you’re having trouble assigning a drive letter using Disk Management, you can follow the given steps to assign a drive letter to your hard drive partition.
- Run Command Prompt as administrator. In the open elevated window, type diskpart and hit Enter to proceed.
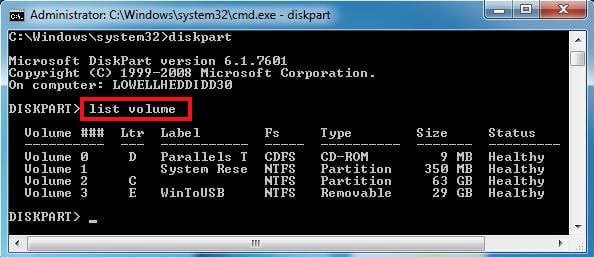
- Next, type list volume and hit Enter. The list of drive partitions will show up on the screen.
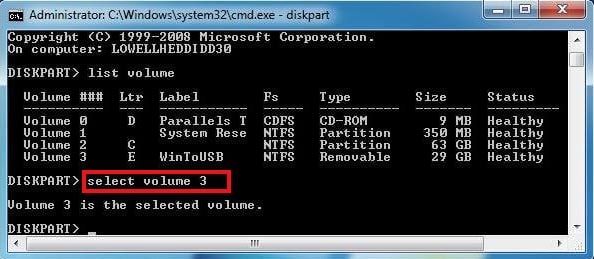
- Now, type select volume (with the drive volume number) and press Enter. For example, if you choose partition 3, type select volume 3 and then press Enter.
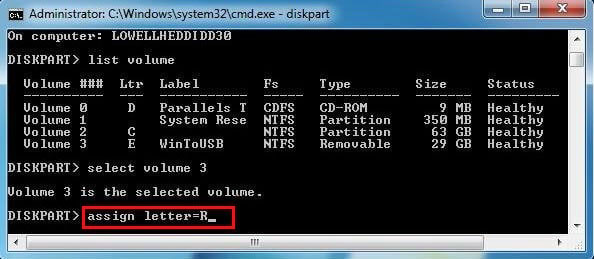
- Next, to assign a drive letter to the partition or volume, type assign letter=X (replace X with your drive letter) and hit Enter.
- Next, if you want to see the drive partition with the assigned letter, type list volume and hit ‘Enter’. Once the process is completed, type exit and reboot your system.
3. Create Primary Partition Command
You can create a primary drive partition on the basic disk drive with focus. Once the primary partition is created, the focus will automatically shift to the next partition. To create the partition with DiskPart, follow the given steps:
- Open Command Prompt, type diskpart and hit Enter.
- In the elevated window, type the following commands and press Enter after each command.
List disk
Select disk 0
Create partition primary size=20480
Assign letter=H
Exit
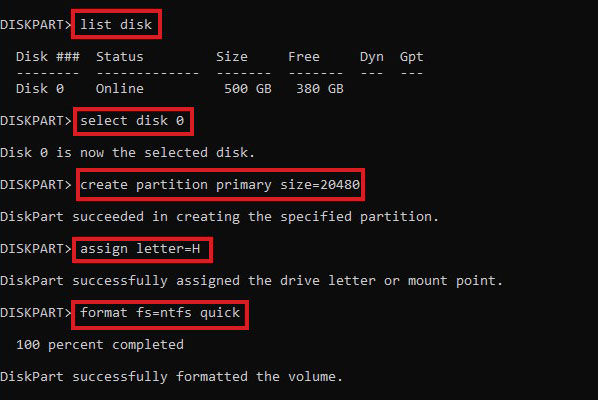
- You can choose the partition size as per your requirement and assign the desired drive letter to it.
- Now, check in the Disk Management utility if the primary partition is created successfully.
4. Delete Partition Command
To delete a particular drive partition, follow the given steps:
- Open Command Prompt, type diskpart in the window and hit Enter.
- Then type the following commands and hit Enter after each command.
List volume
Select volume 6
Delete volume
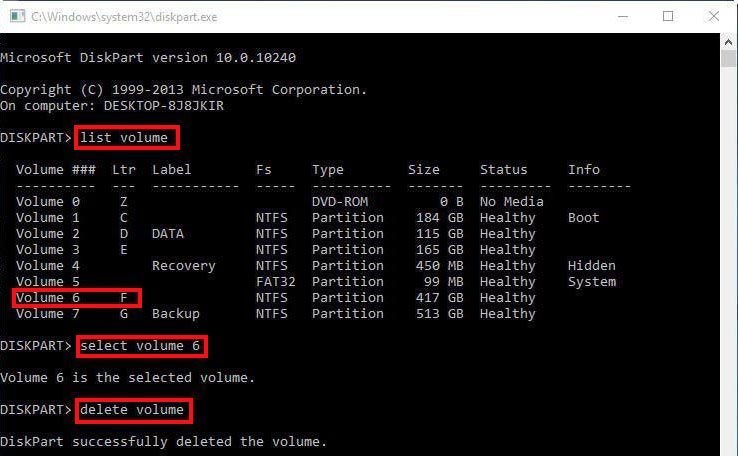
Note: You won’t be able to delete the system, boot, or any volume containing the active crash dump or paging file.
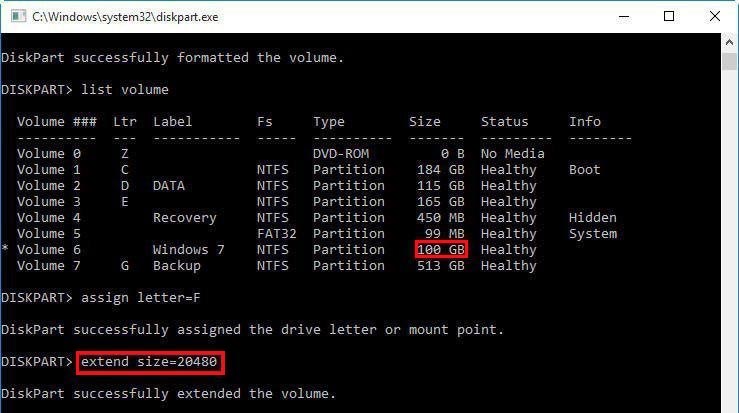
5. Extend Partition Command
First, you need to select the drive partition to focus on and then specify the size of the partition to extend the partition. Follow these steps to do so:
- Open Command Prompt, type diskpart, and press Enter.
- Type list volume and hit Enter.
- Type Select volume 5 and hit Enter.
- Type extend size=20480 and hit Enter. (You can choose the partition size as per your needs.)
- Type exit and press Enter.
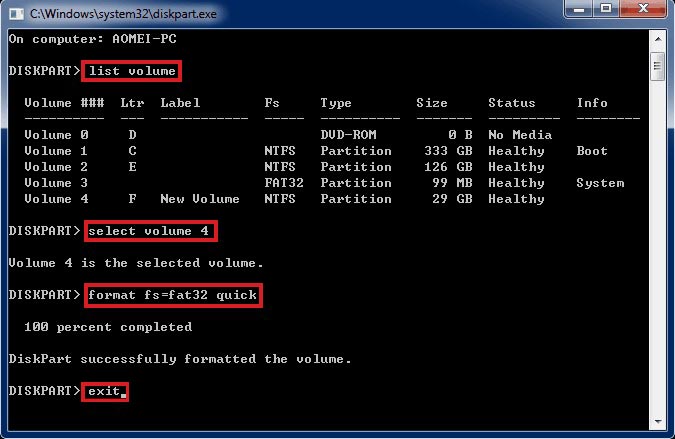
6. Format Partition Command
To format the drive partition, follow the given steps:
- Open Command Prompt.
- Type Diskpart and then hit Enter.
- Type list volume and hit Enter.
- Next, type select volume 4 (you can choose the volume you want to format from the available ones) and hit Enter.
- Type format fs=fat32 quick and press Enter.
- Finally, type exit and press Enter.
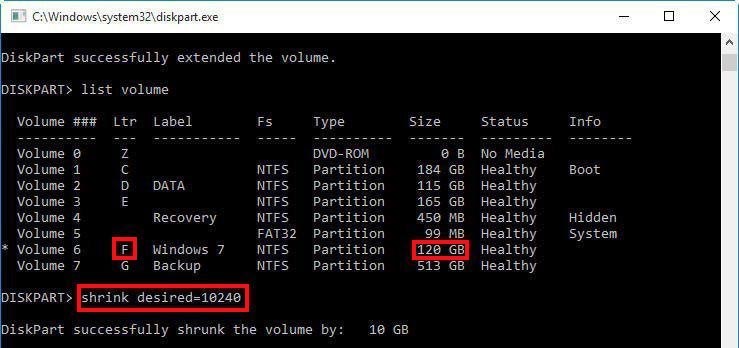
7. Shrink Partition Command
When you need an additional partition or drive volume, you can minimize the space used by primary partitions and shrink them into the adjacent, contiguous space on the same disk. On shrinking a drive volume, any files will automatically get relocated on the disk for building a new unallocated space. You don’t have to re-format the disk. Follow the given steps:
- Open Command Prompt and type the given commands, and after each command, press Enter.
Diskpart
List volume
Select volume enter the="" volume="" number="" you="" want="" to="" shrink<="" em="".>
Shrink [desired=<give the appropriate size you want to give to the drive volume>] [minimum=< provide the minimum size of the drive volume>].
- Finally, type exit and hit Enter.
Also Read: How to partition a hard drive on Windows 10?
To Wrap Up
Be it creating, extending, shrinking, deleting, or formatting the hard disk partitions, DiskPart can help you. Additionally, we suggest you back up your hard drive before using this utility to prevent any damage to your data. However, if you don’t have the data backup and lose it while using DiskPart, you can recover the data using a powerful data recovery software, such as Stellar Data Recovery for Windows. It is a DIY data retrieval tool that efficiently restores all kinds of data from formatted, corrupted, or even BitLocker-encrypted hard drives.


A seasoned technology writer and tech enthusiast with keen interest for everything in technology.

 27 min read