

Office 365 Email Limits: How and When to Disable EWS Throttling in MS 365 & Exchange Online?
April 7, 2026| 6 min read


Our content follows trusted Editorial Standards - accurate & unbiased.
Summary: For Exchange Server 2019 to Office 365 migration, hybrid method - by using Hybrid Configuration Wizard (HCW) - is recommended. It supports full co-existence and allows to migrate with zero-downtime. But this approach is also the slowest and most complex one. In this article, we you’ll get to know how to perform this method and about a specialized Exchange migration tool that can simplify the process.
Free Trial 2 Mailboxes Freefrx versionExchange Server 2019 has reached end of support in October 2025 along with Exchange Server 2016, thus making migration a crucial task and an important job to ensure security, compatibility, and compliance. This server version fully supports full hybrid and modern public folders for the migration, unlike older versions, like Exchange 2013. Nevertheless, to effectively migrate and make sure complete compatibility with the Hybrid Configuration Wizard (HCW), your server must be updated to the Cumulative Update (CU) 12 or later.
There are several factors that make Exchange Server 2019 different from previous versions. Here is the difference matrix you can refer.
| Factor | Exchange 2019 | Exchange 2016 | Exchange 2013 |
| End of Support | October 2025 | October 2025 | April 2023 |
| Hybrid support | Native Full Hybrid — no workarounds | Full Hybrid | Requires CU23 minimum |
| Public folders | Modern Public Folders (MPF) | Modern Public Folders (MPF) | Legacy Public Folders |
| Migration alternative | Upgrade to Exchange Server SE | Upgrade to 2019 or SE | No upgrade path — EOL |
| Minimum CU for HCW | CU12 or later | CU13 or later | CU23 only |
| MAPI/HTTP enabled | Enabled by Default | Enabled by Default (requires configuration on older installations) | Must be enabled manually |
If you have Exchange Server 2019, there are two migration options:
There are a number of reasons why you would opt to remain on-premises or migrate to the cloud. Below is a table that will help you in your decision.
| Factor | Migrate to Microsoft 365 | Upgrade to Exchange Server SE |
| Data location | Microsoft Cloud | On-premises (your control) |
| Cost model | Per-user monthly subscription | Server + CAL subscription |
| Maintenance | No server maintenance needed | Server maintenance required |
| Best for | Organizations wanting to eliminate on-premises servers | Organizations with data residency requirements |
| Migration effort | One-time migration project | Upgrade project (simpler than migration) |
| Upgrade path available | Not applicable — one-way move to Microsoft cloud | Only for Exchange 2019 and 2016 — 2013 and 2010 have no upgrade path to SE |
The below prerequisites must be fulfilled to ensure a smooth migration and before running the first data seed:
Let’s now see the stepwise process to migrate Exchange 2019 to Microsoft 365.
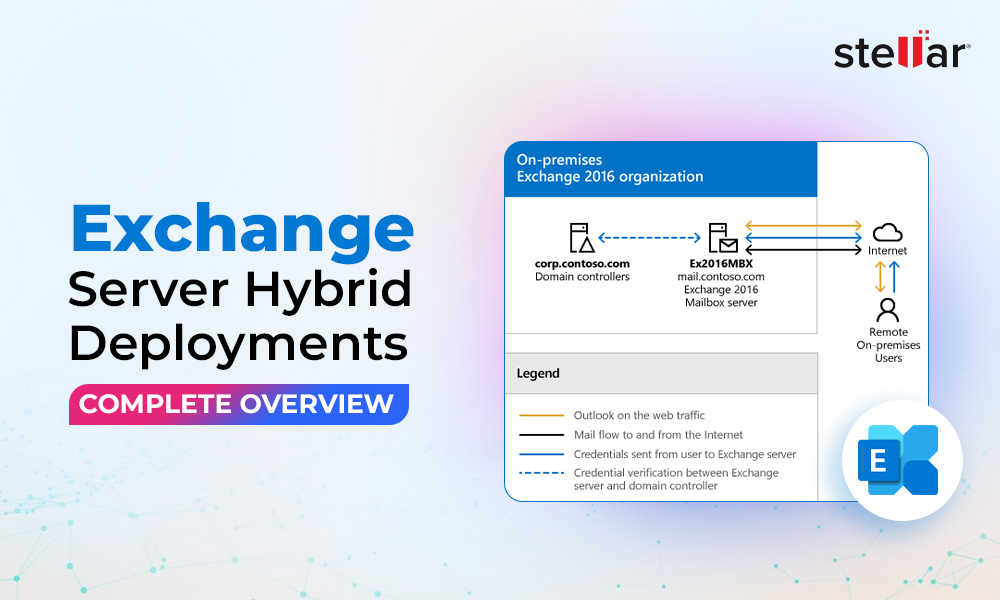
Microsoft Entra AD Connect bridges the identities of the local Active Directory and Microsoft Entra ID to provide a seamless and single sign on from both the on-premises and the cloud identity.
After downloading and opening the executable, select the Express Setting to have a quick installation by keeping the defaults that are recommended by Microsoft. It’s the simplest installation with single forest and password hash synchronization.
Below are the steps you can take to configure the Microsoft Entra AD Connect:
After the installation is complete, it will run the first synchronization. You can see the users being synchronized in Microsoft 365.
Assuming that the requirements have been met, you need to download the Hybrid Configuration Wizard (HCW). Once the installation is executed, in the type of tenant selection, select Office 365 Worldwide unless your tenant is a Government Community Cloud (GCC) or DoD environment. This will ask you to sign in using the on-premises Exchange Server administrator credentials and afterward with your Office 365 global admin.
The next step is to select the hybrid mode. In the case of Exchange Server 2019, it is recommended that you select the full hybrid as it natively supports it and come with all the advanced features such as advanced routing and cross-premises message tracking. The minimal hybrid is used for older Exchange Servers as it only supports mailbox migration and is a less complex setup.
After this is complete, you need to setup the mail flow, which would be centralized, from the Exchange Server 2019 since the MX records are pointing to it. You can also use decentralized mail flow which will route emails directly to Exchange Online, reducing on‑premises load and simplifying operations once most of the mailboxes are on the cloud. However, it’s recommended to have the centralized mail flow since during the migration most of the mailboxes are on-premises and if there is an issue with the hybrid model, it will not affect the mail flow.
You must confirm that your certificates are valid and not expiring soon. A hybrid migration is one of the most seamless migrations, but it is the slowest as well and you don’t want to have a certificate expiring mid-way.
The last step is to enable the security authentication and OAuth to allow the token-based authentication for free/busy, mailboxes moves, and eDiscovery features. Along with many modern systems, the Hybrid Configuration Wizard requires TLS 1.2 on the on-premises server.
After this, the Hybrid Configuration Wizard (HCW) is ready.
Now, you can use the hybrid migration method for Exchange mailboxes to begin migrating the data.
For details, refer the Microsoft document on how to create a hybrid deployment with the HCW.
To begin with, connect to Exchange Online. For this, launch a PowerShell window and execute the below command.

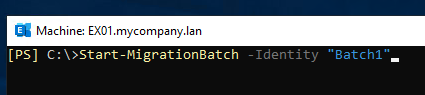
The next thing you have to do is create the migration batch. Here’s the command:

Now, you run the migration batch (see the below command).
Start-MigrationBatch -Identity "
This will start the seeding of data.
To monitor the status of the batch migration, you need to use the below command.
Get-MigrationBatch -Identity "

When it shows 100% complete status, proceed to finish the migration.
The command below will run one last synchronization with the changes and finalize the migration.

Important: After finalizing a batch, you should check that the mailboxes are accessible in Outlook, before moving to the next batch
This step is for the migration of the public folders. If you do not use public folders, skip this step entirely.
To start, you have to use the migration scripts available by Microsoft from the link below.
Download Exchange 2019 Public Folder migration scripts from Microsoft
Below are the scripts that you need to use for completing the migration.
These scripts will do the necessary preparation work, like creating the empty folders, mapping the folders, and validating the source. Next, you need to create the batches to migrate the data.
First, connect to your Exchange Online by using the below command:

Then, create a new migration endpoint using this command:

After this, create a migration batch.
New-MigrationBatch -Name "PFMigration" -CSVData ([System.IO.File]::ReadAllBytes("PF MailboxMap.csv")) -SourceEndpoint "PFEndpoint"

Now, start the migration batch.

You can use the below commands to monitor the status.


Once done, use the below command to complete the migration.
Set-OrganizationConfig -PublicFoldersLockedForMigration $true


After migrating all the user mailboxes and public folders, you will need to change the MX record from pointing to your local Exchange Server so that all emails can be routed to the Exchange Online.
Depending on your provider, you need to change the MX records which can be found in the Admin Center and in the Domains section. The most important ones are the MX records for the email routing and the Autodiscover records for Microsoft Outlook and mobile phones to connect to the Office 365 accounts.
Once this is done, all the emails will be routed through Office 365.
If you are looking for a way to migrate without using PowerShell and without the complexity of hybrid model, you should look for a specialized Exchange migration tool like Stellar Migrator for Exchange. This tool also comes in handy when you have an Exchange Server 2019 where due to some constraints or issues, you cannot comply with the requirements of the hybrid model. You should also consider the complexity and point of failures in the hybrid model. Additionally, when it comes to public folders migration, you can use scripts but it could lead to several issues and chance of human errors.
You can make the migration smooth and seamless by using Stellar Migrator for Exchange. This specialized migration tool facilitates direct migration of user mailboxes, archives, shared mailboxes, and public folders from local Exchange to Microsoft 365. You can get benefitted from its features such as automatic mailbox matching, incremental (delta) synchronization, and real-time and post migration reports.
You can leverage this tool in scenarios where your Exchange 2019 Server is not updated with the CU12, your organization cannot meet the .NET Framework 4.8 requirement and SSL certificates are due to expire.
Once the migration is successful, it’s highly suggested to keep at least one Exchange 2019 server running for Active Directory attribute management. This is required after a migration to ensure data clarification. Here are some tasks you should perform:
Here are some common errors that you may encounter during the migration, along with their causes and fixes.
| Error | Cause | Fix |
| HCW8078 — endpoint creation failed | Certificate mismatch or firewall blocking port 443 | Verify that SSL certificate covers Autodiscover and check port 443 is open. Also check the validity of the SSL certificate. See also: fix HCW8078 endpoint creation error. |
| TooManyTransientFailures | Network throttling or oversized mailboxes are timed out | Reduce batch size and check MRS throttling policy. |
| StalledDueToTarget | Target Microsoft 365 mailbox quota exceeded | Increase quota or remove holds on the target mailbox See: fix StalledDueToTarget error |
| Mailbox size exceeds allowed maximum | Source mailbox over 100 GB | Archive older items before migrating or contact Microsoft for quota increase |
| Migration batch stuck in syncing | MRS service issue or batch limit reached | Restart MSExchangeMailboxReplication on Exchange 2019 and check batch limits |
This article explained the complete stepwise process of migrating from Exchange Server 2019 to Microsoft 365. You can go for the full hybrid (a recommended approach) but you should also be aware that it is a little bit complex to setup and requires a lot of time to complete. So, you can utilize Stellar Migrator for Exchange to simplify the process. This Exchange migration tool can be of great assistance when it comes to migrating data from on-premises server to Microsoft 365 as it doesn’t require any complex setup and PowerShell scripts.
Yes - you can use the Office 365 cutover migration method or staged migration for Exchange mailboxes, or Stellar Migrator for Exchange. But you can’t use the cutover method as it is not recommended with Exchange Server 2019.
Senior Content Writer
This article was written by Shelly Bhardwaj, a Content Writer at Stellar Data Recovery.
Curious about our content creation process? Take a look at our Editor Guidelines.
April 7, 2026| 6 min read
March 17, 2026| 6 min read
February 3, 2026| 6 min read


Get 2 Credits FREE to Experience Seamless Mailbox Migration
 6 min read
