- Use System Preferences to Rebuild Spotlight Index
- Use Terminal to Disable & Enable Spotlight Index
- Search Your Files in Spotlight after Re-Indexing
- Use a Mac Data Recovery Software to Rescue Lost Files
Spotlight is a useful utility that allows you to search files, documents, apps, etc. on your Mac. The utility can even calculate and perform web-search to look for answer. But sometimes, your Spotlight won’t function normally, and may not locate some specific files present on your Mac. This failure might happen due to wrong indexing on your Spotlight. In such a situation, you need to rebuild the Spotlight index to fix the issue. Below are a few ways to rebuild the Spotlight index quickly. Also, learn how to rescue files on your Mac, just in case.
1. Use System Preferences to Rebuild Spotlight Index
You can rebuild the Spotlight index through Preferences. Just follow the steps mentioned below:
Go to Apple menu > System Preferences > Spotlight to open the Spotlight Preferences window.
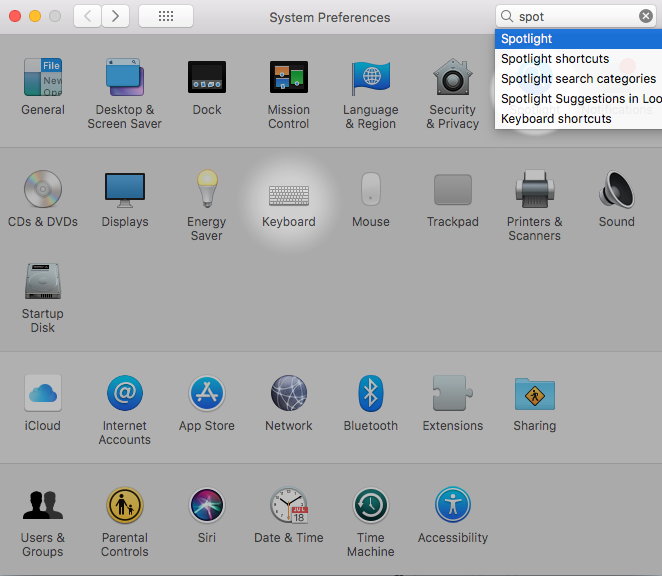
Image: Open Spotlight Preferences WindowClick the Privacy tab, then click the + sign to add the drive or folder that needs re-indexing in the “Prevent Spotlight from searching these locations” list box.
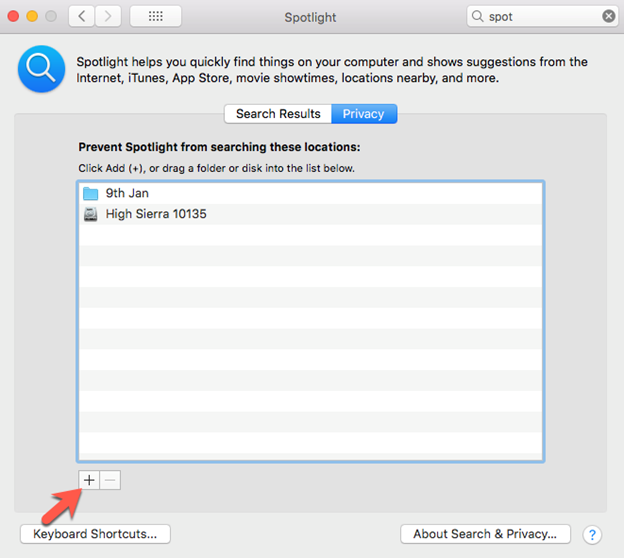
Image: Add Drive or Folder That Requires Re-IndexingSelect the drive or folder that you added just now and click the minus “-” sign present at the bottom-left corner of the list box to remove it from the list. Quit the Preferences window.
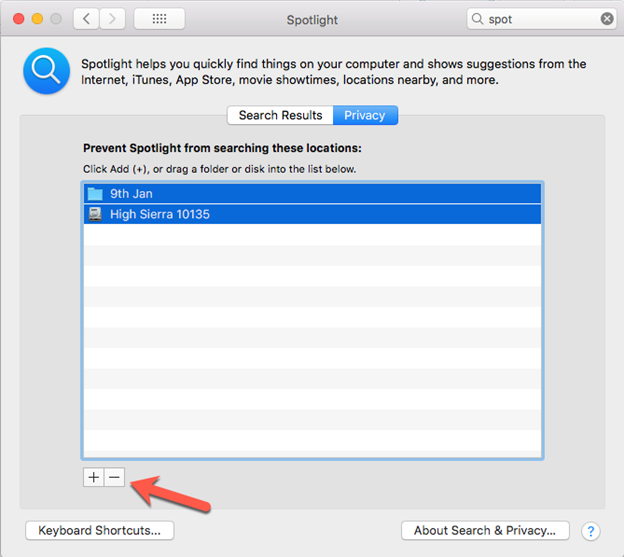
Image: Remove the Drive or Folder from the List Box
Your Spotlight will now re-index the content of the drive or folder. Once the Spotlight index rebuilds, you won’t have any problem searching the disappeared files on Mac.
2. Use Terminal to Disable & Enable Spotlight Index
You can use the Terminal app to disable, then enable the Spotlight index. But make sure you’re using the Terminal command. Steps are as shared next:
Go to Utilities > Terminal on the top menu bar to open the Terminal app on your Mac.
To disable Spotlight, type the following command in the command line, then hit Return.
sudo launchctl load -w /System/Library/LaunchDaemons/com.apple.metadata.mds.plist
To enable Spotlight, enter the following command, then hit Return.
sudo launchctl unload -w /System/Library/LaunchDaemons/com.apple.metadata.mds.plist
Enabling and disabling Spotlight utility might fix the Spotlight indexing issue.
3. Search Your Files in Spotlight after Re-indexing
Now, you should once again try to find the files using your Spotlight on Mac. If all goes well, the searched file will appear in the search result. If you’re are unable to find the file even after re-indexing your Spotlight, the file is deleted or inaccessible from your Mac. In this case, you can use your Time Machine backup to restore your lost or deleted files. Steps are as follows:
Ensure your Time Machine backup drive is in a connected state on your Mac.
From the top Menu Bar, go to Time Machine > Enter Time Machine.
Look for the missing file by going back in Time through Timeline or up/down arrow.
Select the file and preview it by pressing Space Bar. Then Restore the file to your Mac.
4. Use a Mac Data Recovery Software to Rescue Lost Files
In case you don’t have a Time Machine backup, you can use a data recovery software for Mac to rescue your lost files. Steps are as follows:
Download and install the *trial version of Stellar Data Recovery Professional software on your MacBook, iMac, or Mac mini.
Launch the software and select the type of data that is lost and click Next. Select the location from where the data is missing, toggle on Deep Scan, and click Scan.
Preview any scanned file, select all those that are required, and click Recover. Click Browse to specify a different drive location, then click Save.
*The trial version of Stellar Data Recovery Professional allows free scanning and preview but needs activation to perform the recovery task. Besides, the software comes with a 30-day money-back guarantee, so activate with complete assurance.
Conclusion
Rebuilding the Spotlight index is essential to eliminate any indexing issue on your Mac that thwarts usual searching through Spotlight. You can rebuild the index through Spotlight Preferences or by using the Terminal app. In case of any data loss, don’t forget to use Stellar Data Recovery Professional for Mac to rescue data from your Mac SSD, hard drive, or Mac-based external storage media. The software is compatible with macOS Catalina and earlier.


Data recovery expert on Mac & Windows platforms, with 10-year experience in writing
 10 min read
-1920.jpg)