Post Office Protocol 3 or POP3 is the third revision to the email retrieval Post Office Protocol (POP) introduced in 1985 to receive emails from the mail server. POP3 allows users to receive emails from the server on a single device and then deletes the emails from the server’s Inbox folder. There is no synchronization and the users cannot access the same emails on multiple devices. Thus, the protocol is apt for users who use a single device, such as a PC or laptop, to access emails.
Internet Message Access Protocol or IMAP is one of the most commonly used email retrieval protocols, used to receive emails from the mail server. The latest version in use is IMAP4. IMAP stores a local copy of your recent mail items on a local machine. However, it also stores all your emails and mail items on the server and thus, requires more storage.
But unlike POP3, IMAP users can access the same emails from multiple devices. After synchronization, the emails are not deleted from the server. If you make any changes to your IMAP email account, the changes are synced between the local machine and the mail server.
When you configure a POP3 email in Outlook, the client creates a local PST file to store emails and other mail items. For IMAP, Outlook creates a local cache or Offline Storage Table (.OST) file.
Learn More, Introduction to Offline Outlook OST file?
In case you have been using Outlook with IMAP for a while now and want to switch or migrate to POP3 mail server, there’s a stepwise process to switch your Outlook email profile from IMAP/MAPI to POP (POP3) to avoid data loss.
In this guide, you will learn the steps to convert or switch your Outlook configured with IMAP/MAPI profile to POP3 without losing any mail items.
Reasons to Switch IMAP/MAPI Account to POP3
There are a few reasons why someone would want to switch IMAP/MAPI email account to POP3 in Microsoft Outlook.
- Security Reasons: The organization does not want or allow users to access emails from multiple devices for data security. Thus, they may disable the IMAP access for certain or all users and only allow the POP3 email retrieval protocol for accessing emails on single device.
- Access to Emails when Offline: The POP3 account will store all your mail items, including the attachments, on the local machine. Thus, you can always access all your emails and mail items anytime—even if the system is offline.
- Reduce the Server Load: Unlike IMAP, POP3 does not increase any load on the server.
- Limited Mailbox Storage: POP3 does not require large mailbox storage as it fetches the emails from the server and deletes the received email copy from the server, which helps avoid sending/receiving error due to mailbox quota full or low mailbox storage.
- Outlook Performance: IMAP is also complex when compared to POP3. You may encounter synchronization and performance issues in Outlook if the local cache or OST file gets larger.
How to Switch from an IMAP Account to POP (POP3)?
To switch or migrate your Outlook email account and mailbox data from IMAP/MAPI to POP3, your mail server should support POP3 email retrieval protocol. You can switch your account from default IMAP to POP3 while configuring or adding an email account in Outlook by choosing the ‘Manual setup or additional server types’ option. But before that you must backup your mail items from the IMAP email server.
If the IMAP email profile is still active, you can use the Outlook Import/Export wizard to export all mail items to PST as backup. You can then import this PST into the POP3 Outlook email account and restore all mail items.
However, if the profile is not active or you don’t have access to your IMAP email account anymore, you cannot export or backup emails via Import/Export wizard. In such a case, the OST becomes orphaned. But you can still extract all your emails, attachments, contacts, etc. from your local cache (.OST) file and save them to PST format using an OST to PST converter tool, such as Stellar Converter for OST.
The tool also recovers deleted mail items and provides an option to export the emails and other mail items extracted from inaccessible, orphaned, or inconsistent OST files to Office 365 or live Exchange directly.
For this, you will need the OST file linked to your IMAP account. Follow these steps to find and copy the OST file for conversion.
- Close Outlook and open ‘Control Panel.’
- Go to ‘User Accounts and click on ‘Mail.’
- Click ‘Data Files.’
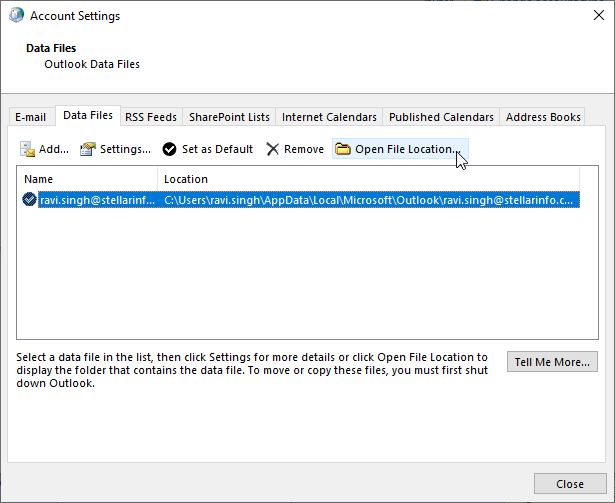
- Click on your email account added as IMAP and then click ‘Open File Location.’
- Copy the OST file to another location. The file contains all your emails and other mail items. You can use this later to restore any missing mail items after switching the email account from IMAP to POP3.
If you can’t find the OST file location by following the steps above, press Windows + R, type %localappdata%/Microsoft/Outlook, and press the Enter key or click OK.
Then, install the Stellar Converter for OST and use the software to convert the orphaned OST file into PST format. Refer to this guide for detailed steps.
Steps to Switch the IMAP Profile to POP3
Once you have the backup of all your emails, follow these steps to configure POP3 email account in Outlook.
- Close Outlook and open ‘Control Panel.’
- Go to ‘User Accounts’ and click on ‘Mail.’
- Click ‘Show Profiles.’ You will see your email profile which is already configured as IMAP.
- Select the profile and click ‘Remove.’
- Click ‘Yes’ to confirm the removal.
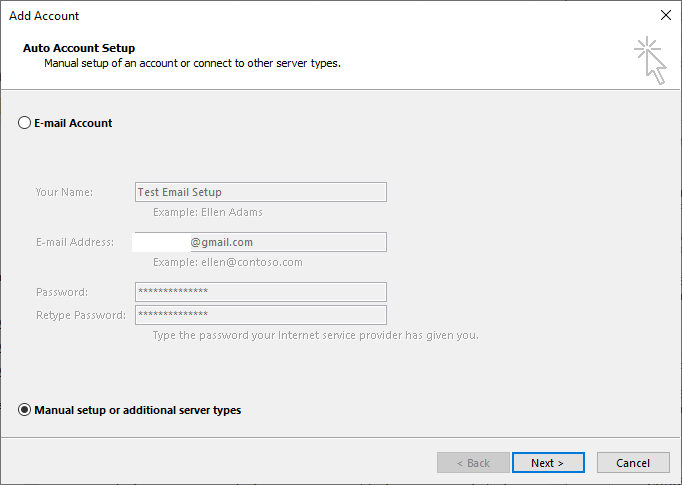
- Then click ‘Add.’ Type the Profile name and click ‘OK.’ This will open the Add Account window to set up your email account.
- Choose the ‘Manual setup or additional server types’ option and click Next.
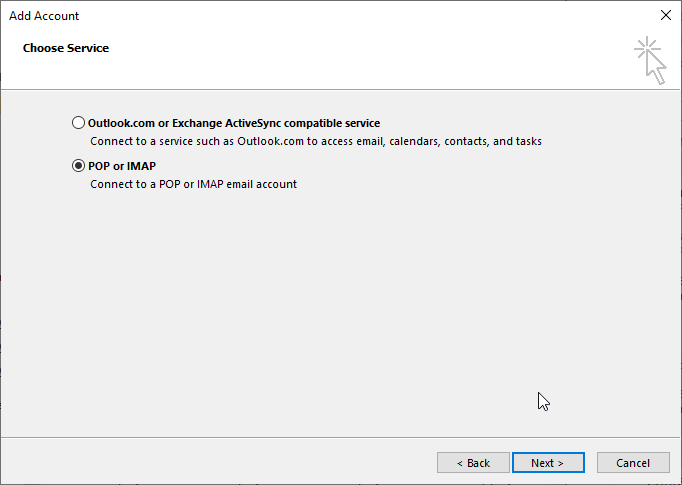
- Choose the ‘POP or IMAP’ option and click ‘Next.’
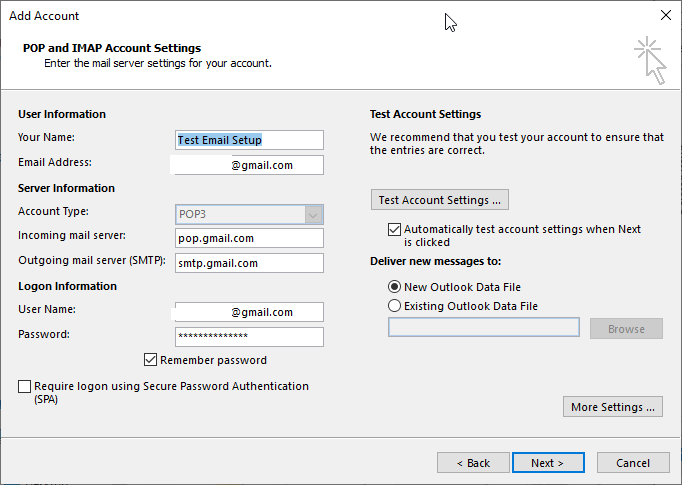
- Enter your ‘Name’, ‘Email Address’, choose ‘POP3’ in ‘Account Type’, and type the ‘Incoming mail server’ and ‘Outgoing mail server (SMTP)’ Then enter the ‘User Name’ (usually your email), and the password. Next, choose ‘New Outlook Data File.’
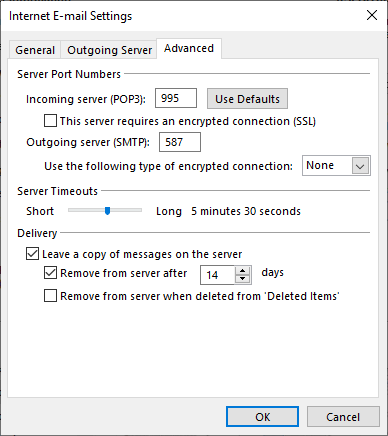
- Click ‘More Settings’ and go to the ‘Advanced’ tab. Here, you need to enter the Incoming Server and Outgoing Server port numbers. For Gmail, it is ‘995’ and ‘587’ Also, increase the ‘Server Timeouts’ to 5 minutes. You can contact your mail server administrator to get these details.
- Click ‘OK’ and then click ‘Next.’
- This will configure your email account in POP3. If you receive any error, make sure POP is enabled on the mail server for your email profile.
When the email account is configured as POP3, Outlook will receive all emails from your server and store them in a local Personal Storage Table (PST) file.
Next, go to File > Open & Export > Import/Export. This opens the PST import wizard.
Use the wizard to import the backup PST file to restore all your mail items.
Conclusion
Switching the IMAP/MAPI account to POP3 is possible only when your mail server supports the POP3 email retrieval protocol. Sometimes, the mail server does support POP3 but it needs to be enabled for users to configure, add, or switch their IMAP account to POP3 in the Microsoft Outlook client. The article discusses steps to switch from existing IMAP email profile to POP3 in Outlook 2007, 2010, 2013, 2016, 2019, and 2021. By following these steps, you can convert your IMAP account to POP3, which helps reduce the server load. Please note that your local cache or OST file linked to your IMAP account becomes orphaned when you remove the profile. However, you can extract the mail items from such orphaned or inaccessible OST files and save them to Outlook importable PST format by using an OST to PST converter tool mentioned in the article.


 9 min read