tl;dr
Synology NAS data loss is typically caused by RAID controller failure, accidental deletion, or drive corruption. If you cannot access your files, avoid writing new data to the drives immediately. Here’s how to fix it:
- Restore from Hyper Backup: If you configured Synology Hyper Backup, navigate to the app, select Restore, and choose "Data" or "LUN" to retrieve files from your local or cloud backup.
- Hot-Swap Failed Drives: For RAID 1, 5, 6, 10, or SHR arrays with a single drive failure, identify the faulty drive (indicated by LED status), replace it with a new one of equal or larger size, and allow the RAID to rebuild.
- Stellar Data Recovery Toolkit: If the RAID configuration is broken or multiple drives have failed, use Stellar Data Recovery Toolkit. This software virtually rebuilds the RAID array (supporting SHR, RAID 0, 5, 6) without requiring the original controller, allowing you to scan and extract data directly from the drives connected to a PC.
The Synology NAS server is one of the most affordable and secure ways to store sensitive data. Not only organizations, but even home users can also leverage the benefits of its deployment. A Synology NAS device or server, in particular, is a computer optimized for use as a shared storage device. Earlier, people practiced using a traditional hard drive to set up a NAS storage and made it accessible to all the connected devices for centralized backups and data sharing. However, with technology advancements, RAID is preferably used in NAS setup. This setup offers plenty of benefits over a normal hard drive, such as higher performance, data reliability, and data redundancy.
However, like any other storage device, Synology NAS Server is also prone to failure and breakdown. There could be many reasons behind Synology NAS failure that eventually makes you lose access to your crucial data. But, worry not! Here, we've listed some authentic ways to recover data from Synology NAS drives. Moreover, understanding the NAS concept and underlying causes behind NAS failure first will help you take the right approach to get back your data.
What exactly is a Synology NAS server?
NAS or Network Attached Storage is a file-dedicated server, also known as a file server. It is hardware connected to a network, making data continuously available to authorized employees. The Synology NAS server is specialized and dedicated to handling scattered files, folders, and other data.
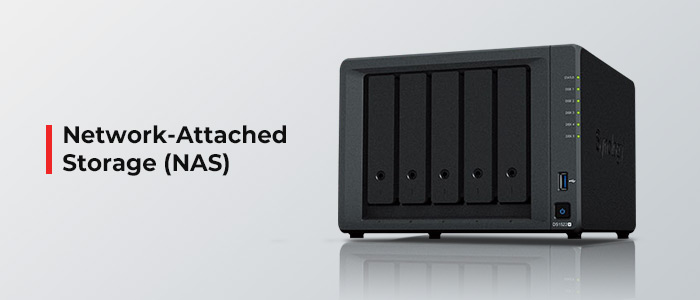
It offers secure, fast, and reliable storage services to private networks. Both homes and businesses may use Synology NAS servers for accessing and sharing important documents, PPTs, and more. It also offers backup, remote access, and web server apps.
Top Synology NAS Models
There are multiple Synology NAS models available. However, only a few are popular, including DiskStation DS220+, and DiskStation DS1621+. Synology DS1621+ is a compact yet powerful 6-bay NAS solution that supports RAID 0, 1, 5, 6, 10, SHR, and Basic RAID. On the other hand, DiskStation DS220+ is the 2-bay base NAS model that runs on DSM (DiskStation Manager) OS, a browser-based operating system. This model supports RAID 0, 1, and SHR.
Synology NAS Data Loss/Failure
Synology NAS server uses RAID drives to store data. Therefore, they're subject to failures as RAID levels do and eventual data loss. Having said that, there are some common reasons for data loss from Synology NAS Server. Some of them are listed below:
- Incorrect RAID array setup
- Multiple RAID drive failure
- Server Registry Configuration error
- Controller malfunction
- Accidental data deletion
- Corrupt firmware
- Damaged PCB (Printed Circuit Board)
- Improper shutdown
- Abrupt power outage
- System Reset
- Corrupt database and more
How to recover data from Synology NAS Server?
Irrespective of the reasons behind data loss from the Synology NAS drives, you can still get back your data with the methods shared below.
Restore Data using Backup
Synology offers an integrated backup solution that facilitates you to store your Synology NAS drives data (files, folders, documents, system configurations, etc.) You can set up a schedule for creating a backup or do it manually. Hyper Backup also allows you to back up your Synology NAS device data on a local shared folder, remote servers, file servers, and external storage devices attached to the NAS and public cloud services. So, if you have taken the backup of the Synology NAS server with Hyper Backup, follow the given steps and restore data:
Restore Data/LUN* backup
- Go to Hyper Backup and click Restore in the upper-left corner.
- Thereafter, choose Data or LUN* and click on the backup task from which you want to retrieve your files.
- You will see different options – System Configurations, Different Versions of Backup Data, and more. These options depend on the backup task selected.
- If your backup is encrypted, you'd need to enter the password or decryption key to successfully retrieve data.
- Follow the wizard instructions and restore the backup restoration.
You can refer to the Hyper Backup Guide to learn more.
Hot-Swap the Failed Drive
This method will work if the NAS is built with RAID 1, 5, 6, 10, or SHR. You can hot-swap the defective drive with a new one and the controller will rebuild the array. However, it may decrease the RAID performance, but your data will remain intact and can be recovered from Synology Nas. You can follow the given steps to hot-swap the failed drive in the Synology NAS device:
- Open the RAID controller and note down the failed drive from the RAID configuration used in the Synology NAS server.
- Shut down your Synology NAS server with the DSM web interface or by using the power button.
- Replace the failed drive in the array with a new or spare drive in the array.
- Turn on your NAS device, and check the status of your RAID configuration, whether it's 'Degraded' or 'Rebuilding'.
- Initiate the RAID rebuilding process. Once it's successfully rebuilt, you can use backup media to restore data on the newly added drive in the array.
Use Synology NAS Data Recovery Software
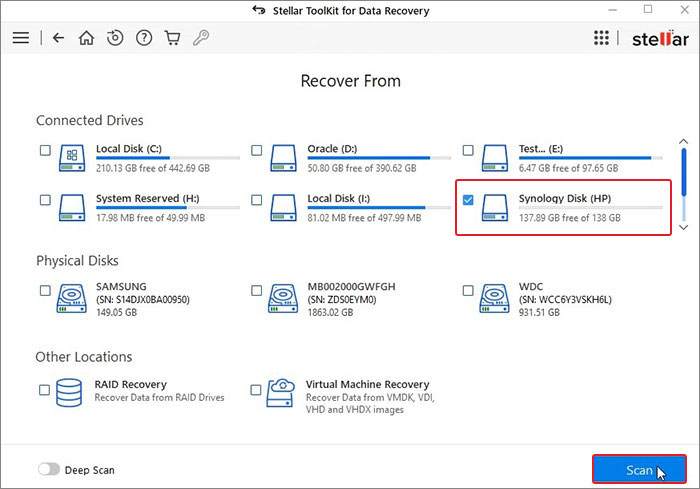
In case you're not able to retrieve data from Synology NAS RAID drive with the above methods, you can opt for the advanced NAS data recovery software, such as Stellar Data Recovery ToolKit. This DIY (Do-it-yourself) data recovery software can efficiently scan and retrieve files/folders from inaccessible, failed, or broken RAID 0, 5, 6, and hybrid RAID levels, such as RAID 10, 50, and 60 used in NAS servers. The software rebuilds the RAID array virtually and allows Synology NAS recovery. You can follow the given steps:
- Download and run Stellar Data Recovery ToolKit on your system.
- Connect the RAID array used in your Synology NAS to your system. (Software supports recovery from the above-discussed RAID levels).
- Select All Data on the Select What to Recover screen and then click Next.
.png)
- Next, under Connected Drives, select Synology Disk and click Scan.
- The scanning process will start.

- After scanning, the software will show you the results on the screen.
- Select the files. You can see the preview of the files you want to retrieve.
- Click Recover to proceed.
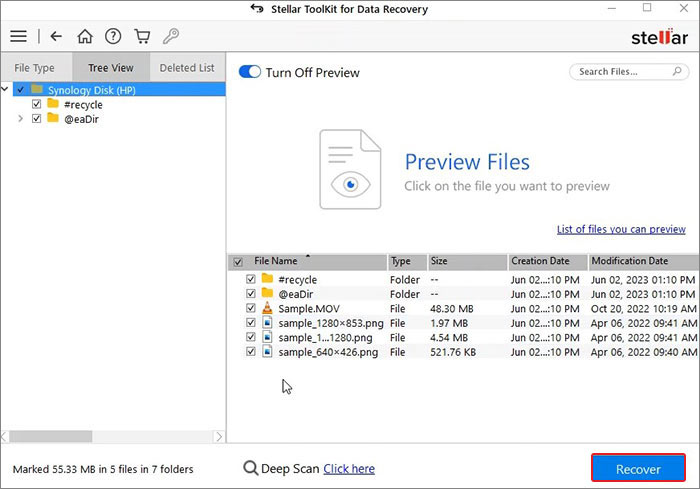
- After the scan, if the desired files are not found in the scan results, click the 'Click Here' link at the bottom to begin 'Deep' Scan.
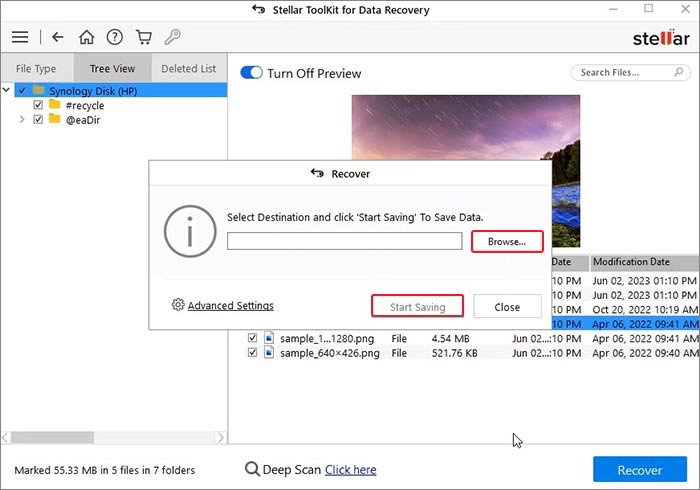
- Now, select Browse to choose a storage location. (Choose a different drive volume or an external media drive.)
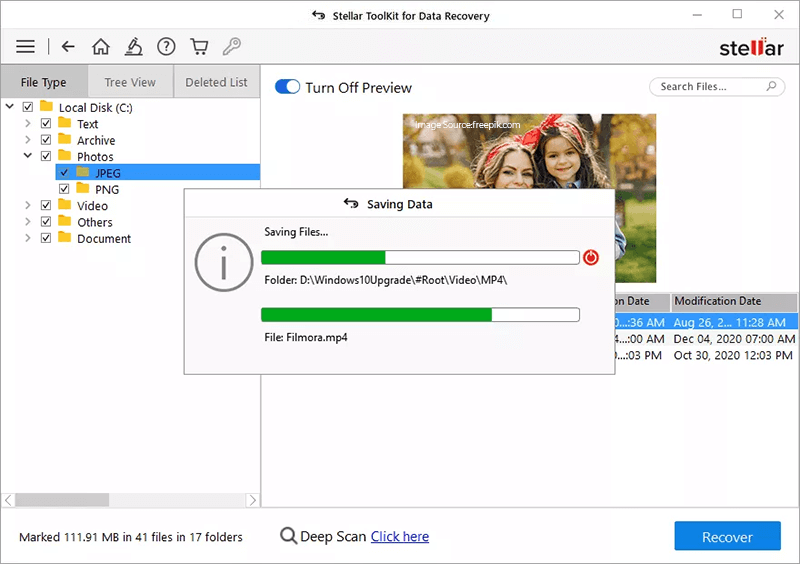
- Finally, select Start-Saving to save the recovered files
- The files will be saved at the chosen location.


A seasoned technology writer and tech enthusiast with keen interest for everything in technology.

 6 min read