


How to Copy all Emails from One Shared Mailbox to Another Shared Mailbox?
October 9, 2025| 4 min read


Our content follows trusted Editorial Standards - accurate & unbiased.
Summary: IMAP Migration is one of the migration types available in Office 365. You can use an IMAP migration to move or migrate user mailboxes from your existing IMAP mailbox server or on-premises Exchange Server to Office 365. However, while IMAP Migration, you may encounter issues that can prevent or disrupt the mailbox migration process. In this article, we discussed the possible common problems that arise while IMAP Migration and the steps to troubleshoot and fix them. However, if the issue isn't resolved, you may use an EDB to PST converter software to extract and move user mailboxes from on-premises Exchange Server database file or EDB file to Office 365 directly in a few clicks.
Free Download 100% SecureAfter adding users in Microsoft 365 or Office 365 and assigning licenses, you can use Internet Message Access Protocol or IMAP Migration to migrate the content of user mailboxes from your current on-premises Exchange server with IMAP4 client connectivity or any other IMAP-enabled email server, such as Outlook, Gmail, Hotmail, etc., to Microsoft 365 or Office 365.
Administrators can use the Exchange Admin Center (GUI-based) in Exchange Server 2013 and later or Exchange Management Shell (CLI-based) in Exchange 2010 SP1 and later versions to start IMAP Migration to Office 365 or Microsoft 365.
However, you may encounter a few IMAP migration issues that can prevent you from moving user mailboxes from on-premises Exchange Server to Office 365.
These IMAP migration issues could be any of the following,
In this article, we will discuss and share some troubleshooting steps to resolve common IMAP migration issues while migrating user mailboxes from an on-premises Exchange Server to Microsoft 365 or Office 365.
Before planning or starting IMAP migration to Office 365, you need to keep following in mind to avoid issues later,
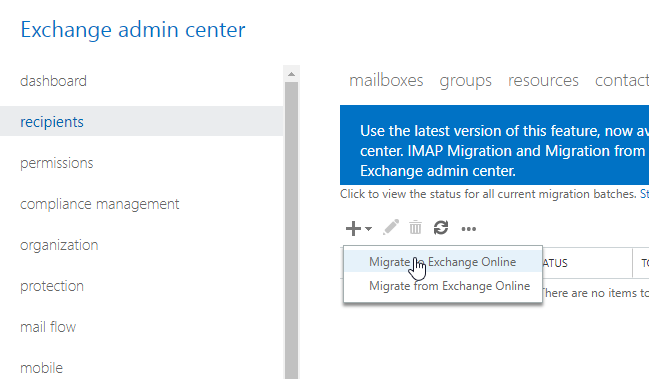
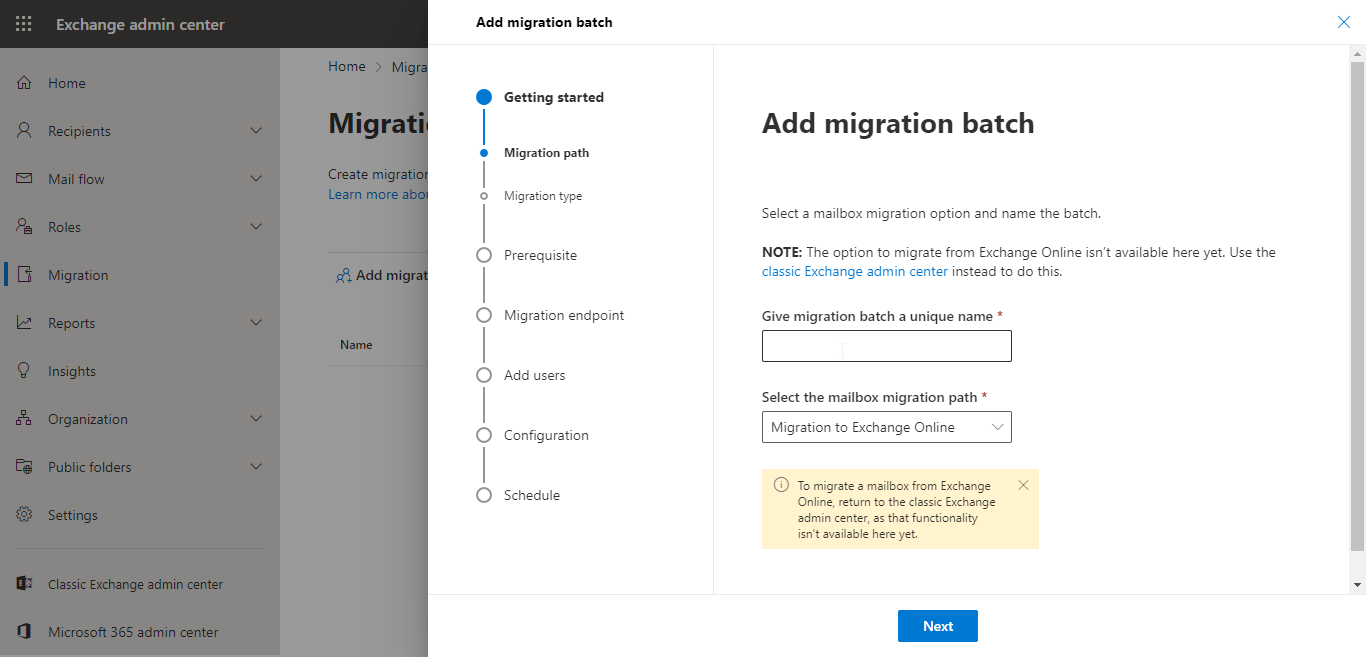
To create an IMPA Migration batch or check if a migration batch already exists, open Exchange Admin Center in Office 365 and go to Recipients> Migration (Classic Exchange Admin Center).
Select the batch and click the play icon to start the migration batch if the batch already exists. Otherwise, click the + icon to create a new migration batch.
At this stage, you may encounter two situations,
Following are the issues that may arise in the situations mentioned above, along with steps and solutions to troubleshoot those issues during the IMAP Migration to Office 365.
If the IMAP Migration batch starts, but you encounter an error,
A recipient wasn't found for abc@xyz.com on the target. Create a recipient of the appropriate type for this migration on the target and try again.
In such a case, create a mailbox in Office 365 or Microsoft 365 with the email address specified in error and then start the migration batch again.
If you still encounter the error, it could be your CSV file that needs an inspection. Open the CSV file you uploaded and check the values in the EmailAddress column for specified users. The CSV file should contain information in the following format,
EmailAddress,UserName,Password
ravi@stellarinfo.com,stellarinfo/ravi.singh,12345678
Rectify the issues, re-upload the CSV, and start the IMAP Migration batch.
Sign-in issues may arise if the username and password values in the CSV file for any user are incorrect or have additional space, which is counted as a character. Ensure that the CSV file contains the correct user credentials used for their on-premises or hosted account.
You can either obtain the username and password from the users, which will allow them to access their mail items while you migrate their mailbox to Office 365.
EmailAddress,UserName,Password
ravi@stellarinfo.com,stellarinfo/ravi,MyPassword
john@stellarinfo.com,stellarinfo/john,MyPassword
Use administrator credentials having Full Access right for all user mailboxes. The administrator should also be assigned Receive As permission and a member of the Domain Admin group in AD on on-premises Exchange organization.
In this case, the user emails with administrator credentials are added to CSV.
EmailAddress,UserName,Password
ravi@stellarinfo.com,stellarinfo/administrator/ravi,MyPassword
john@stellarinfo.com,stellarinfo/administrator/john,MyPassword
If this still doesn't resolve the issue, check the mailbox on your On-Premises or hosted mailbox sever. In on-premises Exchange Server, navigate to the following location to verify this,
Exchange Server 2003 |
Open System Manager and navigate to Administrative Groups > First Administrative Group > Servers > Server Name > First Storage Group > Mailbox Store (ServerName) > Mailboxes. |
Exchange Server 2007 |
Open Exchange Management Console (EMC) and navigate Microsoft Exchange > Recipient Configuration > Mailbox. |
Exchange Server 2010 |
Open EMC and navigate to Microsoft Exchange > Microsoft Exchange On-Premises (YourServerName) > Recipient Configuration > Mailbox. |
Exchange Server 20013, 2016 and 2019 |
Open Exchange Admin Center (EAC) and go to recipients> mailboxes |
Connection settings may change in an existing IMAP migration endpoint, disrupting the user mailbox migration process. In such cases, you need to remove the endpoint and recreate it via EAC in Office 365 tenant.
This may also occur if the user account you are using for migration has some issues. You may try using another account or create a new account and add the account to Organization Management and Recipient Management role group.
In EAC, navigate to Permissions> Admins Roles and use the edit icon to add the user that you want to the required role group.
Sometimes, the connection may time out and prevent the IMAP Migration batch from starting. You may encounter an error, such as,
The connection to the server Servername.contoso.com timed out after 00:00:15.
This usually occurs when you can't reach port 993 or 143 on the IMAP server. To troubleshoot this, use the Telnet tool. After downloading the tool, open CMD and navigate to the location where Telnet is located and then run the following command,
Telnet yourserver.xyz.com port="" #=""
The port # should be 143 or 993. If the command output is blank, the connection is successful. However, if you get the connection error in the output, ensure appropriate ports are published, i.e., 993 and 143, through the Exchange Server firewall.
CSV errors occur when you upload the CSV file while creating an IMAP Migration batch. The error may occur in the following scenarios,
To avoid and troubleshoot CSV-related errors, refer to this Microsoft documentation on the CSV file for IMAP migrations.
You may fail to create an IMAP Migration batch if a migration batch with the same name already exists. In such a case, you will receive an error message,
The migration batch already exists.
To verify the batch already exists, go to recipients> migration option in Classic EAC on Ofice 365. Then remove the batch if it exists. If the batch is running, you need to stop it before removing it.
This can take a few minutes. After that, you can create and run a new IMAP Migration batch and move the mailboxes from on-premises Exchange to Office 365.
IMAP Migration performance depends on the number of moves you allow simultaneously. By default, the number is 20. You can increase this value via EAC in office 365 tenant by following these steps,
This will help improve the IMPA Migration performance and significantly reduce the migration time.
IMAP Migration is recommended when you need to move user mailboxes from IMAP-based email servers, such as Gmail, Hotmail, etc. Although IMAP Migration can also be used to migrate user mailboxes from an on-premises Exchange Server, you should avoid this and use either Cutover Migration or a reliable third-party EDB converter software, such as Stellar Converter for EDB. The software helps you quickly move users' mailboxes with complete data, including contacts, calendar items, tasks, etc., to Office 365 directly. The software extracts user mailboxes from offline EDB files and provides an option to export the mailboxes to Office 365 tenants. All you need is global administrator credentials. The software auto maps the user mailboxes, and thus, you need to create a CSV file or encounter any error or issues manually.
It's the most efficient and reliable way to migrate mailboxes between Live Exchange Servers or from on-premise Exchange Server 2003, 2007, 2010, 2013, 2016, 2019 to Office 365.
Senior Content Writer
This article was written by Ravi Singh, a Content Writer at Stellar Data Recovery.
Curious about our content creation process? Take a look at our Editor Guidelines.
October 9, 2025| 4 min read
October 9, 2025| 4 min read
October 9, 2025| 4 min read


 4 min read