Windows 11 release has become a buzz around the world. There was a great anticipation among Windows users for this new Operating System since its announcement. And now, as Microsoft has officially released it on October 5, 2021 for the eligible devices, searches for ways to install Windows 11 has considerably increased.
Every user, currently using Windows 10, may upgrade to Windows 11 for free. The only condition is that the system should meet some specific requirements. If your system meets all the requirements for this new OS, you'd eventually get the option to upgrade. However, Microsoft is rolling out this OS in a phased manner – new eligible devices getting it first and remaining later. So, it is possible that you might not have got the notification to upgrade to Windows 11 just yet.
As per the Microsoft's post, "All eligible devices to be offered the free upgrade to Windows 11 by mid-2023." But if you're amazed by Windows 11 first look and its features and don't want to wait until then, read on to know top 4 methods to download and install Windows 11.
Caution: Installing Windows 11 will delete Windows 10 and all your data stored on the drive partition on which it was installed. You're suggested to back up everything on your system or use a free data recovery software to recover data lost due to Windows installation.
Things you need to have for Windows 11 Installation
If you want to upgrade from Windows 10 to 11 or install it on your system, there are a few basic requirements your PC or laptop should possess.
| Minimum System Requirements for Windows 11 Installation | |
| RAM | 4 GB |
| Processor | 1 (GHz) or faster processor on a compatible 64-bit processor or System on a Chip (SoC) |
| Storage | 64 GB or larger |
| System firmware | UEFI, Secure Boot capable |
| TPM | TPM Version 2.0 |
| Display | 720p display, greater than 9" diagonally |
| Graphics card | Compatible with DirectX 12 compatible or WDDM 2.0 driver |
Now, that you're familiar with the minimum requirements, let's proceed with Windows 11 installation.
How to Install Windows 11?
- Install Windows 11 from System Settings
- Take Help of Windows 11 Installation Assistant
- Create Windows 11 Installation Media to Download Windows 11
- Download Windows 11 Disk Image (ISO)
Before you begin, make sure that your device on which you want to install Windows 11 meets the minimum system requirements. You can use PC Health Check app to confirm the same. Remember that Microsoft doesn't recommend installing this new OS on the systems that don't meet the given requirements. Once done, follow the below methods to learn how to install Windows 11.
Method 1: Install Windows 11 from Settings
If you're using Windows 10, you'd be notified about the upgrade ready for downloading and installing the new OS. Additionally, you can open Settings to see if the upgrade is available for your device. To do so, follow the given steps:
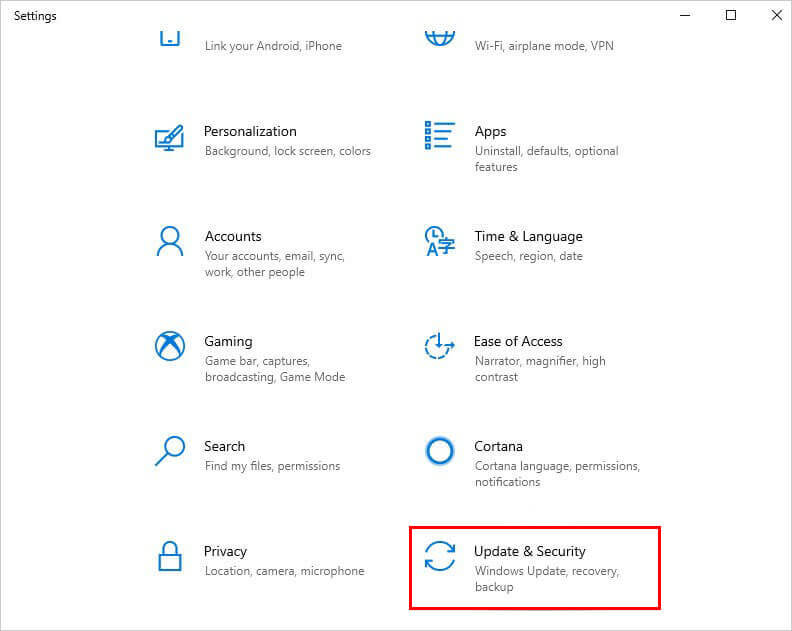
- Go to Start and then open Settings. You can also straightaway press Windows + I to open it.
- Next, locate Update & Security.
- Now, go to Windows Update and then click Check for updates.
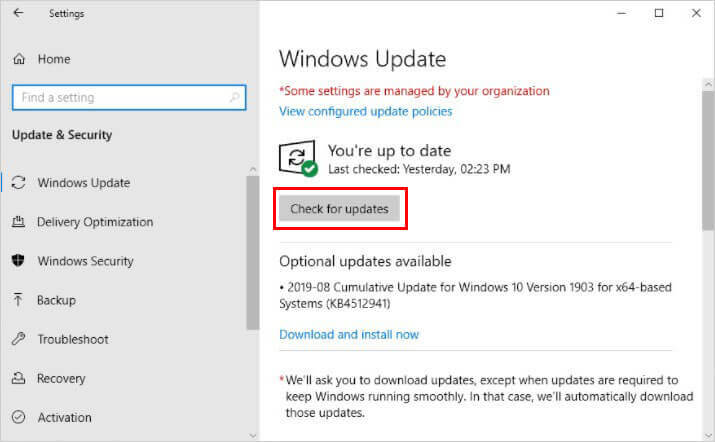
- If available, you'll see Feature update to Windows 11, click Download and Install for its installation.
Method 2: Take Help of Windows 11 Installation Assistant
If upgrade is not available, you can install Windows 11 with the help of Installation Assistant. This is the best option when there is no upgrade available for installing Windows 11 on your device. Follow the given steps:
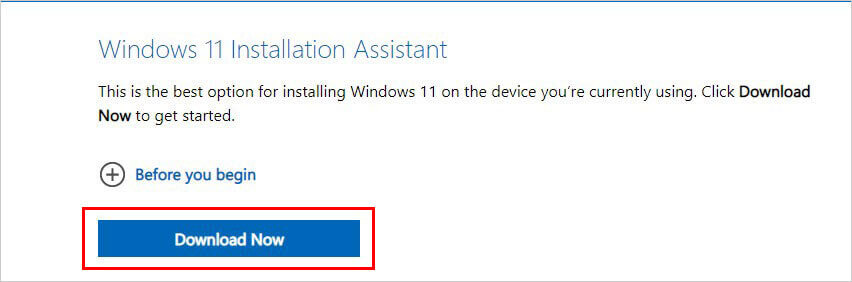
- Visit the Windows 11 download page.
- Under Windows 11 Installation Assistant, click Download now.
- An exe file will download. Open file and click 'Yes' to permit the action.
- The Installation Assistant will ask you to use PC Health Check app and only when you're done with it, you'll be able to proceed.
- Once tool is done with confirming that your device hardware is compatible for the upgrade, click Run > Accept and Install to agree the licensing terms to start the installation process.
- Now, click Restart Now to complete installation.
- Windows 11 installation may take some time. You may notice that PC gets rebooted a few times during the process. However, it's advised not to forcefully turn off your PC.
Method 3: Create Windows 11 Installation Media to Download Windows 11
Another way to get this new Operating System installed on your device is by creating Windows 11 Installation Media.
However, before you begin, here's what you need to ensure:
- Enough data storage on your system, USB drive or external drive on which you're going to download the .iso file. (All the device data will be deleted during the process.)
- Recommended: New or blank USB/DVD of at least 8 GB to create a bootable disc.
- Windows PC with a 64-bit CPU.
- System meeting Windows 11 device requirements and matches the current language.
Steps to Create Installation Media
- Download and run Windows Media Creation tool.
- Click Accept to agree to the licensing terms.
- Now, click Create installation media for another PC > Next.
- Choose USB flash drive to create bootable media.
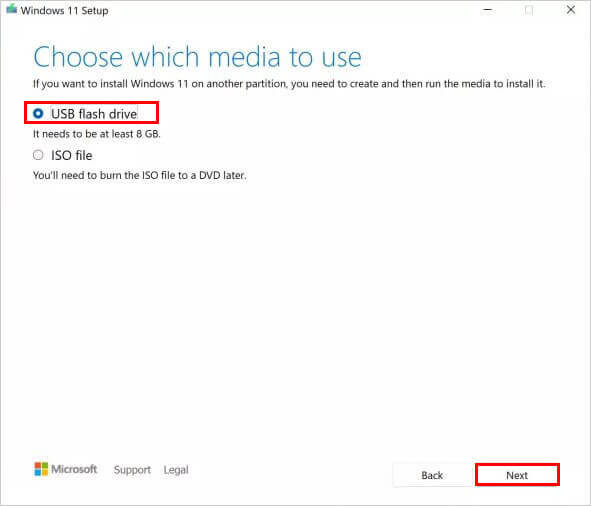
- Your bootable installation media will be ready within a few minutes.
Steps to Install Windows 11 with Installation Media
Before proceeding, make sure you've saved system data or have taken its backup. Now follow the given steps:
- Attach USB installation media and restart your PC.
- You PC should automatically boot from the USB drive. (If it doesn't boot from USB, you might need to open boot menu and change the boot order in BIOS/UEFI settings.)
- Now, select your language, time, and keyboard preferences on the Install Windows page.
- Click Next > Install Windows.
- Once done, reboot your system.
Method 4: Download Windows 11 Disk Image (ISO)
You can also install Windows 11 by creating a virtual machine (.ISO) file or bootable installation media on DVD. For this, you need to use your product key to unlock the correct edition. It is recommended to use a blank DVD disc with at least 8 GB storage (and DVD burner) to create a bootable disc.
Note: Windows 11 installation through an image will not ask for the TPM 2.0 (required) and CPU family and model.
Install Windows 11 Disk Image (ISO) through DVD:
- Locate the folder on DVD where you downloaded the Windows 11 ISO file.
- Burn the ISO file on DVD by using Windows Disk Image Burner.
- Right-click on the ISO file and click Properties.
- Navigate to General tab > Opens with: > Change > Windows Explorer.
- Click Apply to burn the ISO file.
Install Windows 11 Disk Image (ISO) Without DVD
If you want to install Windows 11 without DVD or USB flash drive, you'd need to mount the ISO file. To mount the ISO file, follow the given instructions:
- Locate the ISO file, right-click and choose Properties.
- Click Change… on the General tab. Choose Windows Explorer where it says 'Opens With:' to open ISO file and select Apply.
- Right-click the ISO file and select Mount. It will create a virtual bootable disc. Double-click on it to view files.
- Finally, double-click setup.exe to start Windows 11 setup.
How to Install Windows 11 without TPM?
Many users have reported that they're not able to install Windows 11 without TPM 2.0 (a physical chip that every modern CPU possess). The TPM acts as a "secure crypto-processor" that makes your device securer by preventing malicious software to be run. Even if you don't have TPM 2.0, there is a way to install Windows 11. Follow the given instructions:
- Choose any of the above process to download and install Windows 11.
- If you get a message stating, 'This PC can't run Windows 11,' press Shift + F10 to open Command Prompt.
- In the command prompt window, type regedit and press Enter.
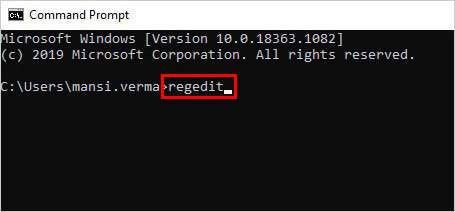
- The registry window will open.
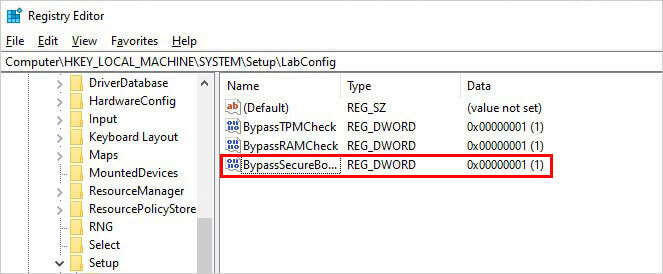
- Now, follow HKEY_LOCAL_MACHINE > SYSTEM > Setup.
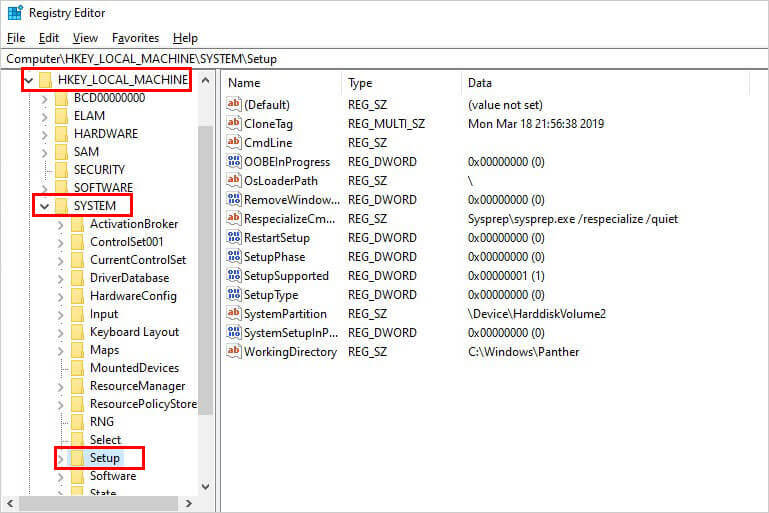
- Right-click the Setup and click New > Key.
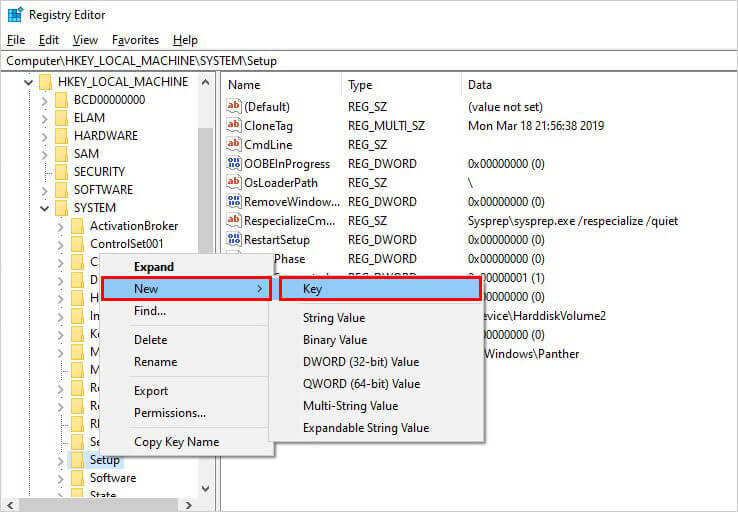
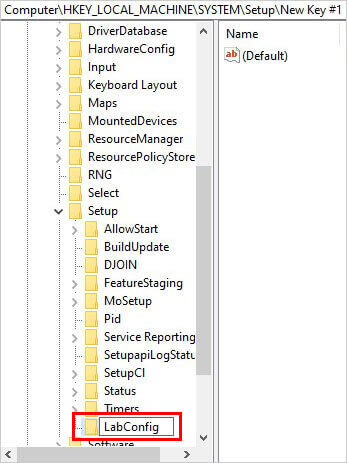
- You'll be prompted to enter a name. Type LabConfig and hit Enter.
- Now, right-click LabConfig and follow New > DWORD (32-bit) Value.
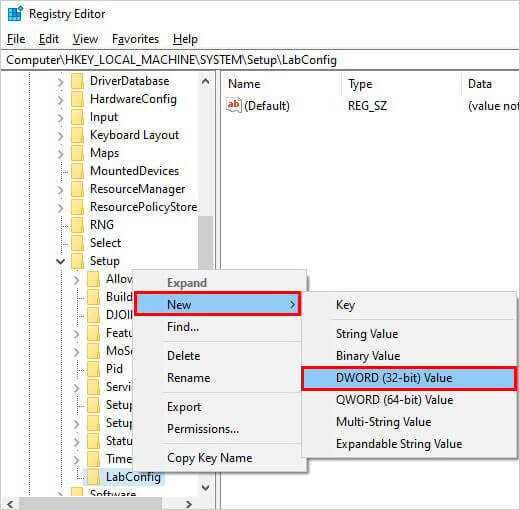
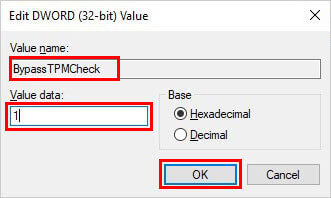
- Now, enter "BypassTPMCheck" in the 'New Value #1' and hit Enter.
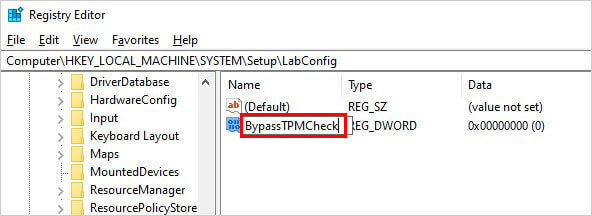
- Now, double-click BypassTPMCheck and set its value data to 1 and click OK.
- Follow the same process to create 'BypassRAMCheck' and 'BypassSecureBootCheck', with the same exact value data of 1 and click OK.
- Now, close the window, type Exit in the Command Prompt window and you'll be back at the message 'This PC can't run Windows 11.' Click 'back' and now the installation process should work.
Hope all the processes are clear and help you install Windows 11 on your system.


A seasoned technology writer and tech enthusiast with keen interest for everything in technology.
 17 min read
-1918.jpg)