-1193.jpg&url=https://www.stellarinfo.com/article/how-to-manually-move-pst-files-to-microsoft-365.php)


Microsoft 365 (Office 365) offers users with better security, accessibility, and collaborative tools. As it is a cloud-based platform, it allows users to have access to their emails and other data from anywhere and at any time. Due to these and various other factors, users tend to migrate from their on-premises or desktop-based platforms to this cloud-based platform.
And if you plan to switch to Microsoft 365 (M365), then you will also want to move your mailbox data (in PST files) from your current environment to this platform. In this article, we will explain some ways to move PST files to M365 manually. We will also mention a specialized PST to Office 365 migration tool that can make the process a seamless experience.dd
Why to Move PST Files to Microsoft 365?
Listed below are some reasons why users move their PST to Office 365:
- Remotely access emails, contacts, etc., stored in the cloud from any device and at any time
- To create a centralized repository of all the mailbox data on a single platform
- Reduce the risk of file corruption and data loss that often occurs with large PST files stored on network or local drives
- Ease mailbox data management by storing scattered PST files on a single platform
What are the Methods to Move PST Files to Microsoft 365?
Here are some ways you can follow to manually move PST files to Microsoft 365.
Method 1: Using Outlook Import/Export Wizard
You can use the Import and Export wizard - an in-built Outlook feature - to import PST files into Office 365 account. For this, configure your MS Outlook profile in Microsoft 365 account.
Now, let's look at the procedure below:
Step 1: Add your Outlook Profile in Microsoft 365
- Launch Outlook. Click on File in the ribbon.
- The Account Information window will open. Click on Add Account.
- Add the credentials and click Next.
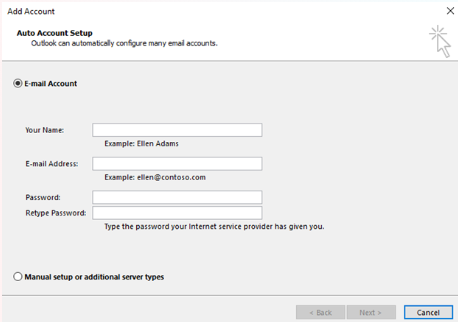
- Now, follow the displayed prompts to complete the process.
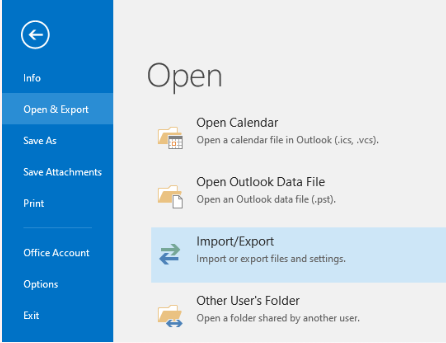
Step 2: Import the PST File
- In Outlook, go to File > Open & Export.
- Select Import/Export.
- Select Import from another program or file and click Next.
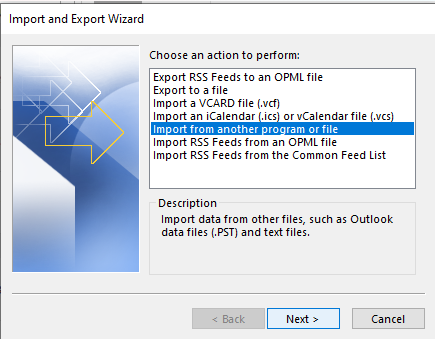
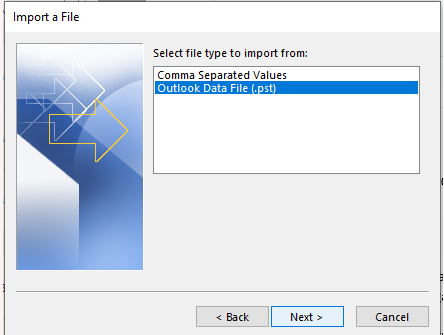
- Click on Outlook Data File (.pst) > Next.
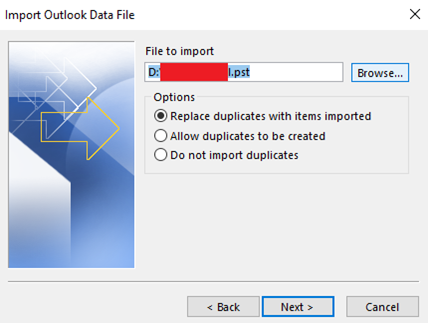
- Next, select the PST file (you need to import) by using the Browse option. Then, choose the Replace duplicates with items imported option and click Next.
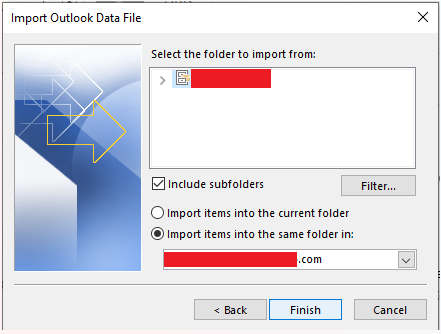
- Next, choose the folder to import from.
- Then, select "Import items into the same folder in" to confirm that you want to put the items straight into the user's primary mailbox.
- Click Finish.
This will move (import) the selected PST file into the configured Office 365 account. Repeat the procedure to import other PST files into the same or other M365 profile/s.
Method 2: Using Network Upload Method
Network Upload is often recommended as a reliable method to import PST file/s into Office 365. Follow the given steps to use this method:
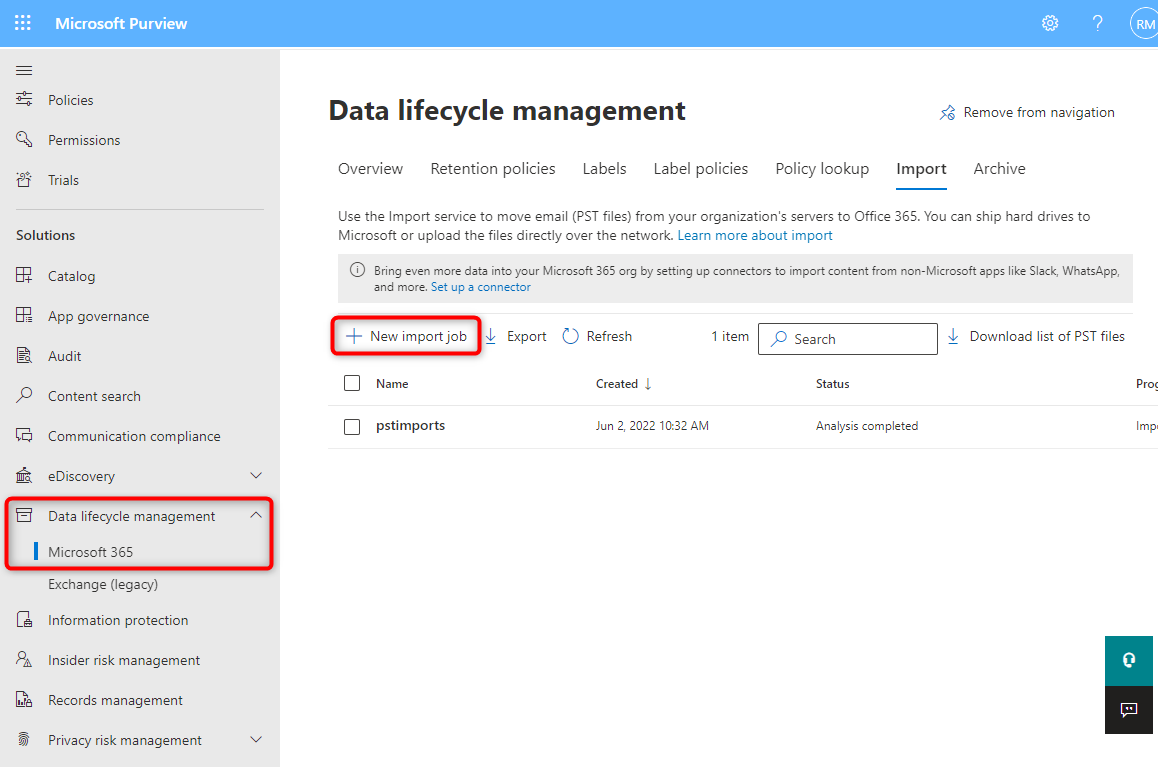
- Go to Microsoft 365 > Data Lifecycle Management.
- Choose "New Import Job" from the "Import" menu. It will open the Import Job wizard.
- Enter the import task name, choose "Upload your data" as the import type, and then click "Show network upload SAS URL." Copy the SAS URL and paste it into Notepad.
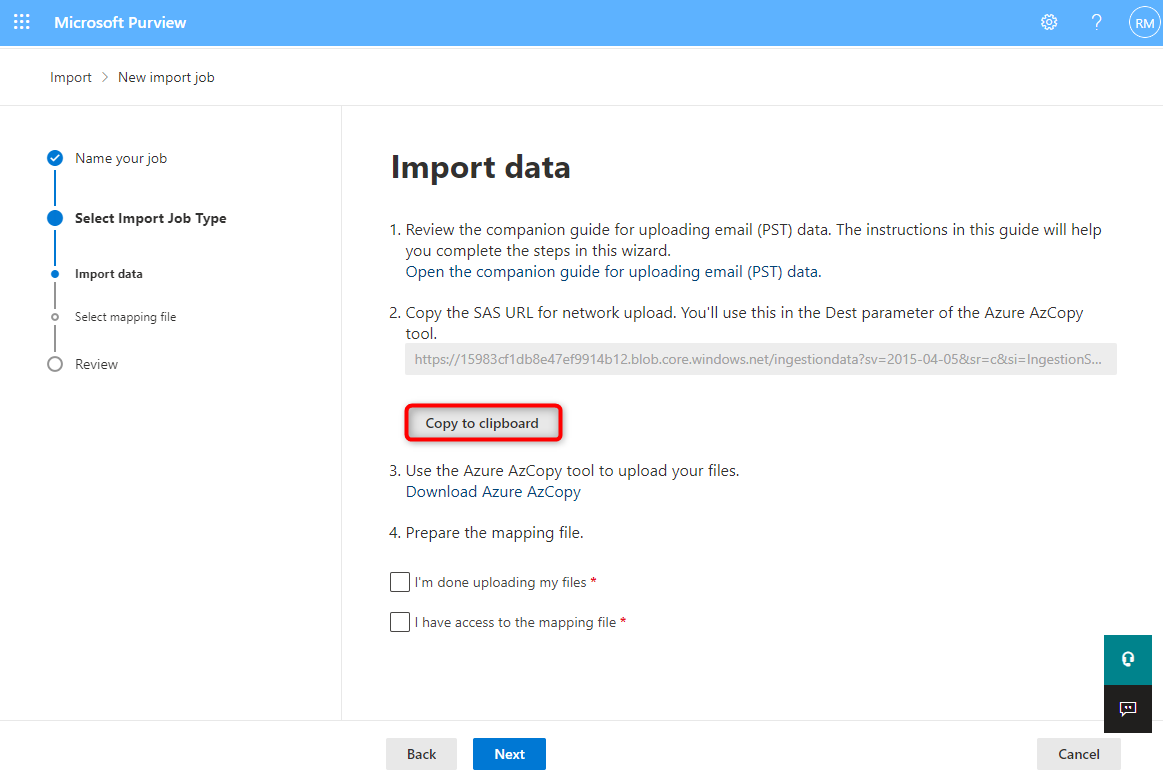
- Download Microsoft Azure AzCopy tool and extract it on Desktop.
- On your computer, launch Command Prompt and type the following command: Azcopy copy “Folder/FilePathContainingPST” “SAS URL”
- Go back to the Microsoft Office 365 import process after the upload process is finished. Choose "I'm done uploading my files" and "I have access to the mapping CSV file.
- Click on the Select Mapping File tab to upload the file for the validation process. Once validation is done, you can start the PST file import process.
Method 3: Using the Drive Shipping Method
Another method to bulk-import PST files into Microsoft 365 is Drive Shipping. For this, you’ll need to first transfer all your PST files to a BitLocker-encrypted hard drive. Next, you will have to physically ship the hard drive containing your PST files to a Microsoft data center, where a professional will upload your PST files to Microsoft storage cloud.
You must create a CSV mapping file and a PST Import Job after the PST files are uploaded to cloud storage. Next, as explained in Method 2, start the PST import procedure to move PST files to Microsoft 365.
Some points to keep in mind:
- You’ll have to pay Microsoft $2/GB or $2000/TB of data.
- Each PST file you add to the hard drive is not ≥ 20 GB in size. This is to prevent slow PST import performance.
Use a Specialized PST to Office 365 Migration Tool to Move PST Files to Microsoft 365
The above methods are complex and time-consuming. Hence, they aren't efficient in moving PST files in bulk. However, there is a simple solution – a powerful PST to Office 365 migration tool like Stellar Migrator for Outlook. Recommended by admins, MSPs, and professionals, this tool lets users simplify moving PST files to O365. It safely imports user PST files to the cloud platform by establishing a secure connection using Microsoft Modern Authentication. Additionally, users can also use this tool to directly migrate OST and PST files to a live Exchange Server.
Bottom Line
Moving PST files to Office 365 using manual methods – network upload and drive shipping – aren't suitable for bulk migration. Moreover, they are complex and time-consuming. A straightforward approach is to use Stellar Migrator for Outlook – a specialized software to migrate PST to Office 365. It can help you to import multiple PST files into Office 365 in a few simple steps and with 100% data integrity. Moreover, you can also use to migrate PST files to a live Exchange server.


An experienced Senior Content Developer with a deep interest in technology.

 8 min read