

How to Fix “Unable to Add Exchange Server to DAG” Error?
June 27, 2025| 6 min read


Our content follows trusted Editorial Standards - accurate & unbiased.
Summary: Microsoft recommends their users and customers to install the Exchange Server Cumulative Updates (CUs), Security Updates (SUs), and Hot Fixes (HFs) as soon as possible to safeguard against known threats and avoid the risk of malicious attacks. However, installing or upgrading Exchange Server to newer CU requires planning and preparation to ensure your users are unaffected and the upgrade is successful. In this article, we have shared the detailed instructions to apply Cumulative Updates to Exchange Server 2013 and later. You can follow these instructions to safely upgrade your Exchange Server to the latest Cumulative Update.
Free Download 100% SecureSoftware updates are critical as they bring new features, fix bugs, and patch vulnerabilities that threat actors may exploit to gain unauthorized access. Microsoft releases Security Updates (SUs) monthly and Cumulative Updates (CUs) for supported Exchange Server versions, such as Exchange 2013, 2016, and 2019, every quarter.
Cumulative Updates contain all the hotfixes and security updates released between the current and last CU releases. In addition, CUs also bring new features and updates that may improve the server's performance and reliability.
Moreover, Microsoft provides security updates for newer builds (CUs) and stops supporting the older Exchange Server CUs.
Thus, updating the Exchange Server to the latest Cumulative Update is critical to continue receiving new security updates and protect the Exchange environment from malicious attacks.
Below we have explained the complete process of downloading and applying the latest Cumulative Updates released by Microsoft for supported Exchange Server versions with step-by-step instructions. You can follow this guide to apply the Cumulative Updates to Exchange Server 2013, 2016, and 2019.
Before you begin installing the Cumulative Update to Exchange Server, consider the following:
IMPORTANT NOTE: Back up before you start installing the CU. If the update fails for any reason, you can use your backup to build a new server and restore mailbox databases. However, if the backup isn't available, you can use Exchange recovery software, such as Stellar Repair for Exchange, to recover mailboxes from failed Exchange Server and export them to the new live Exchange Server directly.
There are two ways to install Cumulative Updates,
Below we have discussed both ways to install the Cumulative Updates on standalone and DAG Exchange Servers.
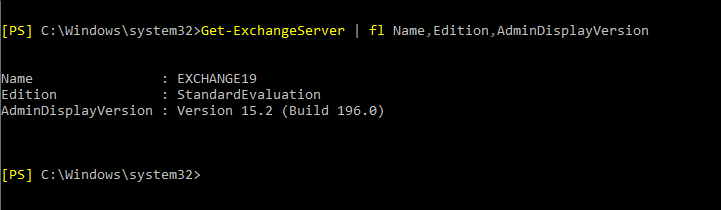
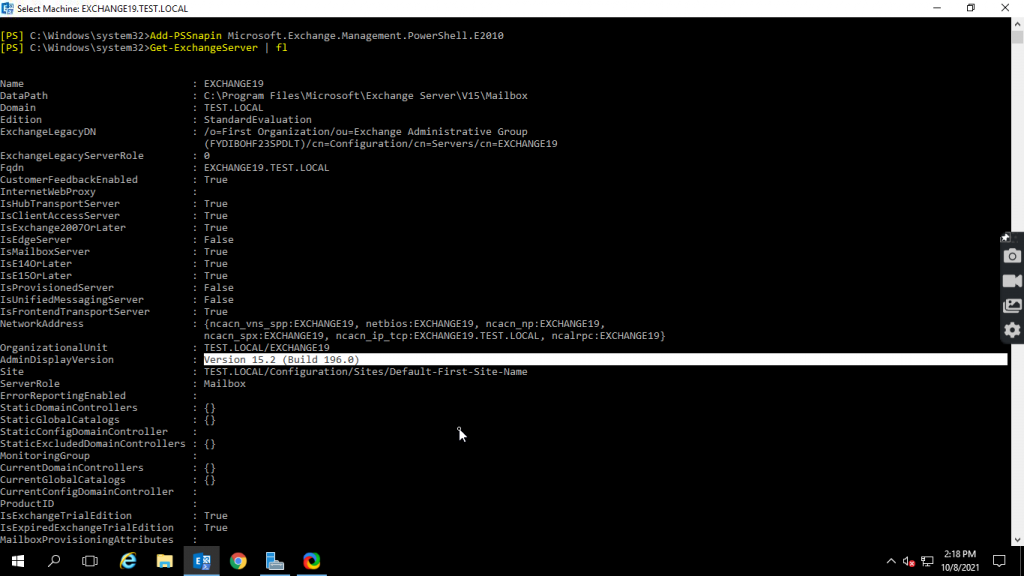
Before downloading the latest CU for your Exchange Server, check the current version using the following Exchange Management Shell cmdlet,
Get-ExchangeServer | fl Name,Edition,AdminDisplayVersion
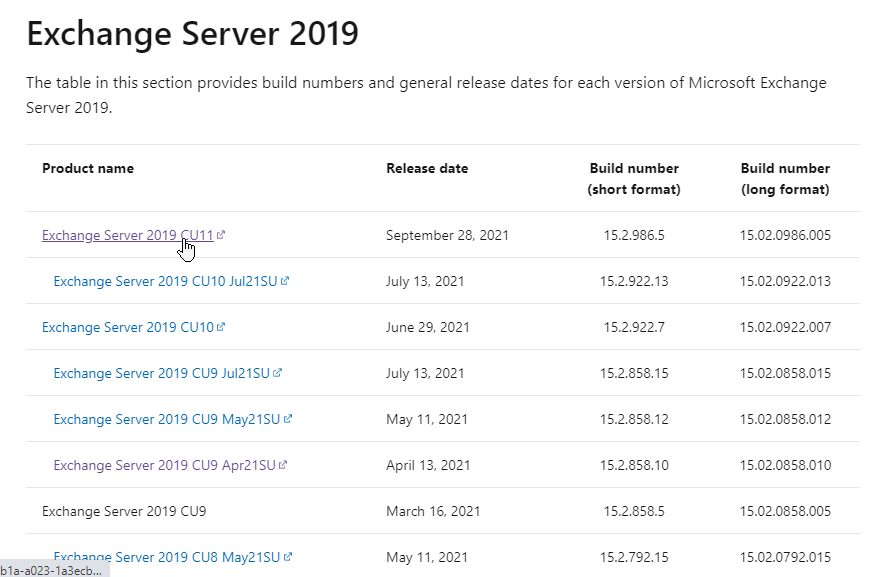
Then visit Exchange Server build numbers and release dates page to check and download the latest Cumulative Update for your Exchange Server Version. Never download any security or cumulative updates from third-party or unofficial sites as they may contain malware.
It is recommended to put Exchange Server in maintenance mode before updating or upgrading it. You can use the following PowerShell commands in Exchange Management Shell (EMS) to put your Exchange Server 2013, 2016, or 2019 into maintenance mode.
Set-ServerComponentState -Identity "ServerName" -Component HubTransport -State Draining -Requester Maintenance
Redirect-Message -Server ServerName -Target "ServerName-02.stellarinfo.com"
Suspend-ClusterNode "ServerName-01"
Set-MailboxServer "ServerName-01" -DatabaseCopyActivationDisabledAndMoveNow $true
Set-MailboxServer "ServerName-01" -DatabaseCopyAutoActivationPolicy Blocked
Set-ServerComponentState "ServerName" -Component ServerWideOffline -State Inactive -Requester Maintenance
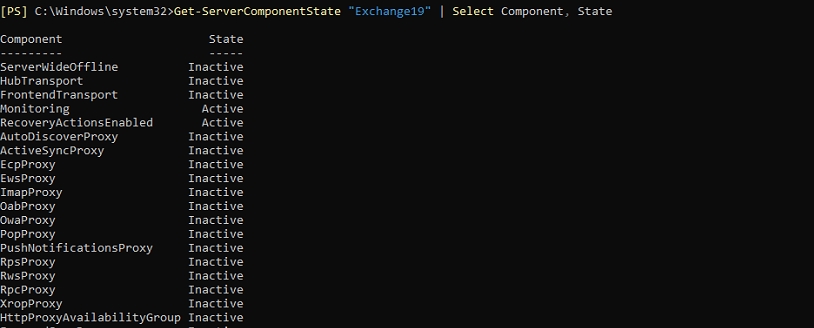
Get-ServerComponentState "ServerName” | Select Component, State
The components must be in an inactive state.
Restart the server.
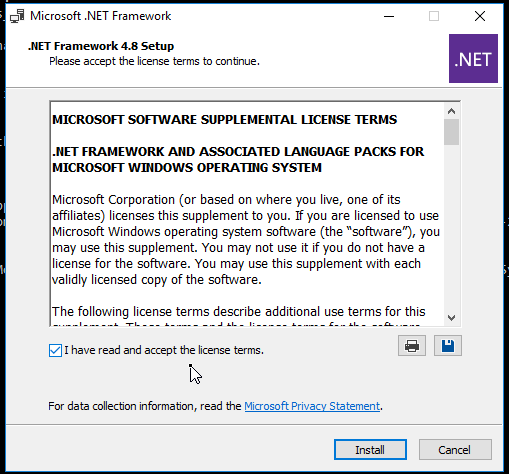
On the download page, check the system requirement section to learn the pre-requisites you need to install.
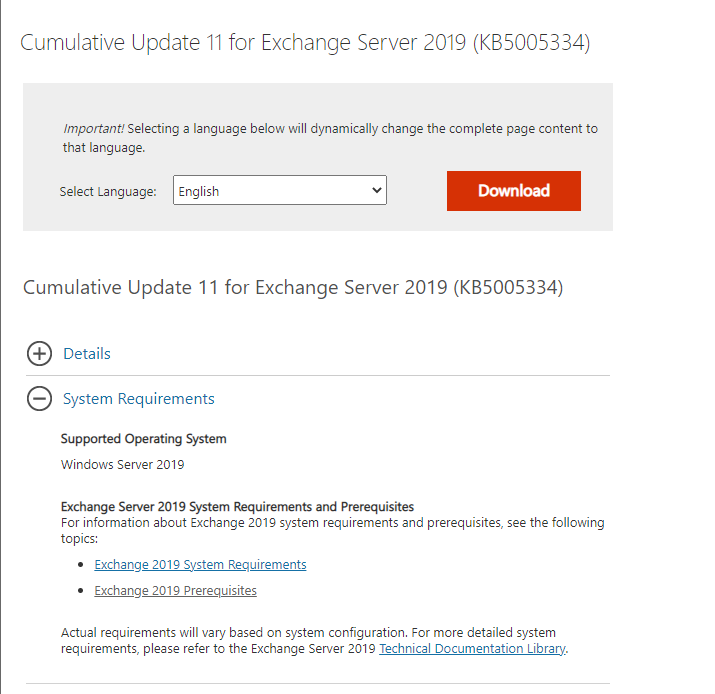
Usually, you need to install the following:
Before extending the Active Directory Schema, you must install the RSAT-ADD feature (Remote Tools Administration Pack) on the domain controller and Exchange Server. For this, open PowerShell as administrator and run the following command,
Install-windows feature RSAT-ADDS
Restart the server.
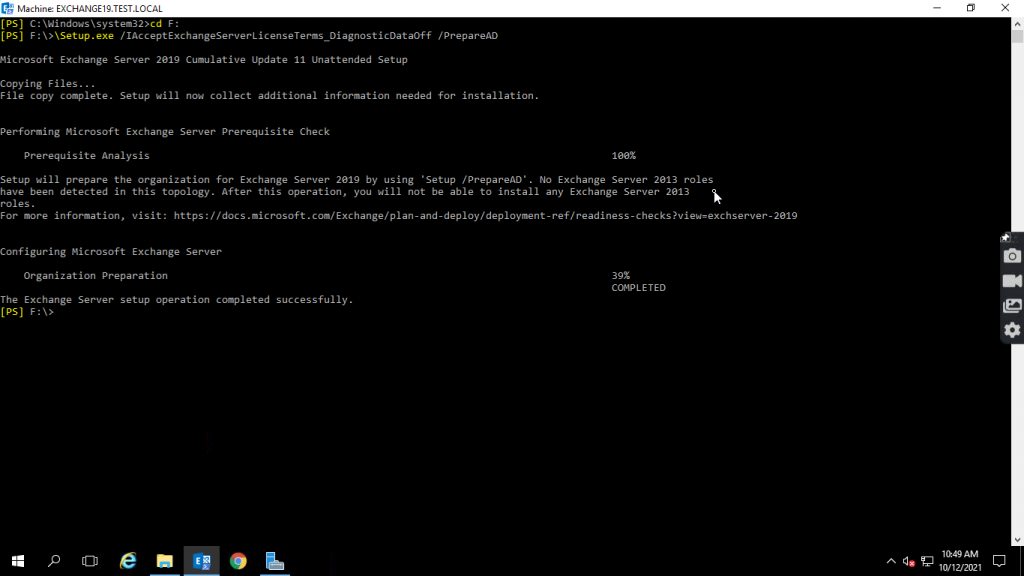
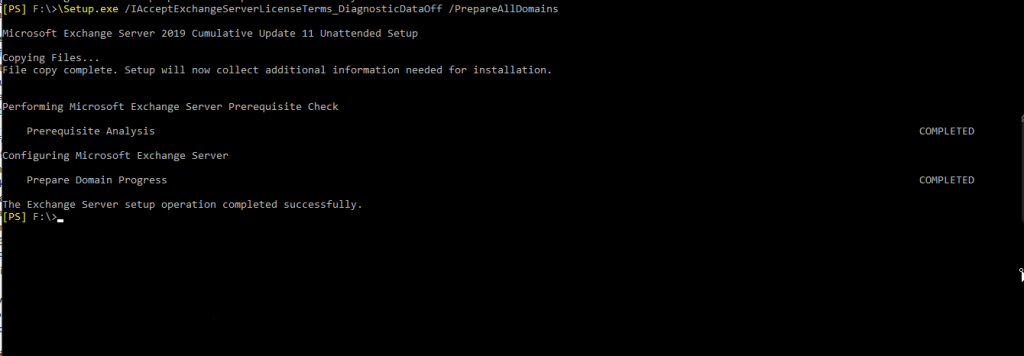
To prepare the Schema, Active Directory, and Domains, open Command Prompt as administrator and navigate the mounted CU ISO location using the CD command. For instance,
cd F:
Then run the following commands to prepare the Schema, AD, and all Domains,
\Setup.exe /IAcceptExchangeServerLicenseTerms_DiagnosticDataOff /PrepareSchema

\Setup.exe /IAcceptExchangeServerLicenseTerms_DiagnosticDataOff /PrepareAD
\Setup.exe /IAcceptExchangeServerLicenseTerms_DiagnosticDataOff /PrepareAllDomains or /PrepareDomain
NOTE: Starting from September 2021 CU, you need to use the /IAcceptExchangeLicenseterms_DiagnosticDataOFF or/IAcceptExchangeLicenseterms_DiagnosticData_ON for unattended installs.
Restart the server in between to clear any pending reboots.
After installing the pre-requisites on your server, mount the downloaded Cumulative Update ISO image.
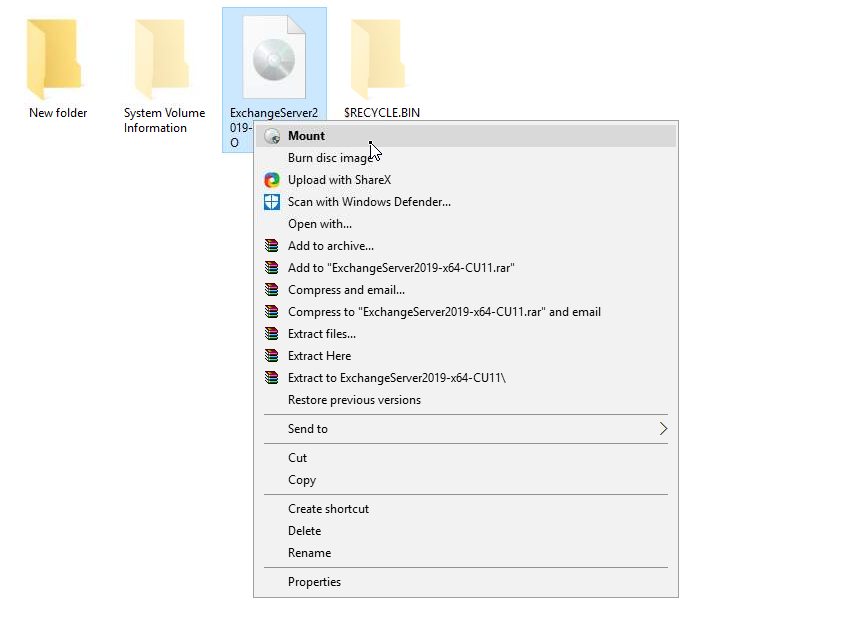
You can install Cumulative Update using the Command Prompt or directly launch the Setup.exe file from the mount location.
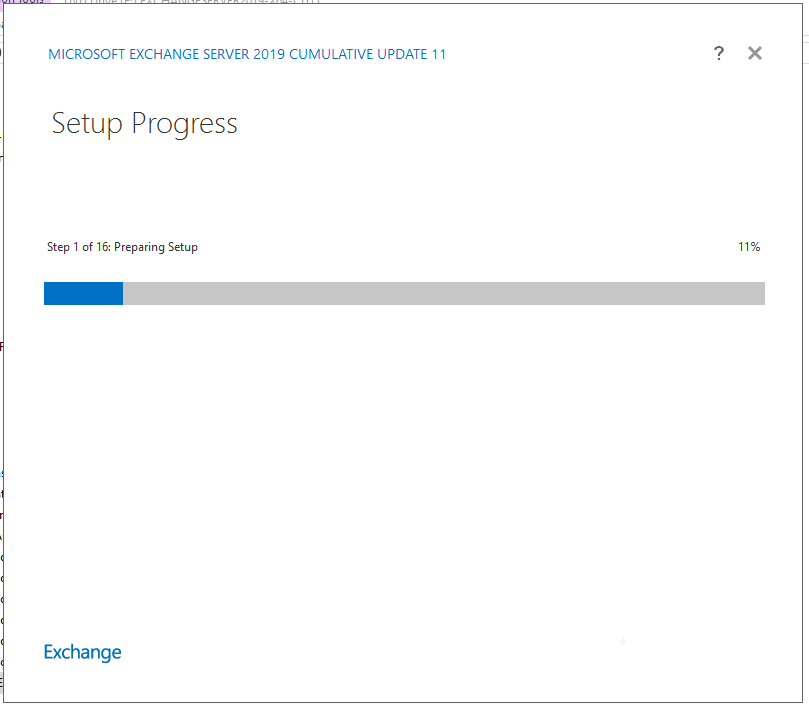
To run the installation in unattended mode via Command Prompt, open an elevated command prompt and execute the following command,
cd F:
\Setup.exe /Mode:Upgrade /IAcceptExchangeServerLicenseTerms
Once the installation is finished, restart the server and then check the current version using the following command in EMS,
Get-ExchangeServer | Fl
Once verified, remove the server from the maintenance mode using the following command in Exchange Management Shell:
Set-ServerComponentState “ServerName” –Component ServerWideOffline –State Active –Requester Maintenance
Set-ServerComponentState ServerName –Component HubTransport –State Active –Requester Maintenance
On the DAG member server, you need to perform the following commands to remove maintenance mode,
Resume-ClusterNode –Name ServerName
Set-MailboxServer ServerName –DatabaseCopyAutoActivationPolicy Unrestricted
Set-MailboxServer Servername –DatabaseCopyActivationDisabledAndMoveNow $false
Set-ServerComponentState “ServerName” –Component ServerWideOffline –State Active –Requester Maintenance
Set-ServerComponentState ServerName –Component HubTransport –State Active –Requester Maintenance
To verify the DAG member server is out of maintenance mode,
Get-ClusterNode "ServerName"
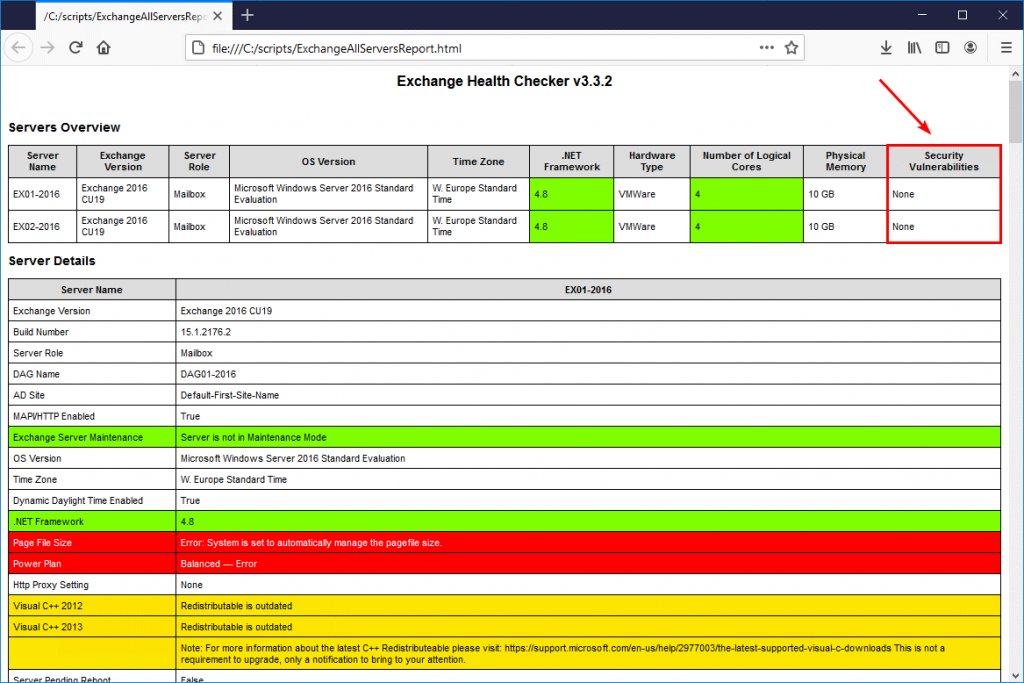
Once you have updated your Exchange Server to the latest Cumulative Updates, check any pending Security Updates. You can run healthChecker.ps1 script on your server to find the vulnerabilities and then apply the SUs to patch them.
To install Security updates, navigate to the folder where Security updates are downloaded (.msp files) and run the following command in the elevated Command Prompt window,
.\Updatename.msp
Follow the wizard to complete the installation and then reboot.
IMPORTANT UPDATE: From May 2023, Microsoft will release the Security Updates and Hot Fixes as self-extracting auto-elevating executable files. Thus, one can directly install the May 2023 or later SUs and HFs as administrators or with admin privileges like any other program.
Microsoft recommends its Exchange customers to install the latest updates—whether Security Updates (SUs) or Cumulative Updates (CUs)—as they arrive to protect the organization from known threats and malicious attacks. Attacks on unpatched Exchange Server often rise immediately after Microsoft releases the patches or updates, increasing the chances of your organization getting compromised. To prevent the risks, install the updates as soon as possible.
However, if the server is compromised or the database is damaged after a malicious attack or server failure, create a new server and restore the mailboxes from the backup. Never use the compromised server, even if you can fix it.
If the backup isn't available, use Exchange server recovery software, such as Stellar Repair for Exchange, to recover mailboxes from your compromised Exchange Server and save them as PSTs. You may also export the extracted mailboxes from corrupt or damaged Exchange database directly to your new Live Exchange Server or Office 365 tenant in a few clicks.
Senior Content Writer
This article was written by Ravi Singh, a Content Writer at Stellar Data Recovery.
Curious about our content creation process? Take a look at our Editor Guidelines.
June 27, 2025| 6 min read
May 23, 2025| 6 min read
April 30, 2025| 6 min read


 6 min read
