When migrating from on-premises Exchange Server to Exchange Online in hybrid environment, you may encounter several issues. Two common issues that may arise are:
- Problem in moving a mailbox from local Exchange Server to Exchange Online.
- Problem moving a mailbox back from Exchange Online to the local Exchange Server.
Let’s see how to troubleshoot these migration issues.
First, you need to determine at which point you have the failure – in transit, at execution, or after.
- A move request is failing to initiate.
- After the move request has been initiated.
- Unable to verify if the move initiated or not.
Troubleshooting the Move Issue
The first thing to do after a failure is to try to make the move from the Exchange Admin Center (EAC) in the Exchange Online. If the move is not working, the best way is to remove the migration endpoint and start again. You need to also evaluate if the problem is with just one mailbox or the whole process. There could be issues with the local Exchange Server mailbox which are stopping you from migrating it or there could be restrictions which are stopping the move request.
Remove the Migration Endpoint
To remove the migration endpoint, follow these steps:
- Open https://portal.microsoftonline.com and login with your global admin.
- Click on Admin and then click on Show All.
- Click on Exchange.
- Click on Migration.
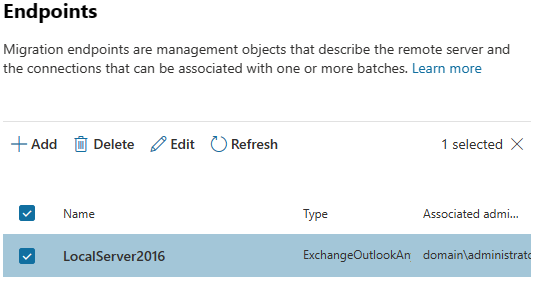
- Click on Endpoints.
- Find the already created endpoint and delete it.
Move a Local Exchange Server Mailbox to Exchange Online
To do so, follow the below steps:
- From the migration area, click on the + button to create Migrate to Exchange Online.
- On the Select a migration type page, select Remote move migration.
- Select the users you want to move to the cloud.
- Enter the on-premises Exchange credentials in the format Domain\User.
- Ensure that the migration endpoint is correct and pointing to the CAS server with the MRS Proxy enabled.
- Initiate the migration batch to start the move.
Move Exchange Online Mailbox to Exchange Server
To move Exchange Online mailbox to Exchange Server, follow these steps:
Note: The same process is used here. But when creating a new migration with the + button, you need to select Migrate from Exchange Online.
- On the Select a migration type page, select Remote move migration.
- Select the users you want to move.
- Enter the on-premises Exchange credentials in the format Domain\User.
- Enter the on-premises Exchange Database name to move onto.
- Ensure that the migration endpoint is correct and pointing to the CAS server with the MRS Proxy enabled.
- Initiate the migration batch to start the move.
Confirm the Authentication Options
Now, you need to make sure that everything is in place. If the problem still persists, you need to ensure that the proper authentication is enabled and in place. Apart from that, you need to ensure that the migration endpoints are enabled. Let’s start by making sure the endpoints are working. For this, run the following commands.
Get-WebServicesVirtualDirectory -Identity "\server name="" \EWS (default Web site)" |fl Server,MRSProxyEnabled,WSSecurityAuthentication /server

If the authentication is set to false or the MRS Proxy Enabled is false, you need to enable them using the following command.
Set-WebServicesVirtualDirectory -Identity "\server name="" \EWS (default Web site)" -MRSProxyEnabled $true -WSSecurityAuthentication $True /server
If this was the case, you can try to re-run the move requests. The issue should be resolved now.
Firewall or Intrusion Detection issue
There could be a firewall or network issue which is preventing communication. It might happen that traffic is blocked. You need to ensure that the Exchange Server is allowed with no restriction. You need to make sure that the following paths are allowed to any outbound traffic.
/ews/mrsproxy.svc
 /ews/exchange.asmx/wssecurity
 /autodiscover/autodiscover.svc/wssecurity
 /autodiscover/autodiscover.svc
If you have Intrusion Detection System (IDS), you need to ensure that the IP address is excluded from any rules, like maximum HTTP requests per minute or other rules depending on your system which you have in place to protect your network from denial of service and other attacks.
Remove Previously Created Move Requests
Leaving previous request in place can cause issues and even prevent a mailbox move from taking place. It’s always a good practice to remove any previous requests, even if they are successful or if you have old stale requests.
To remove the request moves related to the mailbox which is failing, connect to the Exchange Online using PowerShell and run the following command.
Get-MoveRequest -Identity '\email address=""' /email>

The will get any requests related to the user, if exist.
Then, run the following command to remove the requests.
Remove-MoveRequest -Identity '\email address="" /email

What if the troubleshooting procedures fail?
If the above troubleshooting methods fail, then you can take the help of an application, such as Stellar Migrator for Exchange, to migrate Exchange Server mailboxes to Microsoft 365. With this application, you can directly migrate mailboxes between on-premises Exchange servers or from Exchange to Microsoft 365 with no data loss. Apart from migrating user mailboxes, you can also move archives, and public folders with ease. The software offers automated mailbox mapping, incremental migration to avoid data duplication, and ensures a smooth, secure, and hassle-free migration experience.


 4 min read