Although you might have the latest Exchange version and all the Cumulative Updates (CU) installed, your Exchange Server might still be at risk of some potential threats in the wild. So, you need to make sure that your Exchange Servers are locked down and secure, especially when the Exchange Server connects to the internet for incoming and outgoing messages. To help you secure your Exchange Servers from such threats, Microsoft offers the Exchange Emergency Mitigation (EM) Service. Below, we will be discussing the Exchange Emergency Mitigation (EM) service in detail and how to use it.
About the Exchange Emergency Mitigation Service
The Exchange Emergency Mitigation Service helps you to mitigate vulnerabilities on your server and secure it as much as possible from any known vulnerabilities. Normally, these mitigations are implemented by a Security Administrator but Microsoft offers this service to automatically configure and enforce these mitigations. Mitigations which are of a general scale will be automatically applied. The service consists of a set of actions which are automatically applied on a server where such configurations are found to be of risk.
The service is not an update installer. So, updates such as security or installing cumulative updates (CU) need to be installed manually by the administrator of the server. This is because if something goes wrong with the installation, it may lead to the server failure. The service works on the following features:
- IIS URL Rewrite Rules – Mitigations will block specific malicious HTTP requests which are coming to the server.
- Exchange Service – This will automatically disable any service which is either deprecated or risky.
- App Pool – This will go through the app pools in IIS which are related to Exchange and disable them if considered as risky.
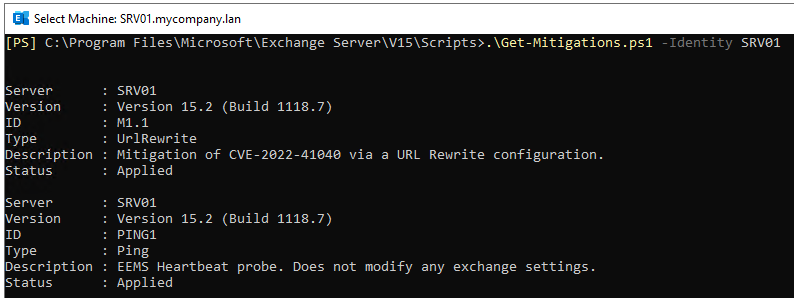
It fixes mitigations, like the EEMS heartbeat probe and CVE-2022-41040 in the URL rewrite engine.
How to Use the Exchange Emergency Mitigation Service?
To use the Exchange Emergency Mitigation (EM) service, you need to install it on a mailbox server. You will not be able to use it on an Edge Server. You need to have at least the September 2021 (CU) update on an Exchange Server 2016 or later, or have the Exchange Server 2019 installed. You will not be able to check for vulnerabilities on Edge Server with this.
Apart from this, the IIS installed needs to have the IIS URL Rewrite Model. The operating system should also have the Universal C Runtime for Windows (KB2999226).
Since this is a cloud service, you need some connectivity requirements. You need to have access to officeclient.microsoft.com/* on port 443. If your Exchange Server is behind a proxy, you need to execute the following commands to make the Exchange Server pass through the proxy.
Set-ExchangeServer -Identity /server name="" -InternetWebProxy /proxy server="" address:port="" /proxy=""
netsh winhttp set proxy /proxy server="" address:port="" /proxy
Before using the service, you need to also confirm that connectivity is successful. In the V15/Scripts, execute the Test-MitigationServiceConnectivity.ps1.
The output from PowerShell should be similar to the given below.

The service can apply such mitigations automatically. Sometimes, this may cause unnecessary downtime or issues. You can disable the automatic mitigation by running the below command.
Set-OrganizationConfig -Identity /server name="" -MitigationsEnabled $false /server

By default, this is set to true.
To view any applied mitigations, you can use the below command.
Get-ExchangeServer -Identity /server name=""/ | Format-List Name,MitigationsApplied
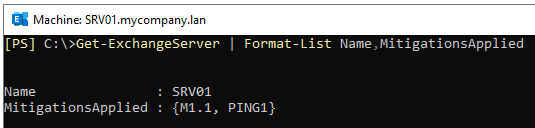
This will show all the applied mitigations on the specified server.
If you want to roll back a mitigation applied on a specific server as it is causing system failure or stopping a functionality, you can use the following command. This will restart the service and eventually re-apply the mitigation.
Restart-Service MSExchangeMitigation
After ten minutes of the restart of the service, it will check for applied mitigations and re-apply them automatically. If for a reason something breaks, you can either remove or block the mitigation to be applied. To block a mitigation, you need to use the following command with the ID of the mitigation.
Set-ExchangeServer -Identity /server name=""/ -MitigationsBlocked @("id")

Once the issue is resolved, you can reapply the blocked mitigation by running the following command and then restart the service.
Set-ExchangeServer -Identity /server name=""/ -MitigationsBlocked @()
In case you want to view both the applied and blocked mitigations, you can run the following command.
Get-ExchangeServer | Format-List Name,MitigationsApplied,MitigationsBlocked

To get the full details of the applied mitigations, you can run the following command.
.\Get-Mitigations.ps1 -Identity /server name=""/ /server
You can see all the changes and information on the service in the Event Viewer where the source would be “MSExchange Mitigation Service”.
What if a disaster strikes?
If your Exchange Server suffers a malware or ransomware attack, then this will leave your Exchange Server inaccessible. Also, the transaction logs get damaged and you will be unable to mount the databases. In this case, you can re-install the Exchange Server. However, you will not be able to reinstate or recover the data if the database or transaction logs are damaged and corrupted. Recover Exchange Server from backup is not an option as this would result in data loss.
This is where applications, like Stellar Repair for Exchange can assist you. It is a leading application for Exchange database recovery. It allows you to open multiple EDB files (healthy or damaged) from any version of Exchange Server, with no size limit. You can easily browse through the database files and granularly export the data to PST and other file formats. You can also export the EDB data directly to a live Exchange Server database or Office 365 tenant. You can process user mailboxes, shared mailboxes, disabled mailboxes, user archives, and even public folders.


 6 min read