Table of Contents
- Restart your Mac
- Update your macOS
- Use Activity Monitor
- Close background applications
- SpeedUp Mac software Introduction
- Using SpeedUp Mac to Clean System Memory
- Using SpeedUp Mac to Clean Mac Disk
- More Tips to SpeedUp Mac
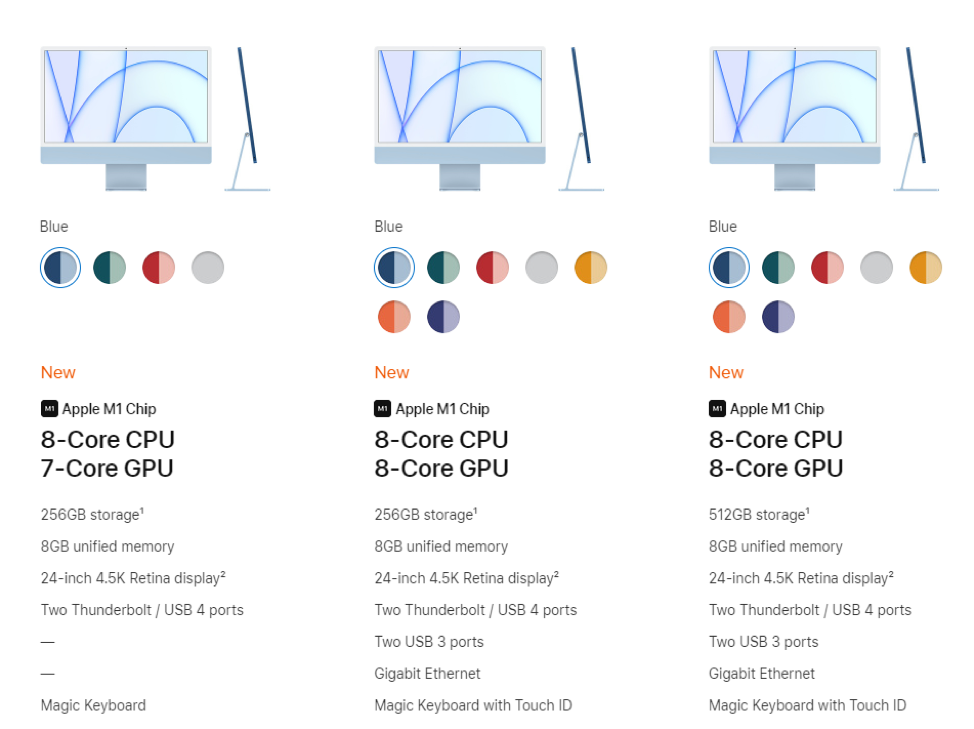
Macs are well-known for their memory management, and the reason is well-optimized macOS and other firmware that Apple has perfected over the years. Most consumer-level Macs don’t necessarily require more than 8 to 16GB of RAM (as shown in the brief comparison of different configurations below). They perform pretty well for any non-intensive task or even an occasional Photoshop render.
Even so, often, after using a Mac for several months, users can sometimes face degraded performance or abruptly crashing apps on it, and these symptoms are indicative of insufficient memory. So why does a MacBook that’s so foolproof fall short in terms of memory management? Let’s find out through this post and also discover easy ways to fix it.
First things first – How much RAM is sufficient for my Mac?
If you’re facing memory management issues on your Mac, you might be tempted to take the easy way out and just opt for a RAM upgrade. While there’s nothing wrong with that, you should know that 8 GB of RAM is good enough for most people and most users. However, if you’re a content creator who works with video or audio editing software, or a programmer with higher memory requirements to run emulations and programming environments; you may need to expand your RAM capacity to at least 16 GB.
To overcome degraded performance issues or errors that say “You may have run out of unified memory,” you can approach the nearest Apple Service Center and ask them about RAM expansion. Usually, this should cost you around $100 - $200, depending on the configuration, speed, and quality of RAM.
But, most of the time, expanding RAM is not a solution for these issues. There are ways of improving the RAM performance without changing it or expanding the capacity. Let’s take a look at each one to understand and implement them.
How to fix memory issues and clear RAM on a Mac?
There are multiple ways to clear your Mac’s RAM and improve its performance. All you need are a few tweaks.
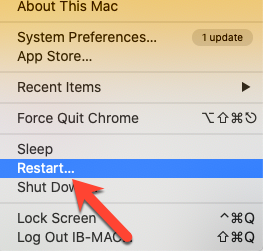
1. Restart your MacBook
Yes, this may seem trivial, but it is a preliminary step to eliminate any simple system bugs/errors and refreshing the memory to run better and more efficiently. If doing this doesn’t help resolve the memory issue, move on to the other methods listed below.
2. Update your macOS
Apple releases updates periodically to improve the performance of its OS and reduce bugs and other issues. Running older versions of macOS means you may be struggling with issues that have been resolved by the manufacturer or have access to lesser features (your privacy may be compromised too!). Therefore, we suggest you update your Mac to the latest macOS version to improve your system’s performance and your overall experience using an iMac.
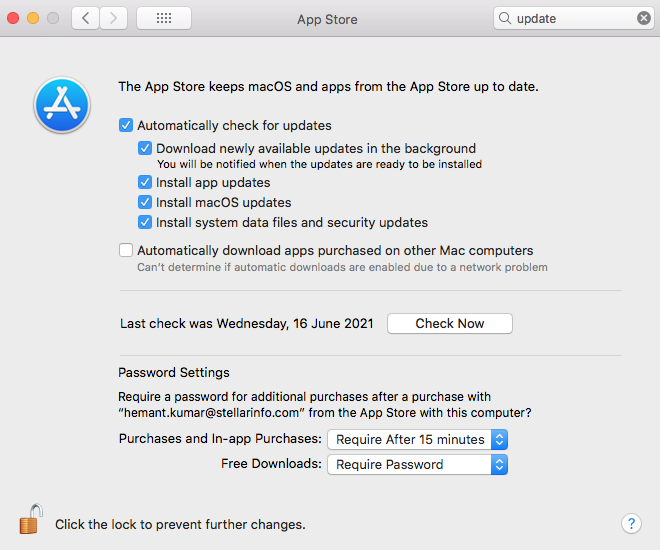
To check if you have the latest version of macOS running, select System Preferences from the Apple menu. Then click on Software Update and if any updates are available, click on the Update Now button to install them. You can make the appropriate settings to check for updates and download/install them automatically.

Since you’re already updating your macOS, it might also be a good idea to update all apps installed on your MacBook or iMac. For this, select App Store from the Apple menu and see the number of updates it shows at the right side. It will also show you when you last checked for updates. You can select the appropriate options to automatically update installed apps and click on Update Now.
3. Use Activity Monitor
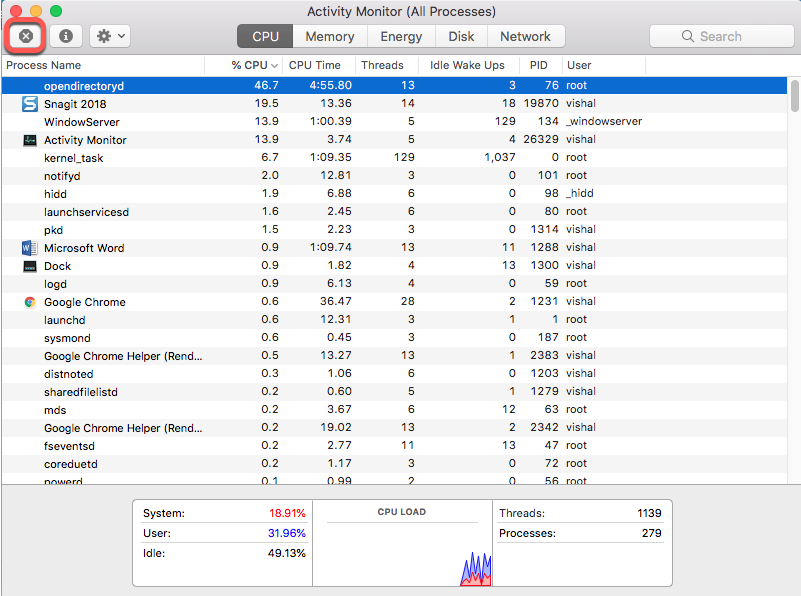
Apple offers this nifty feature to monitor Mac’s resources. You can access Activity Monitor by clicking Command + Space to open up Spotlight and searching “Activity Monitor”. This gives an insight on how much CPU and memory are being used as well as the tasks and applications that are consuming them. You can figure out redundant task and applications by looking at the little graph below, and if it is yellow or red, a lot of memory is being consumed.
To terminate or uninstall resource-intensive tasks with Activity Monitor, follow these steps:
- In Activity Monitor, click on the Memory tab > Memory column in the processes table to sort the table by memory usage. This will help you recognize applications and tasks that are consuming the most RAM.
- Identify applications that you aren’t using or that you don’t identify and select them.
- Then click on Information (i) in the menu. This will enable you to see more information about the application.
- If you want to close this application, click on Quit. This will lead you to a prompt asking if you want to Quit or Force Quit or Cancel. Click on Quit to terminate the application. Force Quit if the application is unresponsive.
4. Close background applications
Most users make this common mistake. Many times, users tend to forget quitting the applications that they’re no longer using. These applications run in the background and hog up all the CPU and RAM, making your Mac slower and unresponsive.
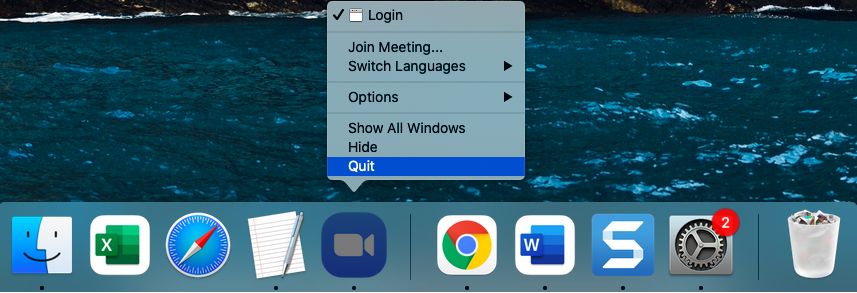
To overcome this, check the Mac Dock for applications that are open, and right-click on them to close them. This will surely improve your Mac’s overall performance by a decent amount.
5. SpeedUp Mac software Introduction
It’s a known fact that when a Mac has less storage space on the storage drive, it tends to run slowly. This is because when the RAM is completely utilized, your Mac automatically uses the hard drive’s extra storage space as virtual memory to buffer tasks. Now, in such situations, if there’s no space on the hard drive, the RAM is forced to overflow, and this causes dire issues with the system’s performance. The solution to this problem is cleaning your hard drives every few months by removing the unnecessary clutter. But of course, manually cleaning hundreds of gigabytes of data isn’t so easy.
In such cases, applications like Stellar SpeedUp Mac can help you automate the process of cleaning up your hard drive to improve your Mac’s performance.
Give your MacBook a power boost with Stellar SpeedUp Mac
SpeedUp Mac from Stellar is a 30-day free-to-use software, which can be used to clean up MacBook and iMac disks and memory for improved performance. Using this application, you can get rid of duplicate files, uninstall unused third-party applications, selectively clean your disks, and optimize system memory utilization. The software can also clean up other Mac devices like iMac, MacBook Pro, Mac mini, and MacBook Air. It is compatible with the latest release of macOS.

Let’s take a look at how you can install this software.
Installing SpeedUp Mac:
- Unzip the SpeedUpMac.dmg.zip file.
- Double-click the dmg file. This will mount a virtual volume – SpeedUpMac.
- Drag the SpeedUpMac application from the mounted virtual volume to the Applications folder.
- To launch the software, double-click on SpeedUpMac in the Applications folder.
- Accept the License Agreement, and then the home screen of SpeedUp Mac software is displayed.
6. Using SpeedUp Mac to Clean System Memory
If you are using macOS Mojave or later, make sure you provide Full Disk Access permission before running SpeedUp Mac.
- From the software’s home screen, click on the Memory tab.
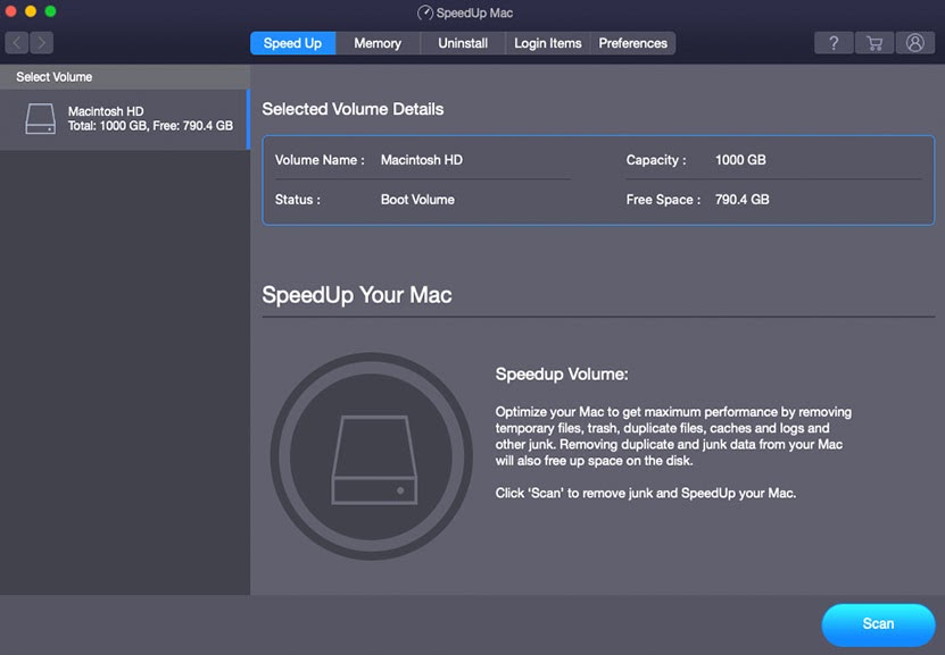
- Click on Memory Cleanup to get a visual of your Mac’s total memory usage. You can see the total system memory, memory being used, and memory that’s available.

- Click on Cleanup Now to start the cleanup process. As more and more memory becomes free, you’ll be able to see a difference in the memory “used” section, which indicates that the memory has been cleared up.
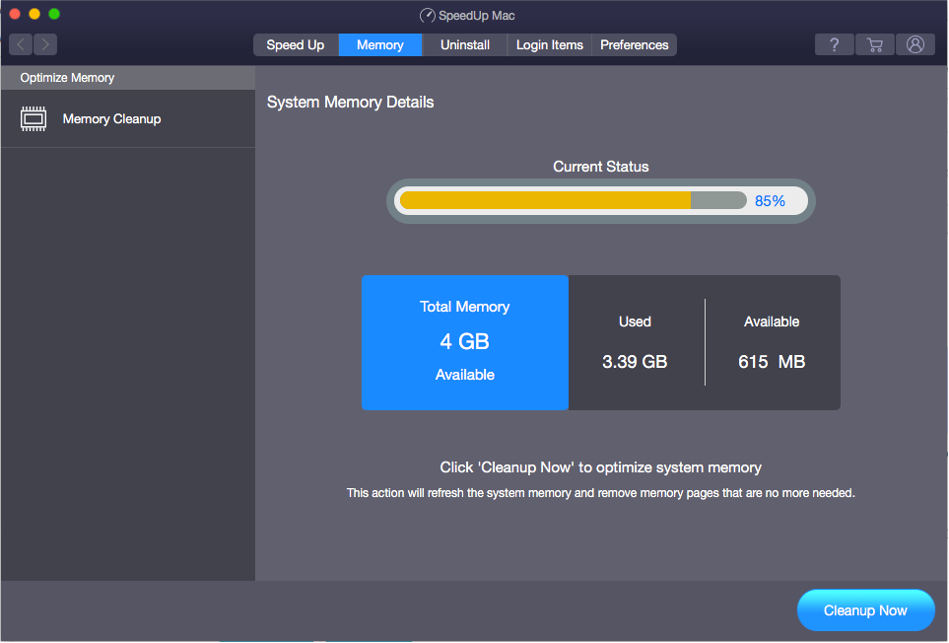
| Ideally, once this clean-up process completes, it should translate into a better-performing MacBook. If not, try the clean-up process again or proceed to the next fix. |
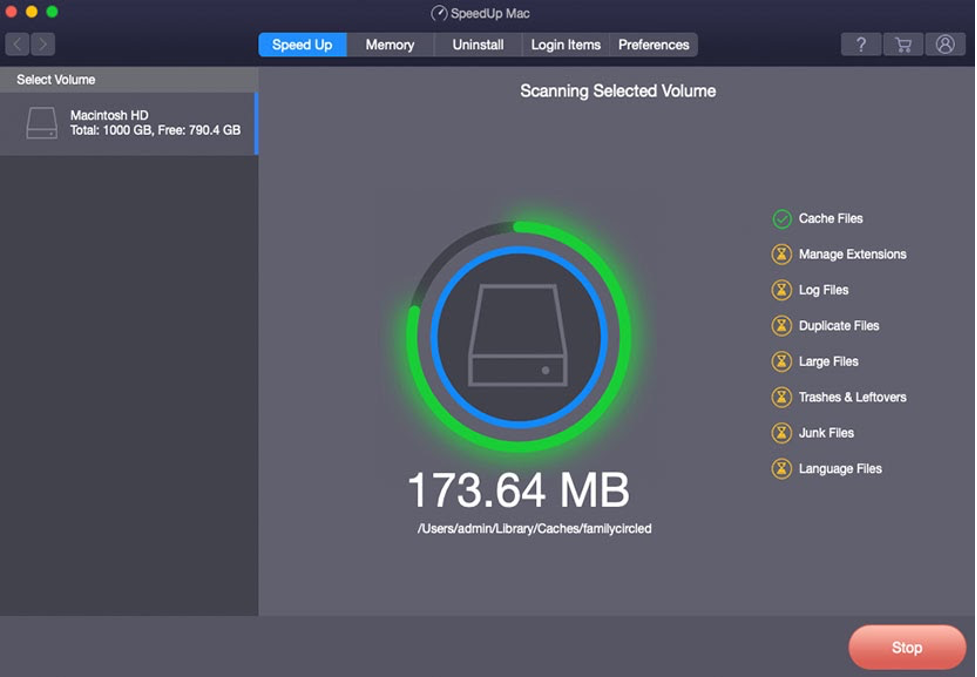
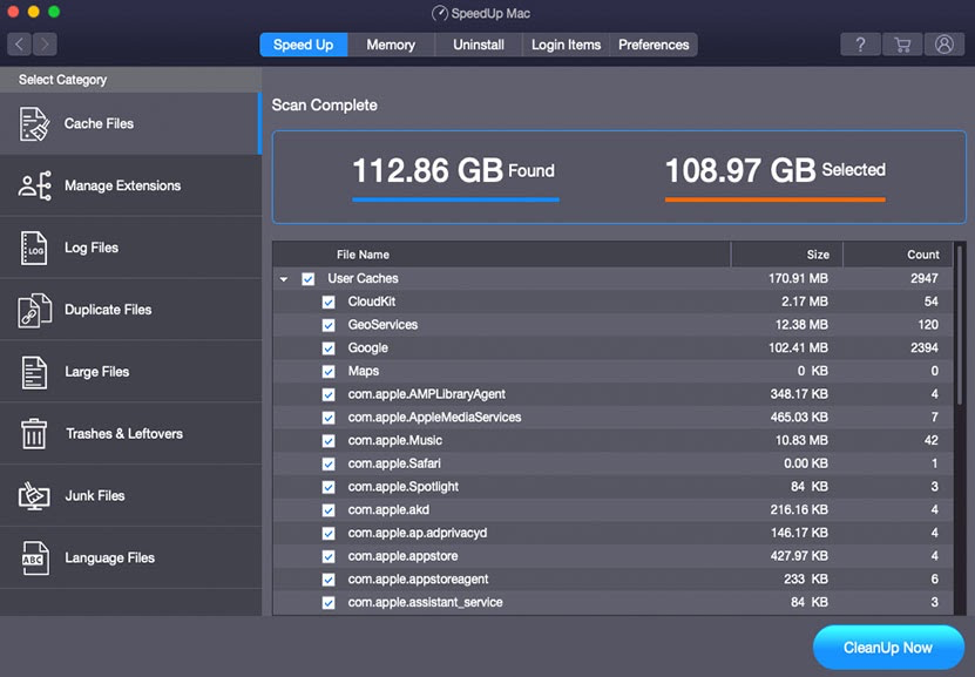
7. Using SpeedUp Mac to Clean Mac Disk
- From the software’s home screen, select a disk or volume to clean.

- Scan the disk or volume to find unwanted files.
- Once the process completes, you can view all the unwanted, duplicate, corrupted files and delete them by selecting them and clicking on the “CleanUp Now” button.
8. More Tips to SpeedUp Mac
In addition to the above-mentioned sure-shot tricks, you can try out a few of the below-mentioned options to further enhance your Mac’s performance.
(i) Speed up Safari
If you use Safari as the default browser and it’s sluggish, you can speed it up by updating it and clearing out cache files. If doing these things doesn’t change anything, try closing unneeded browser tabs and restarting your Mac. Also, check your network connection to see if it’s working as expected. Learn how to speed up slow Safari.
(ii) Managing login (startup) items
Disabling non-essential applications that run during boot-up can help make your Mac perform better and smoother. To do this, go to System Preferences > Users & Groups > Login Items. This will lead you to a list of applications that open every time you boot your Mac. We don’t suggest you meddle with system apps, but if you find any app that you don’t use, set to run every time with the boot-up, disable it by clicking on the minus (-) sign. This should drastically improve boot times and overall smoothness of the system. Learn how to manage Login Items.
Clear cache files
Cache files are temporary files stored on your Mac to pre-load websites and applications so that they open quickly. Over time, too many cache files stored on the disk can hamper your Mac’s performance. You can clear cache files from your browsers to make them run faster. If you are a Safari user, click on Command + Option + E to remove caches. For Google Chrome, click on Command + Option + Delete to remove caches. Alternatively, you can run a clean-up process using Stellar SpeedUp Mac for a quick overall cache file deletion. Learn how to clear caches on Mac.
Conclusion
There could be several reasons behind a slow-running Mac, the most common one being limited memory left to process instructions. To make the device perform better, you could try restarting your Mac, updating macOS, quitting resource-intensive background apps, clearing browser cache, disabling login items, and clearing up disk space. Though quick manual fixes can achieve good results in most cases, if you can’t see much performance boost even after using them, you can try out a free tool like Stellar SpeedUp Mac to boost your Mac’s performance.
We hope the solutions in this article helped you speed up your Mac and have a better user experience.


Data recovery expert on Mac & Windows platforms, with 10-year experience in writing

 5 min read