‘Better safe than sorry’ is a proverb idyllic to all the iPhone users. As a precautionary measure, before handing your iPhone to a new buyer or giving it to a family member, make sure you completely erase the content stored in it. Try some viable options to keep your personal information away from the reach of new users.
DIY iPhone Erasure Tips
These are two primary options to erase iPhone:
Erase Data Using iPhone Settings
To completely erase all the data and content stored in your iPhone, go to Settings > General > Transfer or Reset iPhone > Erase All Content and Settings.
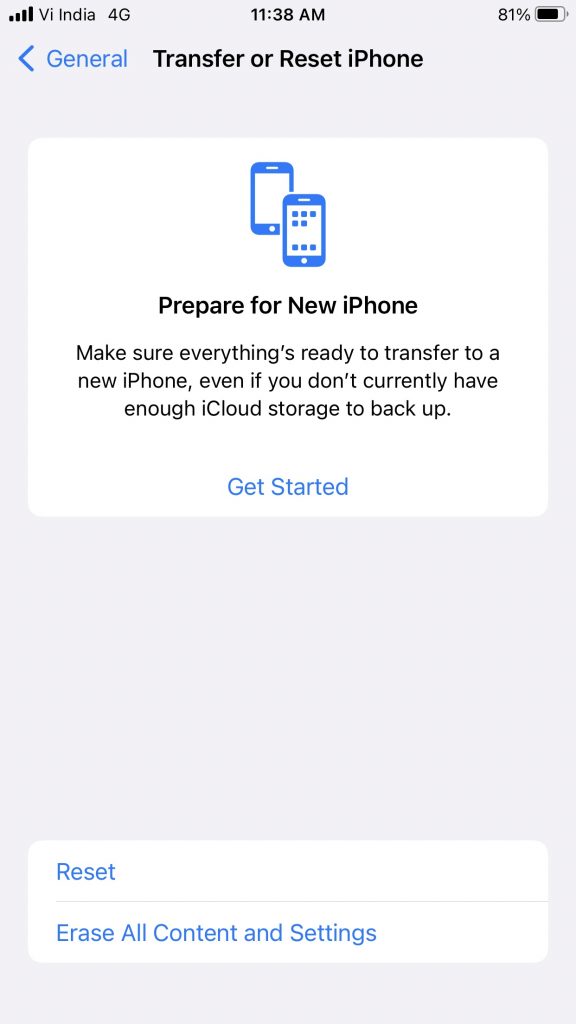
In case, ‘Erase All Content and Settings’ is not working or missing on your iPhone due to a technical glitch, simply restart your iPhone. The move will resolve minor software glitches affecting your iOS device’s functionalities.
Pro Tip: Before erasing all the content and settings, make sure you have a complete data backup of your iPhone stored on iCloud or iTunes.
Erase Data Using a USB Cable
Connect your iPhone to your Windows PC, laptop, or MacBook to erase all data and settings. Observe the steps to do the needful:
- Plug-in the USB cable to your computer/Mac and iPhone and turn it on.
- If using macOS 10.15 or later, you need to click on the Finder icon on the Dock to open it. Now, click on the iPhone button in the Finder sidebar (under Locations) and click on General at the top. After that, click on Restore iPhone.

- On a macOS 10.14 or earlier version or a Windows PC, simply log into iTunes using your Apple ID and Password and click on the iPhone button on the top-left. Next, click Summary and then select Restore iPhone.
Meanwhile, refer to this blog to learn how to erase all content and settings not working on iPhone. It contains 8 reliable methods to fix ‘Erase All Content and Settings not responding’ issue on iOS devices.
How to erase iPhone without password?
Keeping your Apple login ID and password handy makes the Factory reset option to erase your iPhone seamlessly. However, if you forget your iPhone password, which is common among iPhone users, follow these methods:
Activate the Recovery Mode
- Open iTunes (on Windows) or Finder on (Mac). Keep your iPhone connected to the USB cable and enter into the Recovery Mode. The steps may vary for different iPhone models.
How to put your iPhone to Recovery Mode
Source: Apple Support
For iPhone 8, iPhone X, or later: Press and quickly release the Volume Up button first, then repeat the same procedure with Volume Down button. After that, press and hold the Side button till you get the recovery mode screen.
For iPhone 7, iPhone 7 Plus, and iPod touch: Press and hold the Top (or Side) and Volume Down buttons at the same time. Keep holding the buttons till you get the Recovery Mode screen.
For iPhone 6s or earlier, iPad with Home button: You need to press and hold both the Home and the Top (or Side) buttons together. Keep holding them until you see the Recovery mode screen.
- iTunes identifies the DFU mode and shares alerts. You need to press OK to proceed.
- Once the iTunes window opens, click the Summary option in the left panel and select Restore iPhone in the right panel to commence the process.
You may refer to this insightful article on How to Factory Reset iPhone without Apple ID for more tangible details. iTunes can factory reset your iPhone with or without Apple ID. Try this option to delete all your photos, videos, contacts, messages, chats, and other data. Nonetheless, always keep your iTunes updated on the PC/Mac with the latest iOS version.
While aiming to restore iPhone using iTunes, you may face errors like, ‘iTunes cannot Restore Backup to iPhone’ or ‘iPhone could not be restored.’ Read this blog to find suitable alternatives to overcome such errors.
Use iCloud to Factory Reset iPhone
Ideally, this option is suitable in case of accidental iPhone loss. By remotely resetting your iPhone via iCloud, you can prevent unauthorized access to the data stored in it. Follow the steps to perform iCloud Factory Reset.
- Login to www.icloud.com with your Apple ID. Then click on Find My iPhone.
- Click on All Devices > Find the locked iPhone > Click on it to erase iPhone. The move will completely wipe off your iPhone.
Remember, iCloud backup is at your disposal to rescue you in case of unfortunate incidents like data loss, deleted, damaged, or broken iPhone. If you accidentally erase iCloud backup while performing factory reset or any iPhone reset, this blog is your reference guide to undo the unfortunate attempt.
Use a Reliable iPhone Data Eraser Tool
The advanced iPhone data eraser tool plays a significant role in wiping iOS devices. Not only do they completely erase your iPhone beyond recovery, but also averts unauthorized access to volumes of data. Apparently, ‘Erase All Content and Settings’ option in iPhone may bring back the old iPhone to its default settings.
Therefore, always use a professional iPhone eraser software to permanently wipe iPhone. We recommend Stellar Eraser for iPhone to remove all your personal information from the iPhone before selling, donating, or recycling it.
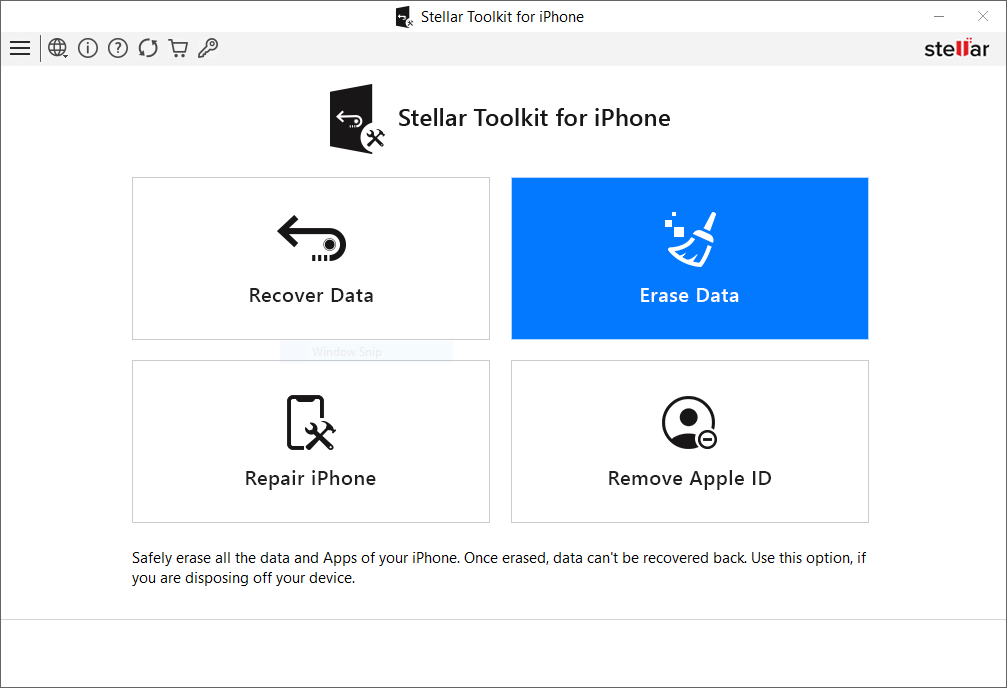
The software is a secure option if you forget your Apple ID and password to tune into iCloud or iTunes. Be it photos, videos, contact list, call logs, messages, voice memos, apps, or bookmarks, the tool can permanently erase everything. Refer to this KB for step-by-step instructions to download and use the Stellar Toolkit for iPhone.
Conclusion:
When you factory reset your iPhone, it becomes an empty slate with zero contacts, downloads, mobile apps, pictures, playlists, passwords, or anything else. It’s a hard reset option that may turn your iPhone into its initial configuration while restoring its original settings. When you decide to sell, donate, or destroy your old iPhone, resetting/erasure becomes a crucial step. However, if you accidentally perform factory reset, you have the option to recover all the lost data. Read this KB to learn how to Recover Deleted Data from iPhone.


 10 min read