

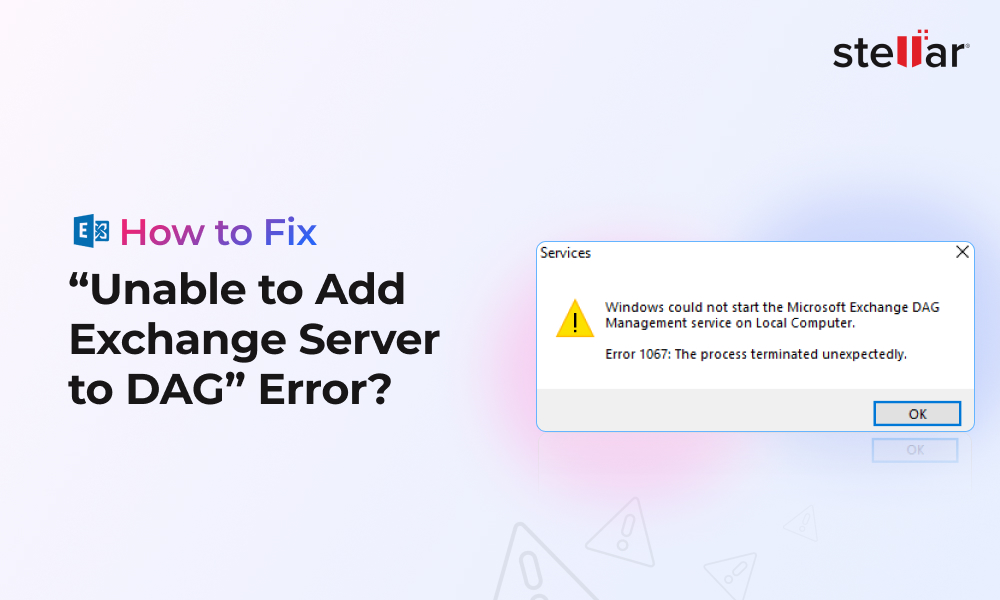
How to Fix “Unable to Add Exchange Server to DAG” Error?
June 27, 2025| 6 min read


Our content follows trusted Editorial Standards - accurate & unbiased.
Summary: When installing any software/security updates, you need to put the Exchange Server in maintenance mode to avoid data loss and any other issues. In this article, we will be going through the step-by-step process of putting an Exchange Server in maintenance mode. We’ll also mention an Exchange repair tool that can come in handy if anything goes wrong during the process.
Free Download 100% SecureYou must put the Exchange Server in maintenance mode when installing monthly Windows Security and features updates, Exchange Server Cumulative Updates (CU), or any other software updates, and doing hardware upgrades or replacement. Otherwise, it would lead to corruption in the database or even failure of the server. Below, we’ll be discussing the stepwise process to put an Exchange Server in maintenance mode.
To put a server in maintenance mode, you need to use PowerShell commands in Exchange Management Shell (EMS) from another Exchange Server in your Exchange Database Availability Group (DAG).
Let’s start off with the process.
The first step is to drain the message queues. For this, you need to use the Set-ServerComponentState PowerShell command, as given below.
Set-ServerComponentState -Identity "servername to put in maintenance mode" -Component HubTransport -State Draining -Requester Maintenance

This will put the server in maintenance mode to drain all the messages. Next, you need to redirect any queued messages to another server by using the below command.
Redirect-Message -Server "server name in maintenance" -Target "server name to redirect to"

The above command will redirect all the queued messages to the new host.
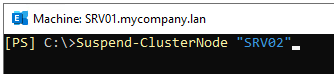
The next step is to pause or suspend the server in the cluster and Database Availability Group (DAG) to reduce the risk of issues from the cluster service. To suspend the server from cluster, you need to suspend the node in the cluster. To do this, use the Suspend-ClusterNode PowerShell command as given below.
Suspend-ClusterNode "server name in maintenance mode"
A secondary server can still host an active database copy. So, you need to move it to another server. This can be done by using the Set-MailboxServer command as given below.
Set-MailboxServer "server name in maintenance mode" -DatabaseCopyActivationDisabledAndMoveNow $true

This may take some time to complete as it is not an instance change.
You need to also make a note of the Activation Policy on the server to make sure that the value is retained after the exit from the maintenance mode. Use the following command to get the Activation Policy.
Get-MailboxServer "server name in maintenance mode" | Select DatabaseCopyAutoActivationPolicy

Now, you need to make sure that the Activation Policy is set to blocked. This ensures that no database will come online on the target server while doing the maintenance.
Set-MailboxServer "server name in maintenance mode" -DatabaseCopyAutoActivationPolicy Blocked

You need to confirm that there are no active databases on the server. For this, run the following command.
Get-MailboxDatabaseCopyStatus -Server "server name in maintenance mode" | Where {$_.Status -eq "Mounted"} | ft -AutoSize

You need to also ensure that there are no emails in the queue of the server. If there is any queue, it should show zero in the message count.
For this, you need to run the Get-Queue command from the target server.

To put the server in maintenance mode, you need to use the Set-ServerComponentState command as given below.
Set-ServerComponentState "server name in maintenance mode" -Component ServerWideOffline -State Inactive -Requester Maintenance

To verify that the server is inactive and is in the maintenance mode, you need to use the same command (as given below) and confirm that all the services, except Monitoring and RecoveryActionEnabled, are inactive.
Get-ServerComponentState "server name in maintenance mode" | Select Component, State

It is recommended that after the above process, restart the server. This will free up any running processes and clear any pending updates which were started.
You must perform such operations after business hours to ensure that the business will not be disrupted. You need to also ensure that if anything goes wrong, then you can recover the databases with no data loss. During installation of Cumulative Updates (CU) or putting the server in maintenance mode, you may suffer damages to the Exchange Server due to sudden power loss, misconfiguration, or not running the process in order. The databases or transaction logs could get corrupted.
In such cases, it’s important to have the right tools in hand that can help you recover from such situations with minimal downtime and no data loss. One such application is Stellar Repair for Exchange. This application can open corrupt EDB file from any version of Exchange Server and in any state. It allows you to browse through the EDB file and granularly export the data to PST and other formats. It can also export recovered database directly to a new Exchange Server database or Microsoft 365.
Senior Content Writer
This article was written by Ravi Singh, a Content Writer at Stellar Data Recovery.
Curious about our content creation process? Take a look at our Editor Guidelines.
June 27, 2025| 6 min read
May 23, 2025| 6 min read
April 30, 2025| 6 min read


 6 min read
