PST import is one of the mailbox migration methods that Microsoft 365 supports to allow users and organizations to migrate their user mailboxes to Microsoft 365. The method is recommended for organizations and users who use an email system that isn’t supported by Microsoft 365.
However, while importing the PST files into Microsoft 365 (Office 365), administrators may encounter certain issues that may prevent them from migrating the user mailboxes or lead to missing mail items after a successful PST import.
In this article, you will learn to troubleshoot some common issues that can affect the PST import job or the process of importing user mailboxes from local Outlook PST files into Microsoft 365 tenant (Exchange Online).
Common Issues that Affect PST Import Job
Below are some common issues that you may encounter while uploading and importing the PST files from your local storage into Microsoft Azure storage. These common issues include:
- Slow PST import performance.
- Stuck PST import job.
- Missing or lost mail items after a successful PST import.
- PST import job failure due to quota limit exceed.
Below we have briefly discussed these issues and shared solutions to troubleshoot and avoid these issues during the PST import job.
1. Slow PST Import Performance
Microsoft PST import job has an ingestion rate of 24GB/day (approximately). However, the import service is shared among multiple tenants, which can lead to a slower ingestion rate and slow processing. Please note that a ~24GB/day rate is not guaranteed. This may vary based on the server workload. Besides, the import job ingests PST files sequentially when you import multiple PST files in a mailbox. Thus, if there’s a larger PST file, it may take longer to import than smaller ones.
2. PST Import Job is Stuck
The PST import job processes and imports the PST files sequentially. During the import, if the import service encounters a PST file larger than 20 GB (maximum recommended size limit), it may fail to process the file or import the PST file. As a result, other PST files in the queue may get stuck until the previous one is cleared. This does not affect other PSTs destined for other mailboxes in your Microsoft 365 tenant. They will be imported without any problem.
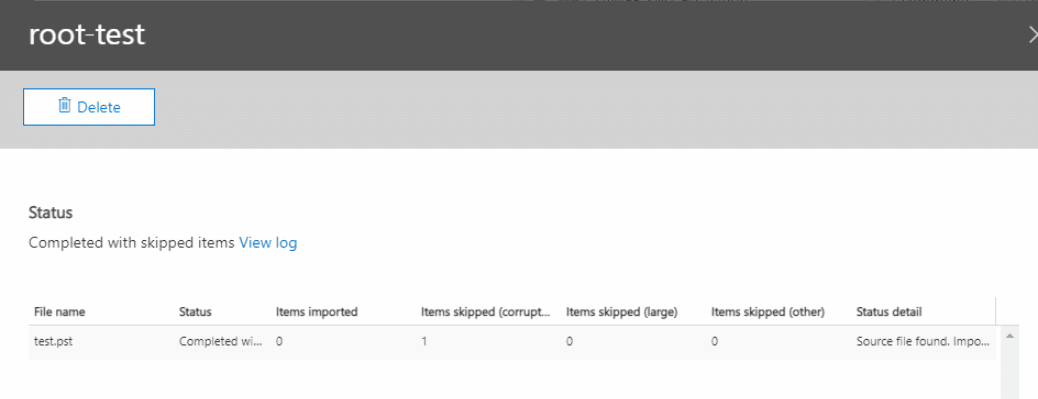
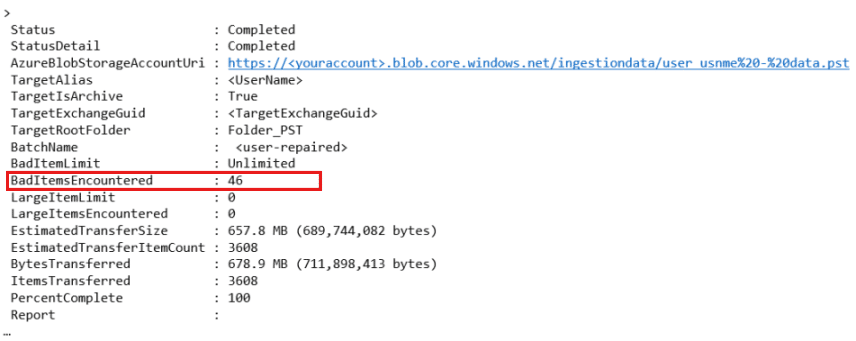
3. Missing Mail Items after PST Import
Sometimes, your PST import job may finish successfully but with missing mail items in the Microsoft 365 mailboxes. This is a common issue with PST import job as it skips any mail item that is deemed corrupt or damaged.
You can view the number of skipped items on the Status page.
You may also use the Get-MailboxImportRequest cmdlet to view the number of corrupt mail items. These items are marked as BadItemsEncountered.
4. PST Import Job Failing with "MapiExceptionShutoffQuotaExceeded" Error
When the available storage in the destination Microsoft 365 mailbox is lower than the size of PST file(s), you may encounter the error message MapiExceptionShutoffQuotaExceeded during the PST import job. For instance, if the Microsoft 365 destination archive mailbox has 50 GB available storage, you cannot import data of more than 50 GB.
When you import PST files into Microsoft 365 archive, the auto-expansion feature does not work. Besides, you should keep at least 20% buffer to ensure performance and avoid issues.
Solutions to Troubleshoot and Avoid PST Import Job Issues
You can avoid and troubleshoot the aforementioned PST import job issues by applying the following:
1. Upload PST Files <= 20 GB
Before uploading the PST files to Microsoft 365 Azure storage, ensure that each PST file is <= 20 GB in size. While you can upload PST files larger than 20 GB, it can lead to slow import performance and lead to stuck PST import job issues.
You must reduce the PST file by deleting unnecessary emails or removing large attachments. You can also use Outlook Import Export wizard to export some mail folders to a new PST file and then delete the exported folders from the original PST file. This way, you can reduce the PST file size and import both PST files into the destination mailbox without any issues.
However, reducing the PST file size manually could be a cumbersome job. To avoid the hassle, you can use a PST file splitter tool that allows you to split PST files based on size or date.
2. Repair/Verify PST Files before Upload
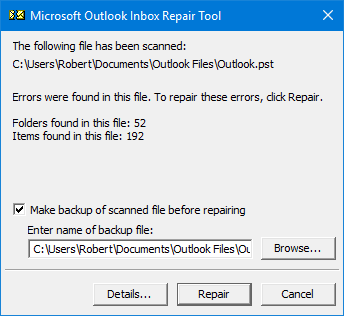
If you see a large number of mail items skipped once the PST import job is finished, you may need to re-import the PST file after repairing it using the Inbox Repair Tool (SCANPST).
To avoid missing or skipped mail items after PST import in Microsoft 365, check and repair all PST files using the built-in Inbox Repair utility before uploading or shipping PST files.
Find and launch the SCANPST.exe (Inbox Repair tool). Then follow these steps to verify and repair the PST files before upload:
- Click Browse to select PST and click
- After the scan, the tool may detect errors in the file. Click Repair. This will fix the errors and inconsistencies in the PST file.
After repairing the PST file, you can upload the files to Azure Storage or ship them to one of the Microsoft’s data centers. Then start the PST import job to import the PST files into the users’ mailboxes on Microsoft 365. This will help avoid any skipped or missing mail items.
Note: Emails larger than 35 MB are skipped by default. However, you can increase this limit to 150 MB. But if some mail items are bigger than 150 MB in size, they will be skipped and the only way to import such mail items is to remove attachments or images from the email and reduce the email size.
3. Avoid the MapiExceptionShutoffQuotaExceeded Error
You can avoid the MapiExceptionShutoffQuotaExceeded error by increasing the destination mailbox size manually as the auto-expansion feature does not work while importing PST files.
Conclusion
PST import job is a preferred method to migrate user mailboxes from an unsupported email system to Microsoft 365. You can either choose the Network Upload or Drive Shipping method to upload and import the users’ PST mailbox backups into their Microsoft 365 mailboxes. While the process is straightforward and well-documented, many administrators encounter certain issues that can affect the PST import job and result in slow or stuck PST import jobs, missing mail items after importing the PST file, and import job failure with MAPI or quota exceeded error codes. You can follow the solutions given in this article to troubleshoot and avoid the issues that affect the PST import job. However, if these solution does not work, you can use an Outlook PST to Office 365 migrator tool, such as Stellar Migrator for Outlook.
Unlike manual methods that can take days or weeks to complete the migration due to the intermediate steps and issues, the software can directly export single or multiple PST files of up to 50 GB or more directly from users’ local systems to their Microsoft 365 mailboxes in a few clicks. The software exports all the mail items with original folder structure and complete integrity.


 8 min read
-1193.jpg)