

Stellar Repair for Outlook Technician software is used to repair the corrupt PST file and save it as a new PST file. Since most corruption problems occur due to oversized PST, the software allows an option to split and compact the PST-file.
Apart from its various advantages and functionalities, the PST Repair software also helps in saving the repaired files in Office 365, MSG, EML, RTF, MBOX, HTML and PDF formats, wherein you can save the repaired PST files as per specified details – date of the email, subject-line of email. The Naming convention feature helps you accomplish this task.
Saving the repaired PST in Technician version
- Go to Home menu and click on Save Repaired File
- Save options dialog box appears. Choose the right format - MSG, EML, RTF, HTML or PDF in which you want to save the data from the repaired file.
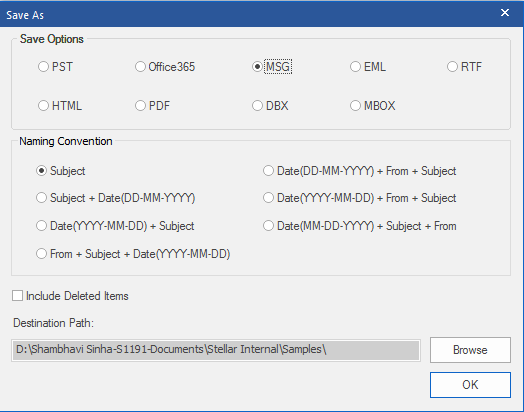
- The Naming Convention is available below the Save Options window. Select any one of the following:
1. Subject - The repaired PST file will be saved with the name corresponding to the subject of email message.
2. Subject + Date (DD-MM-YYYY) - The repaired PST file will be saved with the name corresponding to the subject and date of email message.
3. Date (YYYY-MM-DD) + Subject - The repaired file will be saved with the name corresponding to the Date and Subject line of email message.
4. From + Subject + Date (YYYY-MM-DD) - The repaired file will be saved with the name corresponding to the Sender’s email-address, Subject line of email message and date.
5. Date (DD-MM-YYYY) + From + Subject - The repaired file will be saved with the name corresponding to the Date, Sender’s email address and Subject line of email message.
6. Date (YYYY-MM-DD) + From + Subject - The repaired file will be saved with the name corresponding to the Date and Sender’s email address and Subject line of email message.
7. Date (MM-DD-YYYY) + Subject + From - The repaired file will be saved with the name as the corresponding to the Date and Subject line and Sender’s email address.
- After you have selected the naming convention, select the destination path by clicking on Browse button.
- Click OK to complete the saving process.
The naming convention is a unique way of saving the email messages. This feature allows saving selected messages with specific names for easy follow-up.


